 Bjorn
“Surviving Overgeared Hero as a Barbarian”
Labyrinth of Rafdonia
Bjorn — Stage 1 Hard, a build that cleared
Updated 28 September 2026 · this is a build we actually cleared with
This is the build we used to clear Stage 1 Hard of the “Surviving Overgeared Hero as a Barbarian” collab event with Bjorn. The final boss is Elder Ghoul at 123,000 HP. The enemy HP on this page is measured, re-collected for all 12 rounds (27 September 2026).
The short version
- Carry in the ⚔️Staff of Vitality. With either of the other two you fall somewhere in R1-R8
- Pets: 🧊Yeti, 🐲Red Dragon and 🐯Tiger. Lock them in before the run starts
- Four 🛡️Spiked Armor. The one that stops you is the 🛡️Leather Armor (Uncommon). Buy it on sight in the first half
- Three 🔧Golden Pig. The +32 coins of income become your reroll money
- The Epics are the ⚔️Dragon, the 🔧Golden Hero Statue and the 🔧Blood Stone
- Pets: 🧊Yeti + 🐯Tiger in R10, keep the 🐲Red Dragon for the boss (the 🐲Red Dragon alone takes 30% of the boss's HP = 36,900)
- 119 coins spent in total (from 99 coins + 32 coins of pig income). 12 coins can go to rerolls
- Thinnest margin 118% (R4), boss 132%
27 September 2026: we measured the boss and revised the damage estimate down
Bjorn's Giantization (all damage up to +30% in proportion to max HP gained) does not apply to Spike. That day's measurement showed it only applies to weapons.
Boss-fight forecast  190,107  →  measured about 124,000   (off by +53%)
Corrected forecast   126,580                             (+2%)
The buying order has not changed. We have actually won with it. What changed are the numbers and how the pets are handed out. With less coming from Spike the boss fight got heavier, and keeping the 🐲Red Dragon for the boss became the better choice (section 2). The “use it all up in R10” plan we used to show here comes out at boss 102% when recalculated.
We rebuilt this on 25 September 2026. After putting back into the model ten gaps we found while actually playing Stages 3 and 4, the buying order this page used to show, “two 🛡️Spiked Armor + 🔧Golden Hero Statue + 🔧Berserk Potion”, reached only 79% on the boss, and on top of that its cumulative coin spend was over budget from R2. The “result of the clear” further down is the record of going through with this buying order on 27 September 2026 (not of the old build from before the rebuild).
How to read “margin”
On this site, margin (%) is “damage you can deal in 30 seconds ÷ the enemy's effective HP”. At 100% you exactly finish the enemy off.
| 130% or more | Almost certain win |
| 110-130% | Likely win |
| 90-110% | Coin flip. Needs rerolls and a tight board |
| Under 90% | Unfavourable. Add a pet or reroll more |
How accurate is it (as of 28 September 2026)
Checked against result screens from actual runs.
- Stage 1 boss: we won with the buy order on that page, and the model agrees
- Stage 5 (seven rounds lost on time): modelled vs measured weapon damage ratio is 0.88-1.11
- Stage 2 boss: we actually won with two 🛡️Spiked Armor, but the model says it falls short. The model is pessimistic about this boss
What misses most is “how many seconds until you die”, not damage. Builds with more healing or Block stay standing longer in practice than the model says.
Do not read “101% means a win” or “92% means a loss”. Each fight also swings ±10% on its own. Spike fires on 50% of the hits you take, which is only around 70 rolls in 30 seconds.
“Effective HP” is not raw HP. It adds the enemy's heals and revives. Cutting enemy healing lowers this effective HP.
And even with enough damage, you lose if you die first. That is what “dead” means in the tables, and it is separate from the margin %.
1. Carry in the ⚔️Staff of Vitality — no contest
Bjorn's starting gear is ⚔️Throwing Axe and 🔧Warrior Flesh. On top of that you can carry in exactly one S-Legendary. This is the first fork, and if you get it wrong, no amount of shopping wins it back.
⚔️Staff of Vitality
  [Skill] Rapid Healing: restore 1000 HP and gain +25% healing effect (every 8s)
  Converts 25% of the overheal from skills and ◆ items into Block
We kept the same buying order and the same pets, swapped only the carry-in, and calculated every round.
Stage 1 only offers three. The candidates are fixed per stage, and ⚔️Thunderbolt Spike and ⚔️Spiral Spear do not appear here.
| Carry-in | R1 | R4 | R5 | R8 | R10 | R12 | Lowest |
|---|---|---|---|---|---|---|---|
| ⚔️Staff of Vitality | 151% | 118% | 156% | 148% | 126% | 132% | 118% |
| ⚔️Elderwood Bow | Dead | Dead | 152% | Dead | 132% | 136% | Dead |
| ⚔️Everfrozen | Dead | Dead | 166% | Dead | 149% | 150% | Dead |
Both of them hit harder than the ⚔️Staff of Vitality. The numbers in the rounds where they survive show it. Even so, in R1, R4 and R8 they fall before 30 seconds are up.
On the road through Stage 1, you lose by “falling” before you lose by “failing to finish the enemy off”. 🛡️Spiked Armor only starts to work from R6, and until then your max HP stays at 2,000. The ⚔️Staff of Vitality's 1,000 heal every 8 seconds fills that gap on its own.
What is more, healing scales with max HP (section 5). The more 🛡️Spiked Armor you stack, the stronger the ⚔️Staff of Vitality gets, so it never goes stale late in the run. At 5,200 max HP each heal restores 2,600.
Other stages offer different candidates. Stage 3 is ⚔️Thunderbolt Spike / ⚔️Staff of Vitality / ⚔️Everfrozen, Stage 4 is ⚔️Elderwood Bow / ⚔️Staff of Vitality / ⚔️Primal Flame. On stages where the ⚔️Staff of Vitality is not offered, you need some other source of healing (Stage 2 only offers the ⚔️Spiral Spear, and the 🔧Large HP Potion takes on that role).
2. Choosing the three pets
You pick three pets before the run starts and cannot change them along the way. This is the first and biggest fork.
🧊Yeti (cost 1) / 🐲Red Dragon (cost 2) / 🐯Tiger (cost 2)Power comes in blocks of 5 and refills “at the moment you clear” round 4 and round 8. In other words there are three blocks, R1-R4 / R5-R8 / R9-R12, and you only get 5 in each.
R1   🧊Yeti + 🐯Tiger                 R1-R4   5 total
R2   🐲Red Dragon
R5   🧊Yeti + 🐲Red Dragon       R5-R8   5 total
R8   🐯Tiger
R10  🧊Yeti + 🐯Tiger                 R9-R12  5 total
R12  🐲Red Dragon
The last 5 power: 🧊Yeti + 🐯Tiger in R10 / 🐲Red Dragon in R12
R9-R12 has only 5 power, and it comes down to whether you lean toward R10 or the boss. This is the result of recalculating on 27 September 2026.
| How to spend the 5 power for R9-R12 | R10 | R11 | R12 | Thinner of the two |
|---|---|---|---|---|
| 🧊Yeti + 🐯Tiger in R10 (3) / 🐲Red Dragon in R12 (2) | 126% | 148% | 132% | 126% |
| 🧊Yeti + 🐲Red Dragon in R10 (3) / 🐯Tiger in R12 (2) | 129% | 148% | 113% | 113% |
| 🧊Yeti in R10 (1) / 🐲Red Dragon + 🐯Tiger in R12 (4) | 112% | 148% | 143% | 112% |
| 🧊Yeti + 🐲Red Dragon + 🐯Tiger in R10 (5) / nothing in R12 | 144% | 148% | 102% | 102% |
| 🐲Red Dragon + 🐯Tiger in R10 (4) / 🧊Yeti in R12 (1) | 92% | 148% | 102% | 92% |
Until 26 September 2026 we wrote “use all 5 power in R10 / keep nothing for the boss”. Once we found that Giantization does not apply to Spike, Spike's damage dropped, and with the boss down to 102% the order flipped. The 🐲Red Dragon's “on battle start: fixed damage equal to 30% of the enemy's max HP” is 36,900 against the 123,000 HP boss. With less coming from Spike, this fixed damage carries more weight.
Keeping 🐯Tiger for the boss instead (row 2) drops the boss to 113%. 🐯Tiger is not percentage damage, so the bigger the opponent's HP, the less it does in relative terms.
Leave out 🦅Hunting Hawk. It only strips 10 Dodge, while the enemy's Pouch of Stealth Magic hands out 50 at once.
3. What to have, and by when
Read this as “have this in hand by this round”.
Shopping checklist
Tap to count up. Tap again at the maximum to reset that row. Saved on this device, so it survives switching to the game and back.
ARun-ending if missingBMakes it much easierCSubstitutable
0 / 20
by R1
by R2
by R3
by R4
by R7
by R9
by R10
by R11
by R12
Without the A rows it does not go through. The C rows can be substituted.
🔴 🛡️Leather Armor is the one that runs out first
These are the shop's appearance rates by rarity, readable in the game's item probability info (all 12 rounds, 21 September 2026). They do not change by stage. They are not per-item probabilities.
Round   Common  Uncommon  Rare   Epic
   1     80%      20%      0%     0%
   2     70%      30%      0%     0%
   3     60%      30%     10%     0%
   4     50%      40%     10%     0%   ← Uncommon peak
   5     44%      40%     15%     1%   ← Uncommon peak
   6     40%      35%     20%     5%
   7     30%      35%     25%    10%
   8     24%      30%     31%    15%   ← Rare overtakes Uncommon
   9     23%      26%     31%    20%
  10     20%      27%     32%    21%
  11     20%      26%     32%    22%
  12     22%      28%     28%    22%
Uncommon peaks at 40% in R4 and R5, is down to 30% by R8, and falls to 26-28% from R9 on. Rare first appears in R3, reaches 31% in R8 and then holds flat at 28-32%. Epic first appears at 1% in R5 and is above 20% from R9 on.
🛡️Spiked Armor is 🛡️Leather Armor (Uncommon) + 🔧Steel Spike (Rare). What sets the count is 🛡️Leather Armor, not 🔧Steel Spike. 🔧Steel Spike shows up often in the back half, so 6 or 7 of them is not much of a struggle.
🛡️Leather Armor (Uncommon)   Get them during R4-R7 (Uncommon 35-40%). Hard to find late
🔧Steel Spike (Rare)           Late is fine. No need to hurry
R1 and R2 do not offer a single Rare slot. The first chance at 🔧Steel Spike is R3 (Rare 10%).
Aim for four 🛡️Spiked Armor
The one that stops you is 🛡️Leather Armor (Uncommon). What you actually collect is usually 3 to 4, and the later it gets, the less often it is on the shelf. With good draws you can get 5 or more, but adding more barely raises the margin, because the only way to add more is to cut something else.
🔧Steel Spike, on the other hand, ends up left over. Rare shows up often in the back half, so 6 or 7 is no struggle. Do not turn the extras into 🛡️Spiked Armor; place them as they are (one cell for “80 Block + 3 Spike every 4 seconds”). Since 🛡️Leather Armor tops out at four, the coins that frees up go to the three Epics.
How many 🛡️Leather Armor you managed to buy
🛡️Spiked Armor is 🛡️Leather Armor (Uncommon) + 🔧Steel Spike (Rare). What limits the count is the 🛡️Leather Armor: it shows up less and less in the later shops. 🔧Steel Spike shows often in the back half, so the plan assumes you can collect up to 7 in total.
For each number of 🛡️Leather Armor you managed to buy, we worked out the best buying order you can build from there. Just drop down from the top row.
| 🛡️Leather Armor | 🔧Steel Spike | Rounds to buy the armor | Thinnest margin | Boss | Total | Verdict |
|---|---|---|---|---|---|---|
| 2 | 7 | R1, R3 | 109% | 109% | 82 coins | Coin flip |
| 3 | 7 | R1, R4, R5 | 110% | 110% | 75 coins | Good odds of winning |
| 4 | 7 | R1, R3, R5, R6 | 116% | 116% | 87 coins | Good odds of winning |
| 5 | 7 | R1, R3, R5, R7, R9 | 120% | 120% | 85 coins | Good odds of winning |
These values are from before tightening the board. Read the differences between rows.
The buying order on this page (the one we actually cleared with) is four 🛡️Leather Armor; with the board tightened it reaches 118%.
Each extra pair (10 coins) moves the margin by about 10 points. With two you fall at the boss. Think of three as the floor and four as the target.
Three 🔧Golden Pig make your reroll money
Two in R1, one in R2. Each brings in 1 coin every time you enter the shop, so three make +32 coins of income. You have 131 coins to work with instead of 99.
Total 119 coins / in hand 131 coins → 12 coins can go to rerollsThis is what the 🔧Golden Pig is really for. The “+60 max HP per ◆ tool” part measured 240 for all three together (one 🛡️Spiked Armor is 800). It is a bonus.
🔧Golden Pig + ⚔️Combat Hammer = 🔧Pile of Coins. Your income source disappears, so put a merge lock on the 🔧Golden Pig.
The ⚔️Dragon needs a lock too. Next to a 🔧Golden Hero Statue it becomes a ⚔️Golden Dragon, and it is the 🔧Golden Hero Statue that disappears. Do not put them next to each other until you have drawn the ⚔️Fairy.
Drawing three Epics is the gate
You need the ⚔️Dragon, the 🔧Golden Hero Statue and the 🔧Blood Stone. Epic is 0% through R4, 1% in R5, 5% in R6, 10% in R7, 15% in R8, 20% in R9, and 21-22% from R10 on (the values on the shop's item probability info screen). After R6, put every spare coin into rerolls. Saving coins up is the biggest waste of all.
Buy SALE items even when they are not on the plan
The sale price equals the sell price, so buying costs you nothing. Normal items only sell for half, but sale items are bought at half price, so when you no longer need them you can sell them back for the same amount. They might turn out to be merge material; if not, you just sell them.
4. Merges
🛡️Leather Armor + 🔧Steel Spike   → 🛡️Spiked Armor (x4) ← +800 max HP each
⚔️Dragon + ⚔️Fairy          → ⚔️Fairy Dragon
⚔️Club + ⚔️Throwing Axe          → ⚔️Axe → + 🔧Blood Stone → ⚔️Bloodstained Axe
Leave the 🔧Warrior Flesh as it is. Its “+80 damage to ◆ creatures” lands on the ⚔️Fairy Dragon, so unlike in Stage 3, where no creatures are placed, it is not dead here.
Do not build the 🔧Berserk Potion
“Every 3.5 seconds lose 300 HP, increasing by 100 each proc” = 5,200 self-damage over 30 seconds from a single one. As long as you do not buy 🔧HP Potion and 🔧Red Dust, it will not merge on its own either.
There is also the merge ⚔️Dragon + 🔧Golden Hero Statue = ⚔️Golden Dragon. It is the 🔧Golden Hero Statue that disappears, so if you want to use both, lock one of them.
5. Max HP becomes damage
Base 2,000 + 🛡️Spiked Armor x4 3,200 = 5,200Bjorn's own skills, Giantization (all damage up to +30% in proportion to max HP gained) and Flesh Burst (+80 damage per 100% of extra max HP), both depend on max HP. Defence and offence grow from the same resource, so stacking max HP is the shortest path.
Max HP works five ways. ① defence ② Giantization ③ Flesh Burst ④ healing ⑤ Block gained. ④ and ⑤ are set by “base value x max HP / 2,000”, so the ⚔️Staff of Vitality's 1,000 heal comes back 2.6 times over at 5,200 max HP. Every purchase that thickens your defence is also damage.
But ② Giantization does not apply to Spike
We found this by measuring the boss on 27 September 2026. Spike stays at 20 per stack; however much max HP you stack, it does not grow. Giantization only applies to weapons.
Spike forecast     114,764  →  measured 89,935   (off by +28% with Giantization applied)
Without Giantization    88,964                        (-1%)
Spike makes up 60% of this build's damage, so do not assume “stack max HP and everything grows”. Even so, ①③④⑤ remain, so 🛡️Spiked Armor is still the top priority.
6. Building the board — this build barely cares where things go
    1    2    3    4    5    6    7    8
A  ARM  ARM  (□)  (□)  (□)  BLAX BLAX BLAX
B  ARM  ARM  HAMR HAMR PIG  FAIR FAIR BLAX
C  DUST (□)  ARM  ARM  SPK  FAIR FAIR STAT
D  PIG  (□)  ARM  ARM  STAF MEAT MEAT STAT
E  ARM  ARM  ARM  ARM  STAF (□)  SPK  PIG
F ARM ARM ARM ARM STAF NAIL (□) SPK| Code | Item | Qty | Cells | Position |
|---|---|---|---|---|
| ARM | 🛡️Spiked Armor | 4 | 4 | A1, C3, E1, E3 |
| FAIR | ⚔️Fairy Dragon | 1 | 4 | B6 |
| BLAX | ⚔️Bloodstained Axe | 1 | 4 | A6 |
| STAF | ⚔️Staff of Vitality (carry-in) | 1 | 3 | D5 |
| MEAT | 🔧Warrior Flesh (starting gear) | 1 | 2 | D6 |
| HAMR | ⚔️Combat Hammer | 1 | 2 | B3 |
| STAT | 🔧Golden Hero Statue | 1 | 2 | C8 |
| SPK | 🔧Steel Spike (unmerged) | 3 | 1 | C5, E7, F8 |
| PIG | 🔧Golden Pig | 3 | 1 | B5, D1, E8 |
| DUST | 🔧Red Dust | 1 | 1 | C1 |
| NAIL | 🔧Big Spike | 1 | 1 | F6 |
18 items, 41 cells (of 48, 7 empty). The ⚔️Throwing Axe becomes the ⚔️Bloodstained Axe by way of the ⚔️Axe, and the 🔧Warrior Flesh stays as it is.
The 7 empty cells can hold anything. Fill them with whatever you pick up from rerolls.
| ◆ source | Effect | What it actually reaches |
|---|---|---|
| 🔧Warrior Flesh (D6) | +80 damage to ◆ creatures | ⚔️Fairy Dragon |
| ⚔️Staff of Vitality (D5) | 25% of ◆ items' overheal becomes Block | ⚔️Fairy Dragon |
| 🔧Golden Pig (B5, D1, E8) | +60 max HP per ◆ tool | 🔧Steel Spike, 🔧Big Spike, 🔧Red Dust, 🔧Warrior Flesh. All three together gave +240 (measured) |
With the same items, a board packed the obvious way deals 159,528 in the boss fight, and one squeezed to the limit by annealing deals 162,614. The difference is only 1.9%. Only three kinds of items carry ◆, and the damage comes from max HP and Spike. The 7 empty cells can hold anything.
In a build that hits through ◆, placement would move the result by about 10%, but this build is different. The only thing to think about is “how to fit the four 🛡️Spiked Armor”; they are 4-cell squares, so they fit if you push them together two columns at a time.
7. Enemy data for all twelve rounds (measured)
On 27 September 2026 we re-collected all twelve rounds. Before that we only had seven rounds, and the per-second column had gaps. Per-second figures are the raw values before your own reductions are applied.
| Round | Enemy | Max HP | Disruption |
|---|---|---|---|
| R1 | Goblin | 5,500 | Trap: 4s Stun |
| R4 | Goblin Archer | 13,000 | Hiding bag: 22% of your attacks dodged |
| R5 | Goblin | 15,000 | Trap: 4s Stun |
| R8 | Goblin Archer | 30,000 | Hiding bag: stronger dodge |
| R9 | Ghoul | 44,000 | None. Takes +30% Burn damage |
| R10 | Goblin | 53,000 | Trap: 4s Stun |
| R12 | Elder Ghoul | 123,000 | None. Takes +30% Burn damage |
The Ghoul in round 9 is a scaled-down version of the final boss. It has no disruption and wears the same Parched Cloth as the boss (Burn damage taken +30%). How it feels there is your forecast for the boss fight.
The hardest round on the road is round 10. On top of 53,000 HP it has the Goblin Trap, which halves your attack count.
8. The enemies' two tricks
Goblin Trap (R1, R5, R10) — a 4-second Stun on Hard
Double the 2 seconds on Normal. It halves your attack count. It triggers with a 15% chance on each of your attacks, at most once every 5 seconds. The more attacks you make, the more often you get caught, so builds that line up weapons lose the most.
The 🔧Broom does not clear it
Because the 🔧Broom itself stops while you are stunned. While stunned, every item on the board stops, so items that say “cleanse debuffs” are not a Stun counter. You cannot remove, by yourself, the debuff that is stopping you.
The only counter is 🧊Yeti (Stun immunity for 10 seconds from the start of battle, plus a 900 counterattack on each resist).
Pouch of Stealth Magic (R4, R8) — not an evasion buff but a damage buff
The effect text reads “when HP falls to 66% and 33% or below: gain Dodge for 5 seconds”. It looks like it only raises evasion, but in practice it is something else.
the enemy gains Dodge
   ↓ it dodges your attacks
the bow's “on successful dodge: the next attack strikes twice” triggers
   ↓
the enemy's damage dealt shoots up
In round 8, against a raw 187 per second, we measured 351 per second. What is more, the more attacks you make, the more dodge checks the enemy gets, so the more weapons you line up, the stronger the enemy gets, a relationship no other enemy has.
The answer is to push through with damage. In round 8, fire the 🐯Tiger.
9. The result of the clear
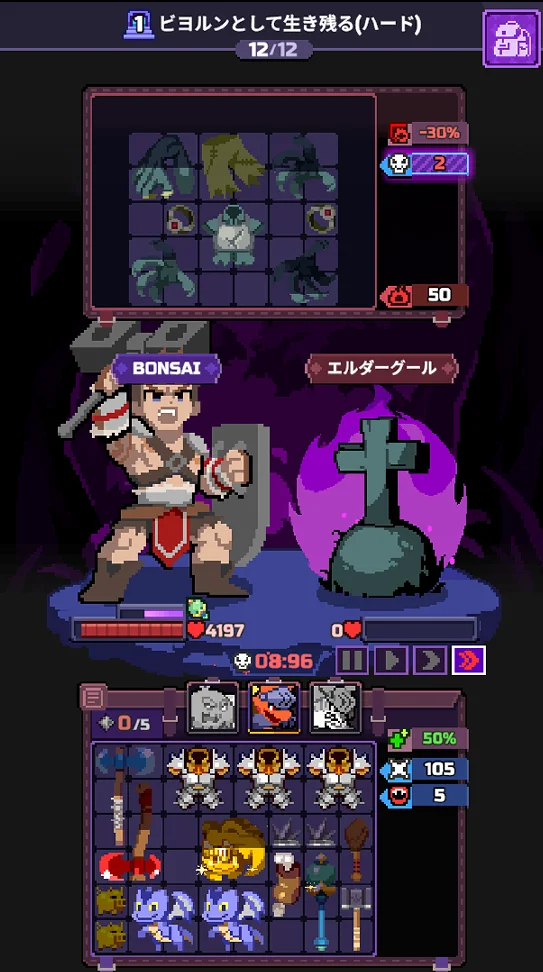
On 30 September 2026 we cleared it again without using a retry. The boss Elder Ghoul went down with 4,197 HP left and 8.96 seconds left on the timer. The pet fired in the boss fight was the 🐲Red Dragon.
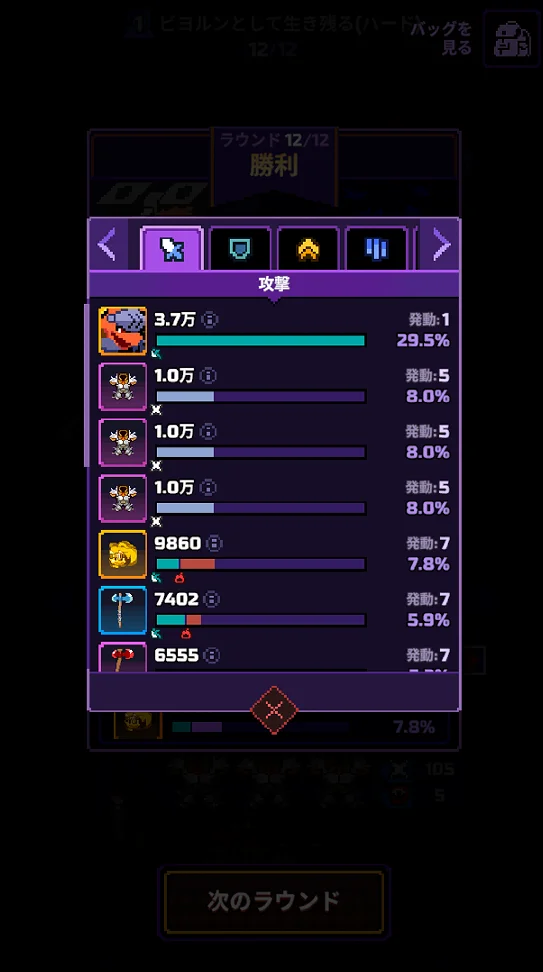
| Source | Damage | Share | Procs |
|---|---|---|---|
| 🐲Red Dragon | 37K | 29.5% | 1 |
| 🛡️Spiked Armor (three, each) | 10K each | 8.0% each | 5 |
| ⚔️Golden Dragon | 9,860 | 7.8% | 7 |
| ⚔️Axe | 7,402 | 5.9% | 7 |
| ⚔️Bloodstained Axe | 6,555 | about 5.2% | 7 |
Total damage dealt was about 126,000 (worked back from 9,860 / 7.8%). Keep the 🐲Red Dragon for the boss and it takes 30% on its own. This run had three 🛡️Spiked Armor, a ⚔️Golden Dragon (⚔️Dragon + 🔧Golden Hero Statue), a ⚔️Fairy Dragon and a ⚔️Bloodstained Axe, and the pets went R1 🧊Yeti / R2 🐲Red Dragon / R4 🐯Tiger / R5 🧊Yeti + 🐲Red Dragon / R8 🐯Tiger / R10 🧊Yeti + 🐯Tiger / R12 🐲Red Dragon (only R1-R4 differ from the table above).
The 27 September clear (beating the boss without firing a pet)
On 27 September 2026 we went through with this page's buying order. Items: 🛡️Spiked Armor x4 / ⚔️Fairy Dragon / ⚔️Bloodstained Axe / ⚔️Staff of Vitality / ⚔️Training Sword / 🔧Warrior Flesh / 🔧Golden Hero Statue / 🔧Steel Spike x3 / 🔧Big Spike / 🔧Golden Pig x3. No pet was fired in the boss fight (following the guidance at the time, we had used up all 5 power in R10).
| Source | Damage | Share | Procs |
|---|---|---|---|
| 🛡️Spiked Armor (four, each) | 16K each | 13.5% each | 7 |
| ⚔️Bloodstained Axe | 10K | 8.5% | 11 |
| ⚔️Fairy Dragon | 9,591 | 7.6% | 8 |
| 🔧Steel Spike (three, each) | 8,645 each | 6.8% each | 6 |
| ⚔️Staff of Vitality | 4,912 | 3.9% | 11 |
| ⚔️Training Sword | 3,557 | 2.8% | 12 |
| Flesh Burst | 2,978 | 2.3% | 1 |
Total damage dealt was about 125,800. Against the boss's 123,000 HP that is 102%, a narrow win. “16K” and “10K” are rounded displays, so we worked the total back from an unrounded row and its share.
Spike alone is 72%. Four 🛡️Spiked Armor make 54% and three 🔧Steel Spike 20%. The four weapons together come to only 23%. This build's damage is Spike.
The physics of Spike could be read straight off the screen
🛡️Spiked Armor x4 (Spike 5 every 3.5s)   7 procs → 4×7×5 = 140
🔧Steel Spike x3 (Spike 3 every 4s)         6 procs → 3×6×3 =  54
🔧Big Spike (Spike 3 on battle start)                  =   3
                                           total 197
It matches the Spike stack count of 197 shown on the screen. That confirms the reading of 20 damage per stack, triggering on 50% of enemy hits.
Max HP also matches the 5,440 on the screen: base 2,000 + 🛡️Spiked Armor 800 x4 + 🔧Golden Pig 240 (the defence tab shows 120 / 60 / 60).
This run showed the Spike estimate was too high
The forecast just before it was 190,107. The measurement was about 125,800, off by +51%. Tracing the breakdown, only Spike was off.
| Source | Forecast (old) | Measured | Without Giantization |
|---|---|---|---|
| Spike | 114,764 | 89,935 | 88,964 (-1.1%) |
| Weapons | 29,668 | 28,060 | 22,800 (-19%, no longer matches) |
Taking it off the weapons breaks the match, so we could confirm that Giantization applies only to weapons. The corrected forecast is 126,580, within 2%.
Had a pet been kept, the 🐲Red Dragon would have added 36,900, so under the current guidance (keep the 🐲Red Dragon for R12) it comes to 132% (section 2).
10. FAQ
What is the HP of the Stage 1 Hard final boss?
The Elder Ghoul has 123,000. Its four claws deal 372 damage per second to you. It wears the Parched Cloth, so it takes 30% more damage from Flame Spell and Burn.
Which pets should I pick?
The three: 🧊Yeti, 🐲Red Dragon and 🐯Tiger. Once you lock in three pets before the run starts, you cannot change them along the way. 🦅Hunting Hawk only strips 10 Dodge, while the enemy's Pouch of Stealth Magic hands out 50 at once, so it does almost nothing.
How long is the Goblin Trap Stun?
4 seconds on Hard, double the 2 seconds on Normal. It triggers with a 15% chance on each of your attacks, at most once every 5 seconds. The more attacks you make, the more often you get caught, so builds that line up weapons lose the most.
Does the 🔧Broom clear the Stun?
No. While you are stunned every item on the board stops, so the 🔧Broom itself does not move either. Items of the “cleanse debuffs” kind are not a Stun counter. The only counter is the 🧊Yeti (Stun immunity for 10 seconds from the start of battle).
How do I deal with the Pouch of Stealth Magic?
Push through with damage. It looks like an evasion buff, but it is really a damage buff. When the enemy gains Dodge and dodges your attacks, the bow's “on successful dodge: the next attack strikes twice” triggers. In round 8 the damage you take went up from 187 to 351 per second.
Does Giantization apply to Spike?
No. It applies only to weapons (measured 27 September 2026). However much max HP you stack, Spike stays at 20 per stack. In a build where Spike is the main damage, stacking max HP does not raise your damage all that much.
Should I keep a pet for the boss?
Keep only the 🐲Red Dragon. 🧊Yeti + 🐯Tiger in R10, the 🐲Red Dragon in R12. The 🐲Red Dragon's “on battle start: 30% of the enemy's max HP” is 36,900 against the 123,000 HP boss, and firing all three in R10 drops the boss to 102%.
Which is the main gun, the ⚔️Golden Dragon or the ⚔️Fairy Dragon?
This build buys the 🔧Golden Hero Statue too (by R11). ⚔️Dragon + ⚔️Fairy makes the ⚔️Fairy Dragon, ⚔️Dragon + 🔧Golden Hero Statue makes the ⚔️Golden Dragon, and the 30 September clear had both. When the ⚔️Golden Dragon forms, it is the 🔧Golden Hero Statue that disappears. Decide which one you want before you place them next to each other, and lock the one you want to keep.
How many 🛡️Spiked Armor do I need for Stage 1 Hard?
Four. Each one adds 800 max HP, and for Bjorn max HP works four ways: defence, Flesh Burst, healing and Block gained. With four, max HP goes from 2,000 to 5,200, for a thinnest margin of 118% and boss 132%. What limits the count is the 🛡️Leather Armor (Uncommon), which shows up in the shop less and less late in the run. The 🔧Steel Spike (Rare) shows up often in the back half, so place the extras on the board as they are.
What not to buy
- ⚔️Boulder — it adds “+50% damage to all weapons”, but also “all items 30% slower”. 🛡️Spiked Armor (every 3.5 seconds) is the main damage, so it is a net loss
⚔️Rock: “fine to buy, but do not think it is strong”
It costs 1 coin to buy and sells for 1 coin, so holding it costs you nothing. If you have space on the board you can place it, and you can sell it when you no longer need it.
But do not convert it to damage per second. It “attacks only once per battle”, so that is a single 240 hit in 30 seconds. Sorted by value per coin it looks like the top pick, but its real contribution is near the bottom. Do not count it as a main damage source.
Contact
Corrections, data fixes, or anything else about this site. Leave an email address if you would like a reply.