 Erwen
“Surviving Overgeared Hero as a Barbarian”
Labyrinth of Rafdonia
Erwen — Stage 2 Hard, a build that cleared
Updated 6 October 2026 · this is a build we actually cleared with
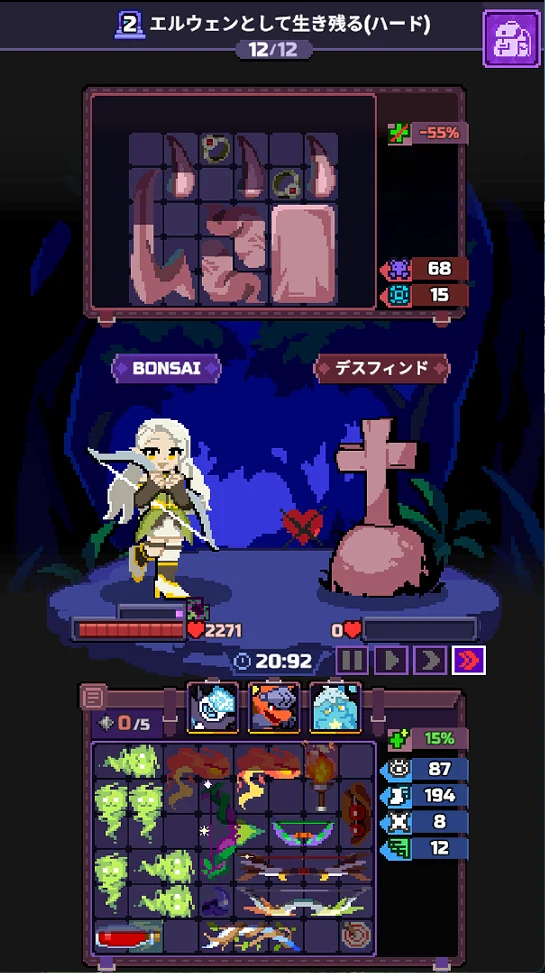
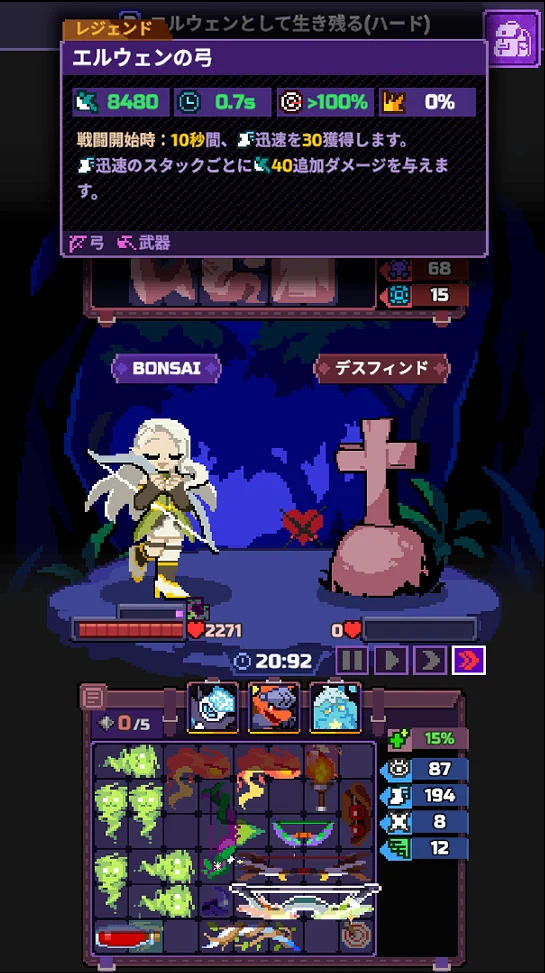
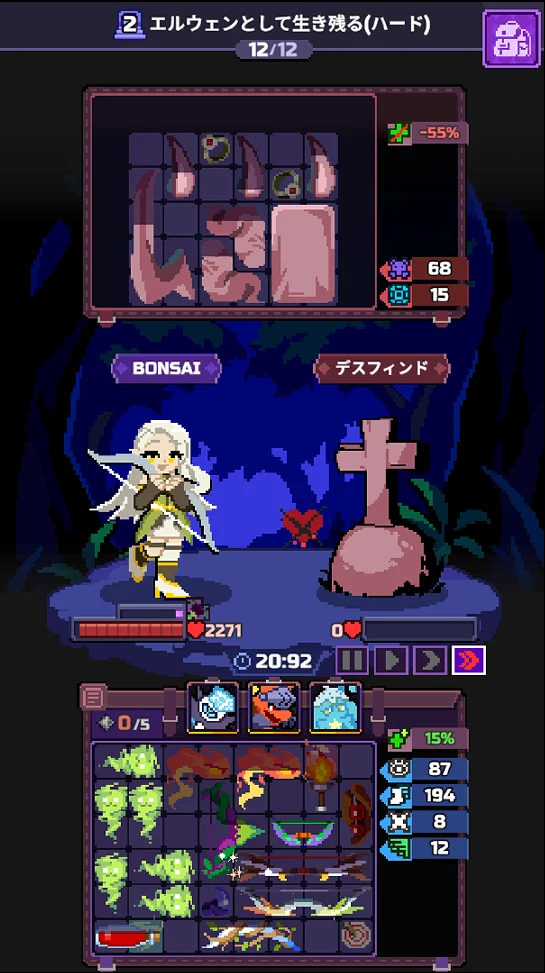
The final boss is the same as Bjorn's and Missha's: Death Fiend, 107,000 HP (-25% to all damage, heals 16,000 HP every 4.6 seconds). We cleared it on the first run. The boss went down in 9.1 seconds, with 2,271 HP left.
The short version
- Carry in the ⚔️Elderwood Bow (the ⚔️Staff of Vitality is not an option). No penalty
- ⚔️Erwen's Bow (59,000 and 48.5% in the boss fight) completes on clearing R10. ⚔️Tracker's Bow completes in R4
- Grow to six ⚔️Wind Spirit for 194 Swift in the boss fight. R11 (79,000) in 7.7 seconds, the boss in 9.1
- Pets: ❄️Ice Reaper, 🐲Red Dragon, 🪼Jellyfish Princess. No pets in R9-R11; all 5 power goes to the boss
1. The carry-in, and what changes from Stage 1
The S2 carry-in choices are the ⚔️Spiral Spear, the ⚔️Elderwood Bow and the ⚔️Thunderbolt Spike; the ⚔️Staff of Vitality is not among them. We picked the ⚔️Elderwood Bow. As a bow it benefits from ⚔️Fire Spirit's ◆ (the 3 cells diagonally down-right; a bow there recovers 30% of its cooldown on hit) and from 🛡️Marksman's Hat, and it applies Poison as well.
Erwen's own items and traits (Spirit Affinity, Chasing Arrow) are covered in the Stage 1 article. “Per Spirit” counts the Spirit next to it (◆), so keep ⚔️Wind Spirit, ⚔️Fire Spirit and 🔧Spirit Stone clustered together.
| Stage 1 | Stage 2 | |
|---|---|---|
| Carry-in | ⚔️Staff of Vitality | ⚔️Elderwood Bow |
| 1-power pet | 🧊Yeti (blocks the trap Stun) | ❄️Ice Reaper (-40% boss healing) |
| ⚔️Erwen's Bow done | R8 clear | R10 clear |
| ⚔️Wind Spirit (boss fight) | 3, 22 Swift | 6, 194 Swift |
| Boss | 11.3s | 9.1s |
2. When to fire the three pets
❄️Ice Reaper (1 power) / 🐲Red Dragon (2) / 🪼Jellyfish Princess (2)Power is 5. It refills to 5 when you clear R4 and R8.
| R | Fire | Why |
|---|---|---|
| R4 | 🐲Red Dragon + 🪼Jellyfish Princess + ❄️Ice Reaper | Elder Ghoul 20,700 (2.1x R3). Power refills when you clear R4 |
| R7 | 🐲Red Dragon | In R6 our HP dropped to 712 |
| R8 | 🐲Red Dragon + ❄️Ice Reaper | Elder Ghoul 48,000 (1.78x R7) |
| R12 | 🐲Red Dragon + ❄️Ice Reaper + 🪼Jellyfish Princess | 32,100 to the boss. ❄️Ice Reaper for -40% healing |
R9 (Banshee), R10 (Banshee) and R11 (Ghoul 79,000) were cleared with no pet.
3. The merges up to ⚔️Erwen's Bow
⚔️Training Bow + 🔧Target                  → ⚔️Hunter's Bow   (R1 clear)
⚔️Hunter's Bow     + 🔧Hawk's Claw            → ⚔️Tracker's Bow     (R4 clear)
⚔️Tracker's Bow       + 2x 🛡️Leather Gloves     → ⚔️Erwen's Bow (R10 clear)

2x 🔧HP Potion                            → 🔧Large HP Potion (R4 clear)
🔧Monocle           + 🔧Glowstone              → 🔧Telescope         (R5 clear)
🔧Telescope           + 🛡️Leather Helmet      → 🛡️Marksman's Hat   (R6 clear)
🔧Glowstone           + 🔧Fairy Dust            → 🔧Fairy Blessing     (R9 clear)
⚔️Tracker's Bow (2nd) + 🔧Hawk Feather Talisman  → ⚔️True Sight         (R11 clear)
🔧Fairy Blessing + 🔧Broom → ⚔️Fairy Forest Twig (R10 clear; Epic, bow)- 🔧Hawk's Claw (Rare) showed up in R3, so ⚔️Tracker's Bow was done in R4
- 🛡️Leather Gloves (Rare): the first came in R8, the second in R10. That delay is why ⚔️Erwen's Bow only completed on clearing R10. Always buy a 🛡️Leather Gloves when you see one
- The second ⚔️Tracker's Bow became ⚔️True Sight (8,292 in the boss fight). 🔧Hawk Feather Talisman is Epic and appears at 20% from R9
4. What to have, and by when
| By | Item | Qty | Why by then |
|---|---|---|---|
| R1 | ⚔️Training Bow + 🔧Target | 1 each | → ⚔️Hunter's Bow (the entry point to ⚔️Erwen's Bow) |
| R3 | 🔧Hawk's Claw | 1 | Next to ⚔️Hunter's Bow → ⚔️Tracker's Bow |
| R4 | 🔧HP Potion | 2 | → 🔧Large HP Potion |
| R5 | 🔧Monocle + 🔧Glowstone + 🛡️Leather Helmet | 1 each | → 🛡️Marksman's Hat (+400 max HP, +45% Accuracy) |
| R9 | 🔧Fairy Dust + 🔧Glowstone | 1 each | → 🔧Fairy Blessing (healing) |
| R9 | 🛡️Leather Gloves | 2 | Next to ⚔️Tracker's Bow → ⚔️Erwen's Bow (R10 in the run that cleared) |
| R12 | ⚔️Torch | 1 | -15% boss healing |
Shopping checklist
Tap to count up. Tap again at the maximum to reset that row. Saved on this device, so it survives switching to the game and back.
ARun-ending if missingBMakes it much easierCSubstitutable
0 / 13
by R1
by R3
by R4
by R5
by R9
by R12
5. Time taken, round by round
The on-screen timer shows time remaining (counting down from 30 seconds). The table below converts it to seconds taken.
| R | Enemy | HP | Pet | Time | HP left |
|---|---|---|---|---|---|
| 1 | Skeleton Warrior | 5,750 | — | 8.6s | 1,230 |
| 2 | Skeleton Archer | 7,935 | — | 9.3s | 1,688 |
| 3 | Skeleton Warrior | 9,833 | — | 9.4s | 1,484 |
| 4 | Elder Ghoul | 20,700 | 🐲Red Dragon + 🪼Jellyfish Princess + ❄️Ice Reaper | 12.1s | 1,769 |
| 5 | Ghoul | 18,274 | — | 10.8s | 1,620 |
| 6 | Ghoul | 24,000 | — | 12.0s | 712 |
| 7 | Skeleton Warrior | 27,000 | 🐲Red Dragon | 9.1s | 2,168 |
| 8 | Elder Ghoul | 48,000 | 🐲Red Dragon + ❄️Ice Reaper | 13.9s | 1,986 |
| 9 | Banshee | 29,000 | — | 15.0s | 1,730 |
| 10 | Banshee | 39,000 | — | 17.3s | 1,808 |
| 11 | Ghoul | 79,000 | — | 7.7s | 2,400 |
| 12 | Death Fiend | 107,000 | 🐲Red Dragon + ❄️Ice Reaper + 🪼Jellyfish Princess | 9.1s | 2,271 |
In R11, right after ⚔️Erwen's Bow was done, we killed the biggest enemy on the way (79,000) in 7.7 seconds. The close call was R6 (712 HP left). The carry-in has no healing, so defence stays thin until 🛡️Marksman's Hat (R6 clear).
6. The boss: Death Fiend's healing
Death Fiend heals 16,000 HP every 4.6 seconds. In Missha's Stage 2 we stopped the healing with 40% from ❄️Ice Reaper + 50% from ⚔️Candlestick + 15% from ⚔️Torch = 105% and then killed it (the Missha guide).
Erwen killed it in 9.1 seconds, so not stopping the healing completely was still enough. All we cut was 40% from ❄️Ice Reaper + 15% from ⚔️Torch = 55%. Inside the first 10 seconds of Swift, we landed 32,100 from 🐲Red Dragon and 59,000 from ⚔️Erwen's Bow.
7. All twelve rounds of enemy data
The enemies are the same as in Bjorn's and Missha's Stage 2 Hard.
| R | Enemy | Max HP | DPS | Traits |
|---|---|---|---|---|
| R1 | Skeleton Warrior | 5,750 | 109 | Crit +50% |
| R2 | Skeleton Archer | 7,935 | 126 | Crit +50% |
| R3 | Skeleton Warrior | 9,833 | 141 | Crit +50% |
| R4 | Elder Ghoul | 20,700 | 167 | Burn +30% |
| R5 | Ghoul | 18,274 | 188 | Burn +30% |
| R6 | Ghoul | 24,000 | 206 | Burn +30% |
| R7 | Skeleton Warrior | 27,000 | 226 | Crit +50% / the healing wall |
| R8 | Elder Ghoul | 48,000 | 295 | Burn +30% |
| R9 | Banshee | 29,000 | 301 | Weapon damage -40% |
| R10 | Banshee | 39,000 | 315 | Weapon damage -40% |
| R11 | Ghoul | 79,000 | 280 | Burn +30% / hardest before the boss |
| R12 | Death Fiend | 107,000 | 397 | All damage -25% / heals 16,000 six times |
8. The clear
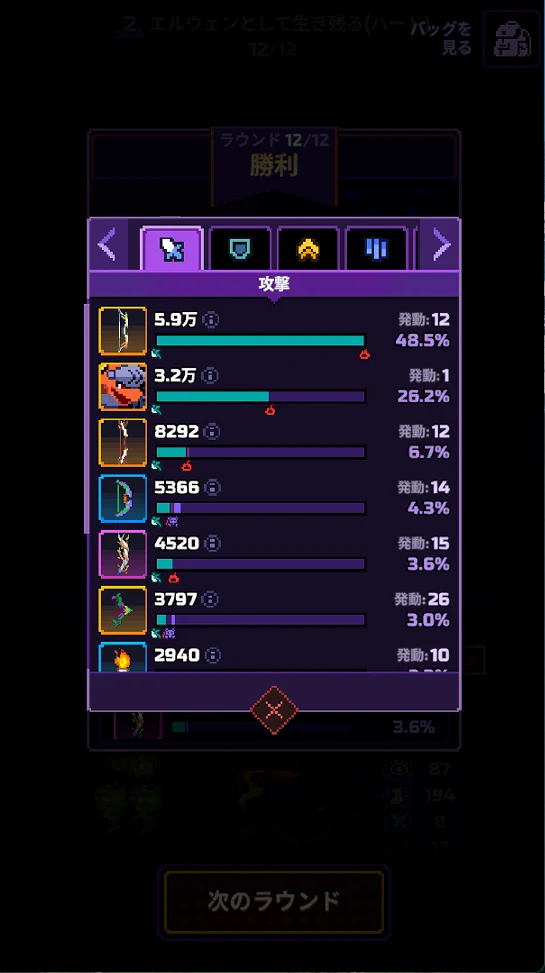
| Source | Damage | Share |
|---|---|---|
| ⚔️Erwen's Bow (12 procs) | 59,000 | 48.5% |
| 🐲Red Dragon | 32,000 | 26.2% |
| ⚔️True Sight (12 procs) | 8,292 | 6.7% |
| ⚔️Poison Bow (14 procs) | 5,366 | 4.3% |
| ⚔️Fairy Forest Twig (15 procs) | 4,520 | 3.6% |
| ⚔️Elderwood Bow (26 procs) | 3,797 | 3.0% |
| ⚔️Torch (10 procs) | 2,940 |
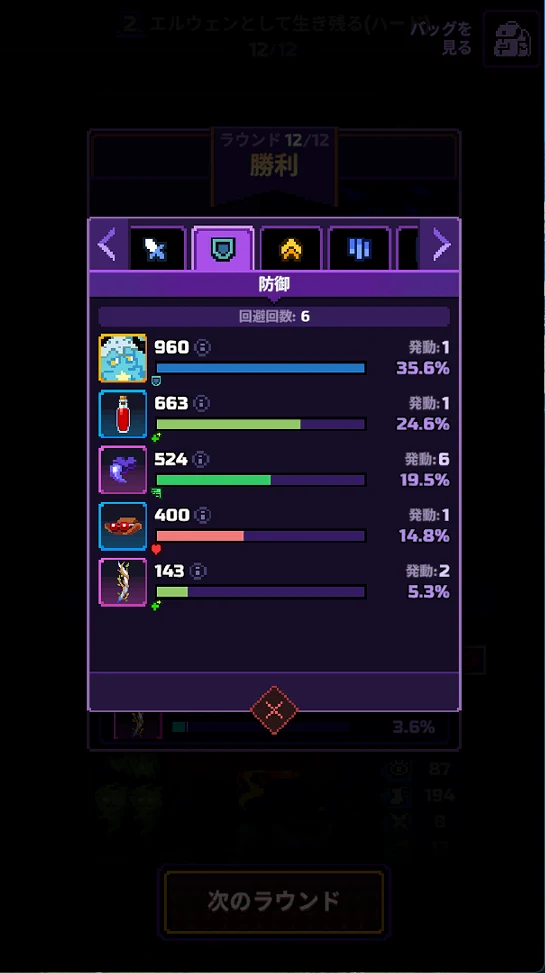
Defence tab (6 dodges)
| Source | Amount | Share |
|---|---|---|
| 🪼Jellyfish Princess (Block) | 960 | 35.6% |
| 🔧Large HP Potion (healing) | 663 | 24.6% |
| 🔧Fairy Blessing (healing) | 524 | 19.5% |
| 🛡️Marksman's Hat (max HP) | 400 | 14.8% |
| ⚔️Fairy Forest Twig (healing) | 143 | 5.3% |
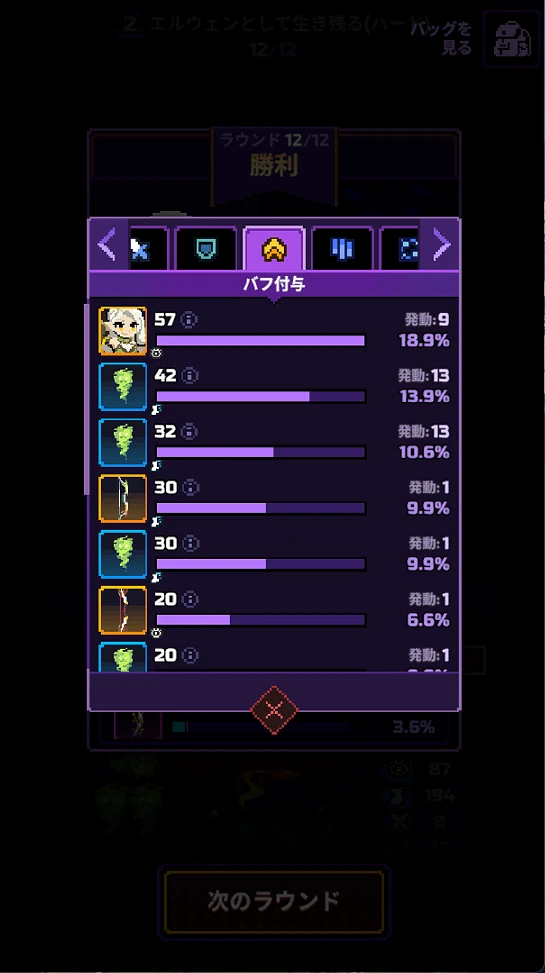
Buff tab
Erwen (Chasing Arrow) 57 Focus; ⚔️Wind Spirit 42 / 32 / 30 / 20... Swift; ⚔️Erwen's Bow 30 Swift; ⚔️True Sight 20 Focus. Swift at the end of the boss fight: 194.
9. FAQ
What should Erwen carry into Stage 2 Hard?
The ⚔️Elderwood Bow. The S2 carry-ins do not include the ⚔️Staff of Vitality (they are ⚔️Spiral Spear, ⚔️Elderwood Bow and ⚔️Thunderbolt Spike). The ⚔️Elderwood Bow is a bow, so it benefits from ⚔️Fire Spirit's “a ◆ bow recovers 30% of its cooldown on hit” and from 🛡️Marksman's Hat's +45% Accuracy.
Don't I need to stop Death Fiend's healing?
With Erwen, you kill it before its second heal comes round. Death Fiend heals 16,000 HP every 4.6 seconds, but the run that cleared had only -55%, from ❄️Ice Reaper (-40%) and one ⚔️Torch (-15%), and killed it in 9.1 seconds. There was no need to stack up to -105% (with ⚔️Candlestick) the way Missha did.
How many ⚔️Wind Spirit did you end up with?
Six. Swift in the boss fight reached 194 (22 in the Stage 1 boss fight). On top of the 🔧Spirit Stone you get in R1, R5 and R9, we also turned 🔧Spirit Stone bought in the shop into ⚔️Wind Spirit on the wind-enhanced cell.
Where do I fire the pets?
Only four times: R4 (🐲Red Dragon + 🪼Jellyfish Princess + ❄️Ice Reaper), R7 (🐲Red Dragon), R8 (🐲Red Dragon + ❄️Ice Reaper) and R12 (🐲Red Dragon + ❄️Ice Reaper + 🪼Jellyfish Princess). S2 has no traps (Stun), so the 1-power pet is ❄️Ice Reaper, not 🧊Yeti. R9-R11 were cleared with no pet, and all 5 power went to the boss.
What is the “-50%” mark?
It is the effect of the Skeleton Core carried by the skeletons (R1, R2, R3, R7): they take 50% more damage from Crits. Erwen gains Focus (Crit chance) from Chasing Arrow, so this weakness applies in full.
What not to do
- ❌Picking 🧊Yeti as the 1-power pet (S2 has no traps. Take ❄️Ice Reaper, which cuts the boss's healing)
- ❌Passing on 🛡️Leather Gloves (if ⚔️Erwen's Bow is late, R9 and R10 run past 15 seconds)
- ❌Forgetting to put a 🔧Spirit Stone on the enhanced cell, or scattering your Spirit
- ❌Using up 🐲Red Dragon in R9-R11 (none left for the boss)
Contact
Corrections, data fixes, or anything else about this site. Leave an email address if you would like a reply.