 Missha
“Surviving Overgeared Hero as a Barbarian”
Labyrinth of Rafdonia
Missha — Stage 4 Hard, a build that cleared
Updated 4 October 2026 · this is a build we actually cleared with
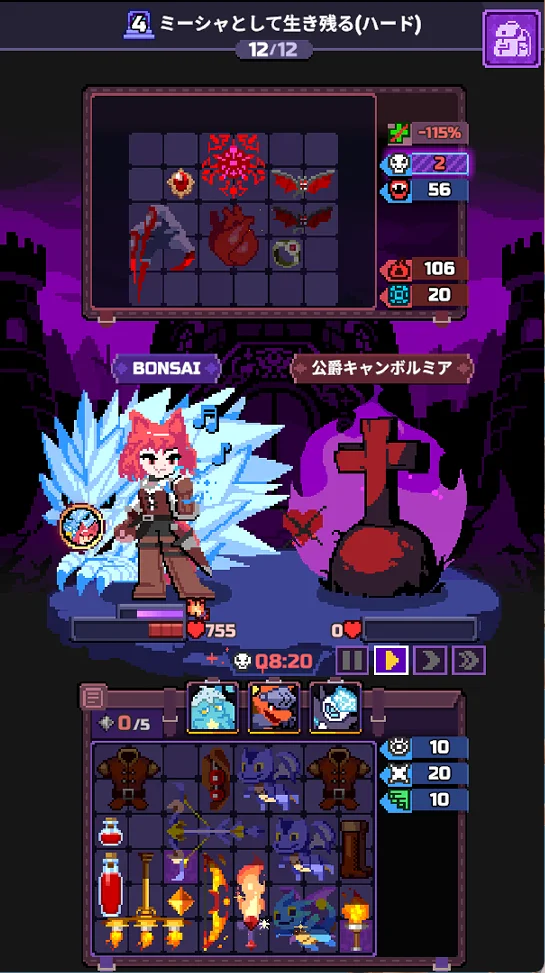
Missha (a Ranger) is a Poison character, but for Stage 4 we built around Burn. The final boss is the same as Bjorn's: Duke Cambormere at 140,000 HP. We cleared it on the 9th run (boss down with 8.20 seconds left, 755 HP remaining).
The short version
- Carry in ⚔️Primal Flame (a Sword). It adds 1 Burn to each Burn from ◆ items
- The pillars are ⚔️Flaming Trail (no Epic needed) and ⚔️Dragon Slayer
- The R5, R9 and R10 Ghoul take +30% Burn. The Poison builds stalled here
- The R4 and R8 Death Fiend heal. Stop it with ⚔️Candlestick, ⚔️Torch and ❄️Ice Reaper
- Pets: use them all up in R1-R8, go petless in R9-R11, and fire 🐲Red Dragon 🪼Jellyfish Princess ❄️Ice Reaper in R12
- Just before it dies, the boss goes invincible for 3 seconds and restores 14k HP (Source of Darkness)
How to read “margin”
On this site, margin (%) is “damage you can deal in 30 seconds ÷ the enemy's effective HP”. At 100% you exactly finish the enemy off.
| 130% or more | Almost certain win |
| 110-130% | Likely win |
| 90-110% | Coin flip. Needs rerolls and a tight board |
| Under 90% | Unfavourable. Add a pet or reroll more |
How accurate is it (as of 28 September 2026)
Checked against result screens from actual runs.
- Stage 1 boss: we won with the buy order on that page, and the model agrees
- Stage 5 (seven rounds lost on time): modelled vs measured weapon damage ratio is 0.88-1.11
- Stage 2 boss: we actually won with two 🛡️Spiked Armor, but the model says it falls short. The model is pessimistic about this boss
What misses most is “how many seconds until you die”, not damage. Builds with more healing or Block stay standing longer in practice than the model says.
Do not read “101% means a win” or “92% means a loss”. Each fight also swings ±10% on its own. Spike fires on 50% of the hits you take, which is only around 70 rolls in 30 seconds.
“Effective HP” is not raw HP. It adds the enemy's heals and revives. Cutting enemy healing lowers this effective HP.
And even with enough damage, you lose if you die first. That is what “dead” means in the tables, and it is separate from the margin %.
1. Carry in ⚔️Primal Flame
Stage 4 offers these three.
⚔️Elderwood Bow / ⚔️Staff of Vitality / ⚔️Primal Flame⚔️Primal Flame (Sword)
On normal attack hit: apply 1 Burn
When a ◆ item applies Burn: apply 1 Burn
[Skill] Flame Surge: 600 damage. On skill hit, trigger Burn 9 times (every 8s)The more Burn items you gather inside its ◆ range, the more Burn it adds. In R10 this one ⚔️Primal Flame dealt 27k (24k of it Burn). It is a Sword, so just as in Stage 3, Glacial Beast Skadia triggers too (if the round icon to the left of Missha changes colour, it has triggered).
The Stage 4 boss fight has a trait, “When attacking Boss, deal extra DMG in proportion to accumulated Freeze”, and the Freeze from Glacial Beast Skadia and ❄️Ice Reaper feeds it.
2. Why Burn and not Poison
| Build | Runs | Where it stalled |
|---|---|---|
| Poison (⚔️Primal Flame) | 4 | R2, R10, R10, R9 |
| Poison (⚔️Staff of Vitality) | 3 | R9, R10, R10 |
| Burn (⚔️Primal Flame) | 2 | R7 (pets held back), clear |
- The R5, R9 and R10 Ghoul carry Parched Cloth (+30% Burn damage taken). There is no weakness to Poison
- The Poison pillar, ⚔️Violet Assassin, depends on 🔧Widow Spider (Epic), and in all seven runs we could not build it by R8
- The Burn pillar, ⚔️Flaming Trail, needs no Epic. Even a single ⚔️Dragon (Epic) has several uses (the user's read)
3. When to fire the three pets
❄️Ice Reaper (1 power) / 🐲Red Dragon (2 power) / 🪼Jellyfish Princess (2 power)Power comes in blocks of 5 and refills at the moment you clear R4 and R8 (R1-R4 / R5-R8 / R9-R12).
| R | Fire | Why |
|---|---|---|
| R2 · R3 | ❄️Ice Reaper | Stout Undead revives twice. Grind it down under ❄️Ice Reaper's -40% healing |
| R4 | 🐲Red Dragon + ❄️Ice Reaper | Death Fiend 18,000 (heals 2,813 every 6 seconds) |
| R6 · R7 | ❄️Ice Reaper | The R7 Stout Undead. We had a run that saved it for R8 and lost |
| R8 | ❄️Ice Reaper | Death Fiend 43,000 (heals 8,750 every 5 seconds). 14 seconds at -85% healing |
| R9-R11 | Nothing | Keep it for the boss. A board that cannot get through without pets cannot beat the boss either |
| R12 | 🐲Red Dragon + 🪼Jellyfish Princess + ❄️Ice Reaper | 🐲Red Dragon deals 42k in one shot |
4. What to have, and by when
| By | Item | Qty | Why by then |
|---|---|---|---|
| R2 | 🔧HP Potion | 2 | → 🔧Large HP Potion |
| R3 | 🛡️Leather Armor | 1-2 | 700 Block. Two gave 1,540 even in the boss fight |
| R5 | 🔧Target | 1 | Next to ⚔️Training Bow → ⚔️Hunter's Bow |
| R5 | ⚔️Crossbow + 🔧Monocle + 🔧Glowstone | 1 each | → 🔧Telescope → combine with ⚔️Crossbow into ⚔️Arbalest. Do not put ⚔️Crossbow next to 🔧Poison Powder (it becomes ⚔️Poison Crossbow) |
| R6 | ⚔️Torch | 1 | Next to ⚔️Hunter's Bow → ⚔️Flaming Trail |
| R6 | 🛡️Leather Helmet + 🔧Telescope | 1 each | → 🛡️Marksman's Hat (+400 max HP) |
| R7 | ⚔️Dragon | 1 | Epic. Next to ⚔️Arbalest → ⚔️Dragon Slayer (720, 5 Burn on hit) |
| R7 | ⚔️Spear + ⚔️Torch | 1 each | → ⚔️Candlestick (-50% healing). Needed for the R8 Death Fiend |
| R10 | ⚔️Dragon + ⚔️Fairy | 1 each | → ⚔️Fairy Dragon (healing. The more Burn stacks, the more it heals) |
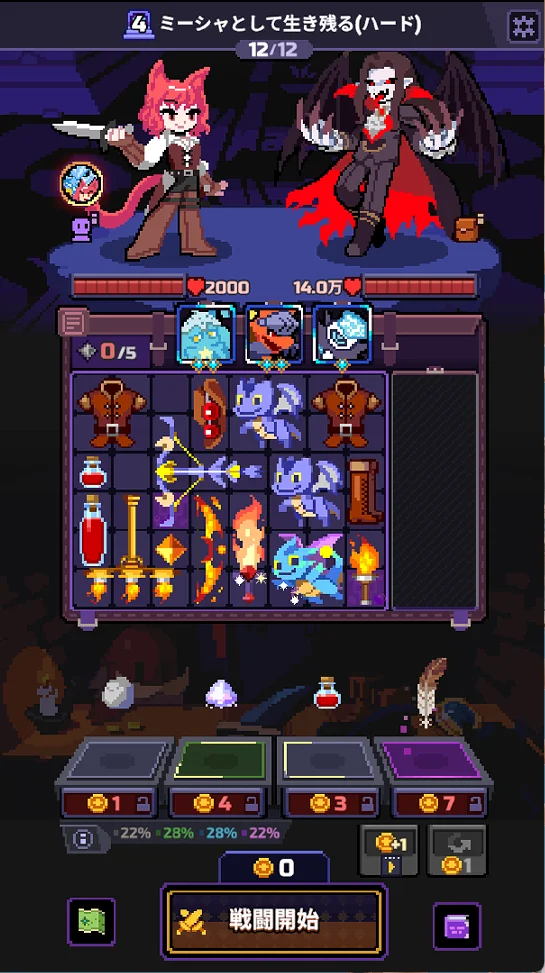
| R12 | ⚔️Dragon, 🔧Glowstone | 1 each | Place them unmerged |
Shopping checklist
Tap to count up. Tap again at the maximum to reset that row. Saved on this device, so it survives switching to the game and back.
ARun-ending if missingBMakes it much easierCSubstitutable
0 / 19
by R2
by R3
by R5
by R6
by R7
by R9
by R10
by R12
5. Merges
⚔️Training Bow + 🔧Target        → ⚔️Hunter's Bow
⚔️Hunter's Bow + ⚔️Torch       → ⚔️Flaming Trail (1.7s, 2 Burn on hit, enemy healing -10%)
🔧Monocle + 🔧Glowstone              → 🔧Telescope
⚔️Crossbow + 🔧Telescope           → ⚔️Arbalest
⚔️Arbalest + ⚔️Dragon              → ⚔️Dragon Slayer (720, 5 Burn on hit)
⚔️Dragon + ⚔️Fairy              → ⚔️Fairy Dragon (2 Burn on hit, restore 200 HP)
⚔️Spear + ⚔️Torch                → ⚔️Candlestick (enemy healing -50%)
🔧Telescope + 🛡️Leather Helmet       → 🛡️Marksman's Hat
🔧HP Potion x2                 → 🔧Large HP Potion
On the R5 clear, ⚔️Hunter's Bow, ⚔️Arbalest and 🔧Telescope were all made at once (different combinations can each merge on a single clear).
6. Round-by-round checkpoints (the 9th run, which cleared)
| R | Enemy | Pets | What came in at that point | HP margin |
|---|---|---|---|---|
| 1 | Skeleton Warrior | — | 🛡️Leather Helmet, 🔧Monocle, 🔧HP Potion | 1,028 |
| 2 | Stout Undead | ❄️Ice Reaper | ⚔️Crossbow, 🔧Monocle (→ 🔧Large HP Potion) | 1,212 |
| 3 | Stout Undead | ❄️Ice Reaper | 🛡️Leather Armor, ⚔️Spear | 1,538 |
| 4 | Death Fiend | 🐲Red Dragon ❄️Ice Reaper | 🔧Glowstone (→ 🔧Telescope) | 1,811 |
| 5 | Ghoul | — | 🔧Target, 🔧Glowstone (→ ⚔️Hunter's Bow, ⚔️Arbalest, 🔧Telescope) | 1,137 |
| 6 | Skeleton Warrior | ❄️Ice Reaper | ⚔️Torch (→ ⚔️Flaming Trail, 🛡️Marksman's Hat) | 1,009 |
| 7 | Stout Undead | ❄️Ice Reaper | ⚔️Dragon (→ ⚔️Dragon Slayer) | 1,600 |
| 8 | Death Fiend 43,000 | ❄️Ice Reaper | ⚔️Torch (→ ⚔️Candlestick). 14 seconds at -85% healing | 1,623 |
| 9 | Ghoul 50,000 | — | 🛡️Leather Boots | 1,250 |
| 10 | Ghoul 67,000 | — | ⚔️Dragon, ⚔️Fairy (→ ⚔️Fairy Dragon). 18.5 seconds | 1,267 |
| 11 | Skeleton Archer 78,000 | — | Second 🛡️Leather Armor, ⚔️Dragon. 21.4 seconds | 1,858 |
| 12 | Duke Cambormere | 🐲Red Dragon 🪼Jellyfish Princess ❄️Ice Reaper | ⚔️Dragon, 🔧Glowstone | 755 |
The R10 Ghoul was the wall that the Poison builds failed to clear all three times. The Burn build did it without pets in 18.5 seconds.
7. The boss fight: Source of Darkness
| Time left | Boss HP | |
|---|---|---|
| 30.00 | 140,000 | Start |
| 28.98 | 95,000 | Right after 🐲Red Dragon hit |
| 22.98 | 71,000 | |
| 19.90 | 42,000 | |
| 16.68 | 19,000 | |
| 13.58 | 4,966 | |
| 12.44 | 14,000 | Source of Darkness: 3 seconds invincible + restores 10% of max HP |
| 10.34 | 14,000 | No damage goes in while invincible |
| 8.20 | 0 | Defeated |
Even with enemy healing stopped at -115%, the 14k from Source of Darkness still came back (it counts as a revive, not a heal). The more Burn piles up, the faster it goes down; in the back half it was losing about 10k per second. The boss's Vamp (+4 each time it loses 10% HP) does nothing as long as its healing is stopped.
8. All twelve rounds of enemy data
The enemies are the same as Bjorn's Stage 4 Hard.
| R | Enemy | Max HP | DPS | Trait |
|---|---|---|---|---|
| R1 | Skeleton Warrior | 6,250 | 126 | +50% crit damage taken |
| R2 | Stout Undead | 3,450 | 143 | Endless Horde x2 (revives twice) |
| R3 | Stout Undead | 4,275 | 158 | Endless Horde x2 (revives twice) |
| R4 | Death Fiend | 18,000 | 179 | Body Preservation 2,813 HP every 6s / Arm Shield 50% for -30% |
| R5 | Ghoul | 19,000 | 216 | Parched Cloth (+30% burn damage taken) |
| R6 | Skeleton Warrior | 23,000 | 254 | +50% crit damage taken |
| R7 | Stout Undead | 15,000 | 263 | Endless Horde x2 (revives twice) |
| R8 | Death Fiend | 43,000 | 324 | Body Preservation 8,750 HP every 5s / Arm Shield 50% for -40% |
| R9 | Ghoul | 50,000 | 332 | Parched Cloth (+30% burn damage taken) |
| R10 | Ghoul | 67,000 | 348 | Parched Cloth. The hardest hit before the boss |
| R11 | Skeleton Archer | 78,000 | 247 | Five arrows. Largest HP before the boss |
| R12 | Duke Cambormere | 140,000 | 472 | Source of Darkness (3s immune + 10% max HP on lethal) / Immortal (lifesteal) |
9. Pitfalls learned from 8 losses
| Pitfall | What happened |
|---|---|
| Built Poison | All 7 runs stalled at the R9 and R10 Ghoul (+30% Burn) |
| Saved power in R1-R8 | R7 with 783 left, R9 with 9,755 left. The saved power never got used |
| Played the early rounds without buying defensive items | Killed in R2 with zero defence |
| Placed ⚔️Crossbow next to 🔧Poison Powder | It merged into ⚔️Poison Crossbow, and ⚔️Arbalest (the material for ⚔️Dragon Slayer) could no longer be made |
10. The clear
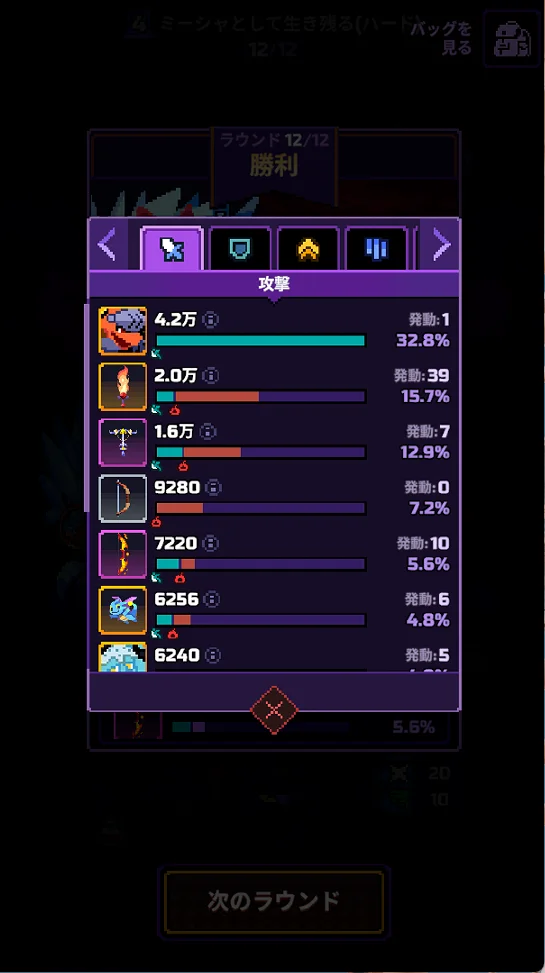
We beat the boss (Duke Cambormere, 140,000 HP) with 8.20 seconds on the timer and 755 HP remaining. We fired every pet: 🐲Red Dragon 🪼Jellyfish Princess ❄️Ice Reaper.
| Source | Damage | Share |
|---|---|---|
| 🐲Red Dragon | 42,000 | 32.8% |
| ⚔️Primal Flame (39 procs) | 20,000 | 15.7% |
| ⚔️Candlestick | 16,000 | 12.9% |
| ⚔️Flaming Trail | 7,220 | 5.6% |
| ⚔️Fairy Dragon | 6,256 | 4.8% |
| 🪼Jellyfish Princess | 6,240 |
Debuff tab (Burn and Freeze)
| Source | Amount | Share | Procs |
|---|---|---|---|
| Glacial Beast Skadia | Freeze 55 | 26.9% | 11 |
| ⚔️Primal Flame | Burn 37 | 18.1% | 37 |
| ⚔️Candlestick | Burn 35 | 17.1% | 7 |
| ⚔️Flaming Trail | Burn 20 | 9.8% | 10 |
| ❄️Ice Reaper | Freeze 15 | 7.3% | 1 |
| ⚔️Fairy Dragon | Burn 12 | 5.8% | 6 |
| ⚔️Dragon | Burn 10 | 5 |
Freeze from Glacial Beast Skadia and ❄️Ice Reaper totals 70. It feeds the boss-fight trait “When attacking Boss, deal extra DMG in proportion to accumulated Freeze”.
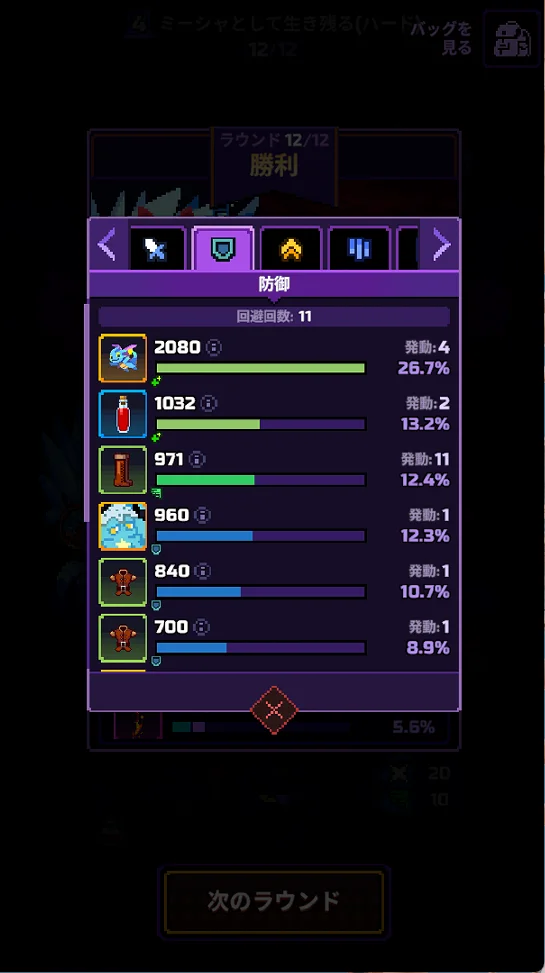
Defence tab (11 dodges)
| Source | Amount | Share |
|---|---|---|
| ⚔️Fairy Dragon (healing) | 2,080 | 26.7% |
| 🔧Large HP Potion (healing) | 1,032 | 13.2% |
| 🛡️Leather Boots (dodge) | 971 | 12.4% |
| 🪼Jellyfish Princess (Block) | 960 | 12.3% |
| 🛡️Leather Armor (Block) | 840 / 700 | 19.6% |
The top healer was ⚔️Fairy Dragon. Its healing goes up by 4 for each Burn stack on the enemy, so in a Burn build it doubles as a defensive pillar.
The pillars on the way (R10 result)
⚔️Primal Flame 27k (24k of it Burn), ⚔️Candlestick 16k, ⚔️Flaming Trail 9,023, ⚔️Dragon 7,199. About 67k in total, killing the Ghoul in 18.5 seconds.
11. FAQ
Should Missha build Poison or Burn for Stage 4 Hard?
Burn. We tried Poison seven times and stalled at the R9 and R10 Ghoul. Ghoul takes +30% Burn damage. We carried in ⚔️Primal Flame, rebuilt around Burn, and cleared on the 9th run.
What should I carry in?
⚔️Primal Flame. 1 Burn on hit, +1 Burn every time a ◆ item applies Burn, and every 8 seconds 600 damage plus 9 Burn procs. It multiplies the Burn from your other items, so in R10 ⚔️Primal Flame alone dealt 24k of Burn. It is a Sword, so Glacial Beast Skadia triggers as well.
I cannot find ⚔️Violet Assassin (🔧Widow Spider)
A Burn build does not need it. ⚔️Flaming Trail needs no Epic (⚔️Training Bow + 🔧Target → ⚔️Hunter's Bow, + ⚔️Torch). If you land a single ⚔️Dragon, it works for any of ⚔️Dragon Slayer, ⚔️Fairy Dragon, or as a Burn weapon on its own.
The boss's HP came back just before it died
That is Duke Cambormere's Source of Darkness. On taking lethal damage it becomes invincible for 3 seconds and restores 10% of its max HP (14k). Stopping enemy healing at 105% or more did not prevent it. Plan on those last 3 seconds and that 14k being undamageable.
When do I fire the pets?
Use them all up in R1-R8, go petless in R9-R11, and fire everything in R12: 🐲Red Dragon 🪼Jellyfish Princess ❄️Ice Reaper. The most common way we lost was saving power through R8 and dying in the round in front of us.
What not to do
- ❌ Take a Poison build into the R9 and R10 Ghoul
- ❌ Save pet power in R1-R8
- ❌ Place ⚔️Crossbow next to 🔧Poison Powder
- ❌ Go in with barely enough damage, without allowing for the boss's last 14k (Source of Darkness)
Contact
Corrections, data fixes, or anything else about this site. Leave an email address if you would like a reply.