 Missha
“Surviving Overgeared Hero as a Barbarian”
Labyrinth of Rafdonia
Missha — Stage 7 Hard, a build that cleared
Updated 5 October 2026 · this is a build we actually cleared with
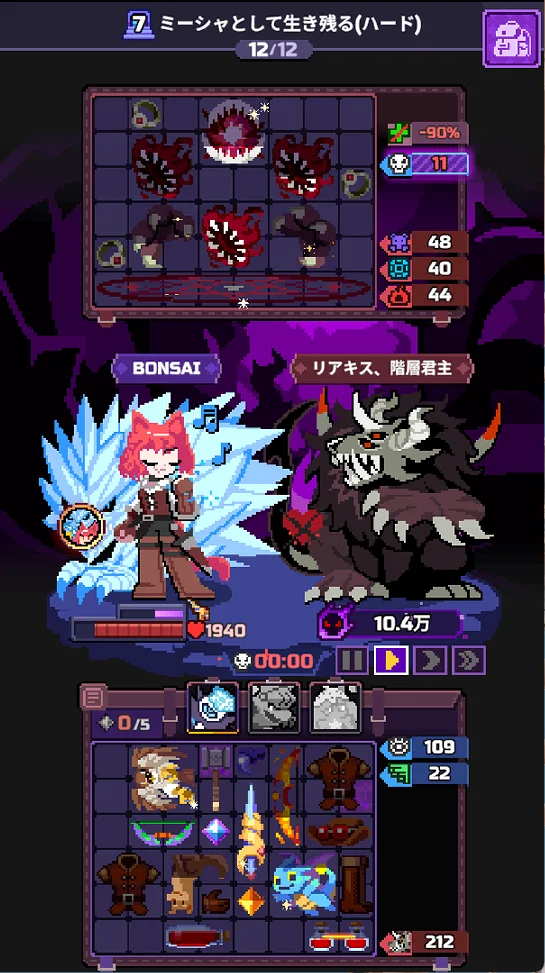
The final boss is the same as Bjorn's: Riakis, Lord of Floor (cannot be killed; survive 30 seconds to win). We cleared it on the first run (1,940 HP left). That completes Missha's Stages 1 to 7.
The short version
- Carry in the ⚔️Thunderbolt Spike. Kill the rounds on the way fast to keep Riakis's Shadow down (188 going into the boss)
- Pets: ❄️Ice Reaper, 🐲Red Dragon, 🪼Jellyfish Princess. Spend 🐲Red Dragon on the way (the boss cannot be killed)
- The boss deals percentage damage. Survive it with dodging (80), healing and the ⚔️Combat Hammer's Stun
- ⚔️Fairy Dragon is first in both damage (23,000) and healing (3,141)
How to read “margin”
On this site, margin (%) is “damage you can deal in 30 seconds ÷ the enemy's effective HP”. At 100% you exactly finish the enemy off.
| 130% or more | Almost certain win |
| 110-130% | Likely win |
| 90-110% | Coin flip. Needs rerolls and a tight board |
| Under 90% | Unfavourable. Add a pet or reroll more |
How accurate is it (as of 28 September 2026)
Checked against result screens from actual runs.
- Stage 1 boss: we won with the buy order on that page, and the model agrees
- Stage 5 (seven rounds lost on time): modelled vs measured weapon damage ratio is 0.88-1.11
- Stage 2 boss: we actually won with two 🛡️Spiked Armor, but the model says it falls short. The model is pessimistic about this boss
What misses most is “how many seconds until you die”, not damage. Builds with more healing or Block stay standing longer in practice than the model says.
Do not read “101% means a win” or “92% means a loss”. Each fight also swings ±10% on its own. Spike fires on 50% of the hits you take, which is only around 70 rolls in 30 seconds.
“Effective HP” is not raw HP. It adds the enemy's heals and revives. Cutting enemy healing lowers this effective HP.
And even with enough damage, you lose if you die first. That is what “dead” means in the tables, and it is separate from the margin %.
1. Riakis's Shadow (the penalty) and the carry-in
The penalty is the same as Bjorn's: during combat you gain Riakis's Shadow every second. One stack builds for every second of combat in R1-R11, and they all carry over to R12. Each stack gives the boss +0.7% item Haste and +0.25 Accuracy (measured on Bjorn's Stage 7).
The faster you kill the rounds on the way, the weaker the boss. The carry-in choices are the same ten as Bjorn's.
| ⚔️Staff of Vitality | ⚔️Thunderbolt Spike | |
|---|---|---|
| The boss's 30 seconds | Healing becomes the pillar | Healing relies on items |
| Speed on the way (= Riakis's Shadow) | Slow | Fast. About 18 seconds on average, 188 Riakis's Shadow |
| Glacial Beast Skadia (Freeze) | Does not trigger | Triggers |
We went with the ⚔️Thunderbolt Spike on the player's call and cleared on the first try.
2. When to fire the three pets
❄️Ice Reaper (1 power) / 🐲Red Dragon (2) / 🪼Jellyfish Princess (2)| R | Fire | Why |
|---|---|---|
| R4 | 🐲Red Dragon + 🪼Jellyfish Princess + ❄️Ice Reaper | Carnivaro 21,000 (its Crits remove your Block) |
| R8 | 🐲Red Dragon + 🪼Jellyfish Princess + ❄️Ice Reaper | Carnivaro 49,000 |
| R10 | 🐲Red Dragon | Skeleton Archer 79,000 |
| R11 | 🐲Red Dragon | Wraith 83,000 |
| R12 | ❄️Ice Reaper | The boss. Freeze slows its attacks |
🐲Red Dragon is wasted on the boss (percentage damage means nothing against an enemy that cannot die). Use it to finish the rounds on the way sooner and keep Riakis's Shadow down.
3. What to have, and by when
| By | Item | Qty | Why by then |
|---|---|---|---|
| R3 | 🛡️Leather Armor | 2 | 700 Block |
| R5 | 🔧Target + ⚔️Torch | 1 each | Next to the ⚔️Training Bow → ⚔️Hunter's Bow → ⚔️Flaming Trail |
| R5 | 🔧Poison Powder | 2 | Next to the ⚔️Training Bow → ⚔️Poison Bow |
| R6 | 🔧HP Potion | 2 | → 🔧Large HP Potion |
| R7 | 🔧Fairy Dust + 🔧Glowstone | 1 each | → 🔧Fairy Blessing (2,352 healing in the boss fight) |
| R8 | ⚔️Combat Hammer | 1-2 | While the boss is Stunned, both Riakis's Shadow and its attacks stop |
| R9 | 🔧Monocle + 🔧Glowstone + 🛡️Leather Helmet | 1 each | → 🛡️Marksman's Hat |
| R11 | 🛡️Leather Boots, 🔧Crow Amulet | 1 each | The dodge pillar (78 dodges each in the boss fight) |
| R11 | ⚔️Dragon + ⚔️Fairy | 1 each | → ⚔️Fairy Dragon (first in both damage and healing) |
Shopping checklist
Tap to count up. Tap again at the maximum to reset that row. Saved on this device, so it survives switching to the game and back.
ARun-ending if missingBMakes it much easierCSubstitutable
0 / 18
by R5
by R6
by R7
by R8
by R9
by R11
4. The gates, round by round, and the running Riakis's Shadow count
| R | Enemy | Pet | Time | HP left | Riakis's Shadow |
|---|---|---|---|---|---|
| 1 | Wraith | — | 14s | 432 | 14 |
| 2 | Wraith | — | 13.8s | 162 | 27 |
| 3 | Skeleton Archer | — | 14.5s | 1,393 | 41 |
| 4 | Carnivaro | 🐲Red Dragon + 🪼Jellyfish Princess + ❄️Ice Reaper | 15.4s | 2,060 | 56 |
| 5 | Skeleton Archer | — | 16.6s | 660 | 72 |
| 6 | Skeleton Warrior | — | 18.7s | 1,730 | 90 |
| 7 | Wraith | — | 20.5s | 1,531 | 110 |
| 8 | Carnivaro | 🐲Red Dragon + 🪼Jellyfish Princess + ❄️Ice Reaper | 18.2s | 1,544 | 126 |
| 9 | Wraith | — | 26s | 543 | 149 |
| 10 | Skeleton Archer 79,000 | 🐲Red Dragon | 21s | 1,924 | 167 |
| 11 | Wraith 83,000 | 🐲Red Dragon | 24.6s | 1,864 | 188 |
| 12 | Riakis, Lord of Floor | ❄️Ice Reaper | Survive 30s | 1,940 | 212 |
Riakis's Shadow only rose by 24 over the 30-second boss fight. That is because it stopped while the ⚔️Combat Hammer kept the boss Stunned for 5.4 seconds.
5. The boss fight: surviving 30 seconds
Every attack from Riakis, Lord of Floor is percentage damage based on your max HP. The “reduce damage taken” effects of shields (🛡️Buckler and the like) do not work. These four do.
- Dodging: 80 dodges. 78 each from 🛡️Leather Boots and 🔧Crow Amulet (Dodge)
- Healing: ⚔️Fairy Dragon 3,141, 🔧Fairy Blessing 2,352, 🔧Glowstone 1,277
- Block: two 🛡️Leather Armor (starting at 1,540)
- Stun: ⚔️Combat Hammer 5.4 seconds (both Riakis's Shadow and the attacks stop)
HP stayed between 1,560 and 2,400 to the end, and there was never a dangerous moment.
6. All twelve rounds of enemy data
The enemies are the same as in Bjorn's Stage 7 Hard.
| R | Enemy | Max HP | DPS | Trait |
|---|---|---|---|---|
| R1 | Wraith | 5,600 | 136 | Fadecloth: -20% weapon damage taken |
| R2 | Wraith | 7,728 | 151 | Fadecloth |
| R3 | Skeleton Archer | 11,000 | 162 | Skeleton Core (+50% crit damage taken; irrelevant to Bjorn). Watch the timer |
| R4 | Carnivaro | 21,000 | 163 | Crit hits wipe all your Block |
| R5 | Skeleton Archer | 20,000 | 220 | Skeleton Core. A round you can lose on time |
| R6 | Skeleton Warrior | 27,000 | 247 | Skeleton Core, Labyrinth Ring x2. A round you can lose on time |
| R7 | Wraith | 28,000 | 280 | Fadecloth, Labyrinth Ring x2. Get through with ❄️Ice Reaper |
| R8 | Carnivaro | 49,000 | 325 | Block wipe, Mana Mine. Tends to fall at 23s. 🐲Red Dragon + 🪼Jellyfish Princess |
| R9 | Wraith | 45,000 | 365 | Fadecloth x2 |
| R10 | Skeleton Archer | 79,000 | 364 | Skeleton Core. More arrows |
| R11 | Wraith | 83,000 | 432 | Fadecloth x2. Largest HP before the boss |
| R12 | Riakis, Lord of Floor | Cannot be killed | 5.2% of max HP | Cannot be killed. Survive 30 seconds to win. Every attack is a share of your max HP (sped up by Riakis's Shadow) |
7. The clear
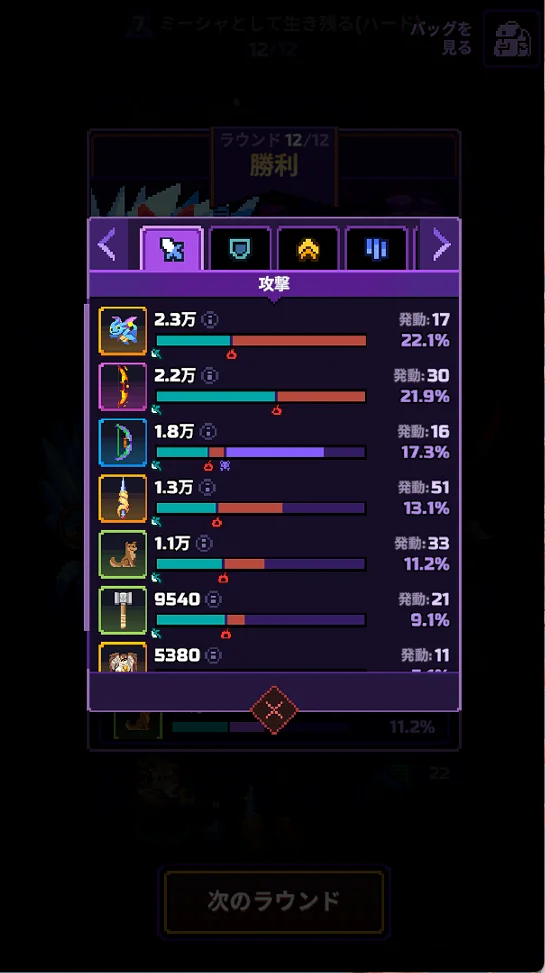

| Source | Damage | Share |
|---|---|---|
| ⚔️Fairy Dragon | 23,000 | 22.1% |
| ⚔️Flaming Trail (30 procs) | 22,000 | 21.9% |
| ⚔️Poison Bow | 18,000 | 17.3% |
| ⚔️Thunderbolt Spike (51 procs) | 13,000 | 13.1% |
| ⚔️Friendly Dog | 11,000 | 11.2% |
| ⚔️Combat Hammer (21 procs) | 9,540 | 9.1% |
| ⚔️War Hawk | 5,380 |
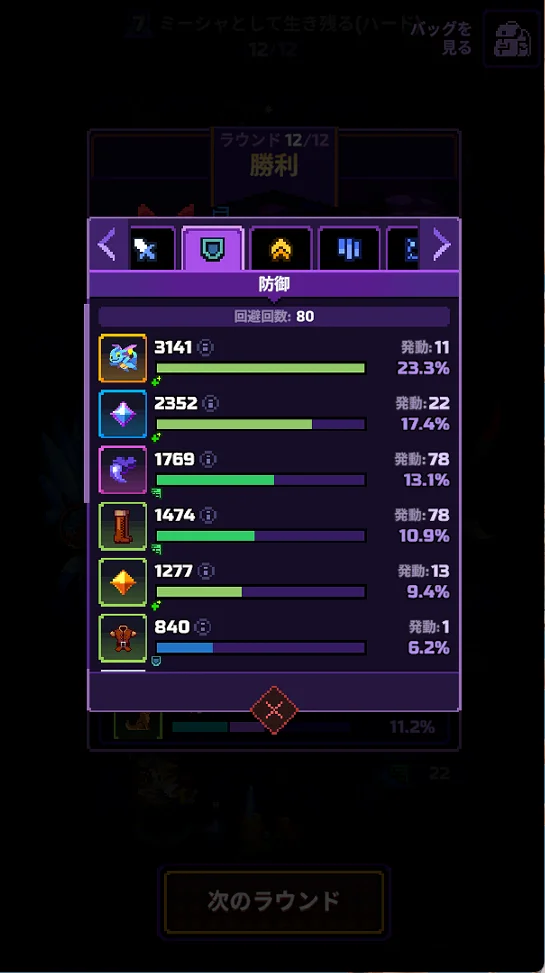
Defence tab (80 dodges)
| Source | Amount | Share |
|---|---|---|
| ⚔️Fairy Dragon (healing) | 3,141 | 23.3% |
| 🔧Fairy Blessing (healing) | 2,352 | 17.4% |
| 🔧Crow Amulet (dodge) | 1,769 | 13.1% |
| 🛡️Leather Boots (dodge) | 1,474 | 10.9% |
| 🔧Glowstone (healing) | 1,277 | 9.4% |
| 🛡️Leather Armor (Block) | 840 | 6.2% |
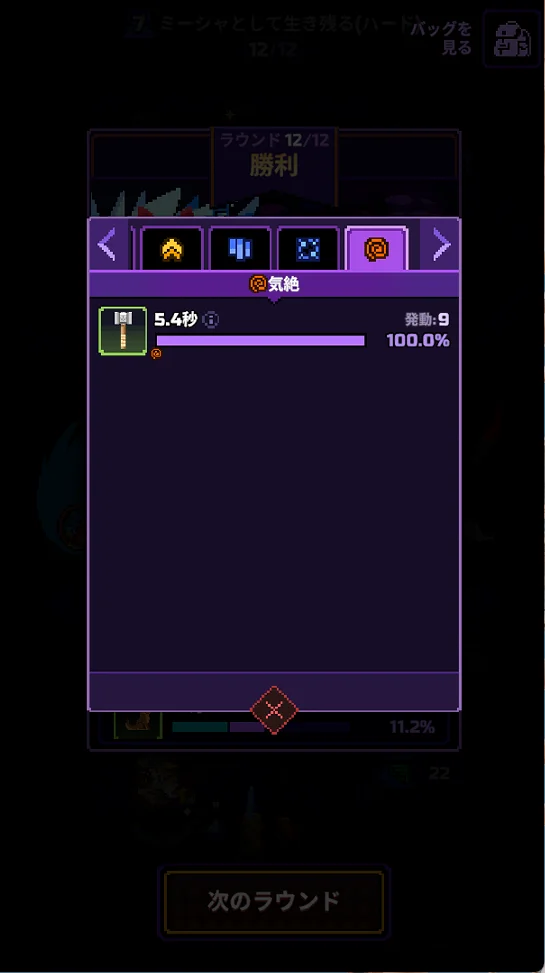
Stun tab
⚔️Combat Hammer 5.4 seconds (9 procs).
8. FAQ
What should Missha carry into Stage 7 Hard?
The ⚔️Thunderbolt Spike. On this stage Riakis's Shadow builds up for every second of combat, and the boss gets stronger with it. With the ⚔️Thunderbolt Spike we killed the rounds on the way in about 18 seconds on average and entered the boss with 188 Riakis's Shadow (Bjorn's ⚔️Staff of Vitality run had about 260).
Can Riakis, Lord of Floor be killed?
No. You win by surviving 30 seconds. Every one of its attacks is percentage damage based on your max HP, so damage reduction from shields and the like does nothing. What works is healing, Block, dodging and Stun.
How do I survive Riakis, Lord of Floor's attacks?
Dodging was the pillar (80 dodges). 🛡️Leather Boots and 🔧Crow Amulet (Dodge) accounted for 78 dodges each. Healing came from ⚔️Fairy Dragon (3,141) and 🔧Fairy Blessing (2,352). The 5.4 seconds of Stun from the ⚔️Combat Hammer also froze the Riakis's Shadow build-up during the boss fight.
Where do I fire the pets?
Spend 🐲Red Dragon on the way (R4, R8, R10, R11). Riakis, Lord of Floor cannot be killed, so 🐲Red Dragon's percentage damage is wasted on the boss. The faster you finish the rounds on the way, the less Riakis's Shadow you carry in. We kept ❄️Ice Reaper for the boss (its Freeze slows the attacks).
What is the number next to the boss?
Your total damage dealt (104,000 over 30 seconds in the run that cleared). The Riakis's Shadow count is shown at the bottom right of the screen.
What not to do
- ❌Saving 🐲Red Dragon for the boss (it cannot be killed, so it is wasted)
- ❌Killing the rounds on the way slowly (Riakis's Shadow piles up and the boss gets faster)
- ❌Relying on “reduce damage taken” defence such as shields (it does nothing against percentage damage)
Contact
Corrections, data fixes, or anything else about this site. Leave an email address if you would like a reply.