 Bjorn
“Surviving Overgeared Hero as a Barbarian”
Labyrinth of Rafdonia
Bjorn — Stage 6 Hard, a build that cleared
Updated 30 September 2026 · this is a build we actually cleared with
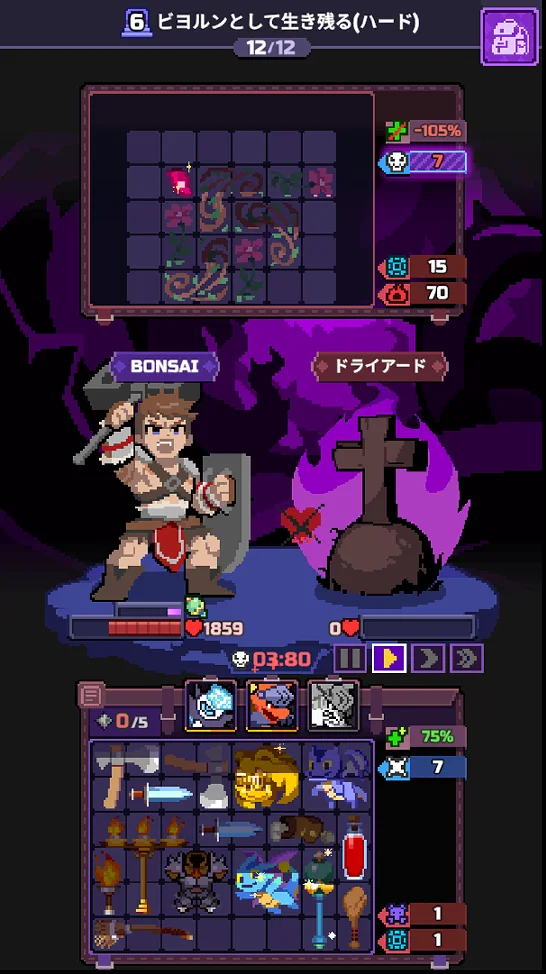
The final boss is Dryad at 97,000 HP. In Stage 6 you lose one coin in the shop every round, and on top of that every enemy has its own trick: the Half-Troll's Regen, Elisa Behenk's Fire of the Dead and the Dryad's Eye. On our 24th run we cleared without using a retry (boss down on the first attempt, 1,859 HP left).
The short version
- Carry in the ⚔️Staff of Vitality. Pets: ❄️Ice Reaper, 🐯Tiger, 🐲Red Dragon
- R4 all three / R6 ❄️Ice Reaper / R8 ❄️Ice Reaper + 🐯Tiger / R9 none / R10 ❄️Ice Reaper / R11 ❄️Ice Reaper / R12 🐲Red Dragon + ❄️Ice Reaper. Always keep 🐲Red Dragon for the boss
- By R5: a ⚔️Candlestick (⚔️Spear + ⚔️Torch) and a 🛡️Spiked Armor (🛡️Leather Armor + 🔧Steel Spike)
- By R7: a ⚔️Golden Dragon (⚔️Dragon + 🔧Golden Hero Statue). The damage to clear R9 without pets
- In R10 and R11, ❄️Ice Reaper + ⚔️Candlestick + ⚔️Torch cut enemy healing by 105%
- 🔧Broom is the key. Every 3 seconds it cleanses both the R8 Burn and the debuffs the boss's eye creates
- Do not sell defensive items on the boss. The run that did was killed in 7.5 seconds
How to read “margin”
On this site, margin (%) is “damage you can deal in 30 seconds ÷ the enemy's effective HP”. At 100% you exactly finish the enemy off.
| 130% or more | Almost certain win |
| 110-130% | Likely win |
| 90-110% | Coin flip. Needs rerolls and a tight board |
| Under 90% | Unfavourable. Add a pet or reroll more |
How accurate is it (as of 28 September 2026)
Checked against result screens from actual runs.
- Stage 1 boss: we won with the buy order on that page, and the model agrees
- Stage 5 (seven rounds lost on time): modelled vs measured weapon damage ratio is 0.88-1.11
- Stage 2 boss: we actually won with two 🛡️Spiked Armor, but the model says it falls short. The model is pessimistic about this boss
What misses most is “how many seconds until you die”, not damage. Builds with more healing or Block stay standing longer in practice than the model says.
Do not read “101% means a win” or “92% means a loss”. Each fight also swings ±10% on its own. Spike fires on 50% of the hits you take, which is only around 70 rolls in 30 seconds.
“Effective HP” is not raw HP. It adds the enemy's heals and revives. Cutting enemy healing lowers this effective HP.
And even with enough damage, you lose if you die first. That is what “dead” means in the tables, and it is separate from the margin %.
1. Carry in the ⚔️Staff of Vitality
Bjorn starts with the ⚔️Throwing Axe and the 🔧Warrior Flesh. On top of that you can carry in exactly one S-Legendary. Stage 6 offers these four.
⚔️Staff of Vitality / ⚔️Meteor Hammer / ⚔️Omnicleaver / ⚔️Thunderbolt SpikeWe cleared with the ⚔️Staff of Vitality.
⚔️Staff of Vitality
  [Skill] Rapid Healing: restore 1,000 HP and gain +25% healing effect (every 8s)
  Converts 25% of the overheal produced by skills and range items into Block
Why the ⚔️Staff of Vitality
- The boss, Dryad, keeps turning your buffs into debuffs with its eye, so it becomes a fight where you hold on and chip to the very end. The 1,000 heal every 8 seconds was the spine of the defence
- It stacks with the healing from the 🔧Large HP Potion and the ⚔️Fairy Dragon. The +25% healing effect applies to those too
- 25% of any overheal becomes Block, so little goes to waste even while your max HP is still low
Even to make the staff work, keep your defensive items. A run that sold 🛡️Spiked Armor, 🔧Large HP Potion and 🔧Warrior Flesh on the boss was killed 7.5 seconds in, before the staff's first heal (at 8 seconds) arrived.
In R8 (Elisa Behenk) the ⚔️Staff of Vitality is also a heal source that triggers Fire of the Dead. Get through R8 by cleansing the Burn with 🔧Broom.
The other three (⚔️Meteor Hammer, ⚔️Omnicleaver, ⚔️Thunderbolt Spike) were not compared under the same conditions in the runs leading up to the clear.
2. Rules only Stage 6 has
- Shop penalty: you lose 1 coin every round. That is -12 over twelve rounds. You have roughly 87 coins to spend
- Half-Troll (R2, R6, R10, R11): every time it is hit it has a chance to stack Regen. Each stack heals 0.5% of its max HP every 2 seconds. Without healing reduction you cannot finish it
- Elisa Behenk (R4, R8): with Fire of the Dead, every time you heal, you take Burn. Below 30% HP she sacrifices a follower for a big heal
- Dryad (R12): every 2.3 seconds its eye turns half your buffs into debuffs. Spike turns into Burn, Poison and Freeze
3. How to fire the three pets — always keep 🐲Red Dragon for the boss
❄️Ice Reaper (1 power) / 🐯Tiger (2) / 🐲Red Dragon (2)Power comes in blocks of 5 and refills “when you clear” R4 and R8 (R1-R4 / R5-R8 / R9-R12). A retry (once per run) also resets it to 5. With 3 power you cannot fire 🐲Red Dragon and 🐯Tiger together.
| R | Fire | Left in that block | Why |
|---|---|---|---|
| R4 | ❄️Ice Reaper + 🐯Tiger + 🐲Red Dragon | 5 → 0 | Elisa Behenk, first time. Get through R1-R3 without firing |
| R6 | ❄️Ice Reaper | 5 → 4 | Half-Troll. -40% healing |
| R8 | ❄️Ice Reaper + 🐯Tiger | 4 → 1 | Elisa Behenk, second time. The worst Burn of the run |
| R9 | None | 5 | 🔴 Fire here and you cannot fire 🐲Red Dragon on the boss |
| R10 | ❄️Ice Reaper | 5 → 4 | Half-Troll. One leg of the -105% |
| R11 | ❄️Ice Reaper | 4 → 3 | Same as above |
| R12 | 🐲Red Dragon + ❄️Ice Reaper | 3 → 0 | 🐲Red Dragon's percentage damage did 30% of the boss fight |
Before you press start, check your round in this table. We lost one run by forgetting to fire ❄️Ice Reaper in R10. If you lose R6 or R8, fire one more pet on the retry (power 5).
4. What to have, and by when
Read this as “have this in hand by this round”. What the shop shows is luck, so this is not a round-by-round buying order. Anything involving a merge is due one round before the round you want to use it in.
| By | Item | Qty | Coins | Why by then |
|---|---|---|---|---|
| R3 | Any weapons | 2 | about 10 | In R3 and R4 one ⚔️Throwing Axe is not enough. A ⚔️Club next to the ⚔️Throwing Axe makes an ⚔️Axe |
| R3 | 🔧HP Potion | 2 | 6 | Clear with them adjacent → 🔧Large HP Potion. Staying power for R9 and defence on the boss |
| R4 | 🔧Steel Spike | 1 | 6 | 🔴Rare. Top priority on sight. Without Spike, R5 is around 105% on paper |
| R5 | 🛡️Leather Armor | 1 | 4 | Clear next to the 🔧Steel Spike → 🛡️Spiked Armor (+800 max HP). Uncommon only shows in the first half |
| R5 | ⚔️Spear + ⚔️Torch | 1 each | 10 | Clear with them adjacent → ⚔️Candlestick (-50% enemy healing). The torch is Rare (10% in R4) |
| R6 | ⚔️Dragon | 1 | 10 | Epic. The damage pillar for clearing R9 without pets |
| R7 | 🔧Golden Hero Statue | 1 | 8 | Epic. Clear next to the ⚔️Dragon → ⚔️Golden Dragon |
| R8 | 🔧Broom | 1 | 6 | Cleanses 5 debuffs every 3 seconds. A key item: it clears both the R8 Burn and the debuffs the boss's eye creates |
| R9 | ⚔️Torch (second) | 1 | 4 | Place it unmerged. ❄️Ice Reaper + ⚔️Candlestick + ⚔️Torch = -105% healing |
| R9 | ⚔️Fairy | 1 | 7 | Next to the (second) ⚔️Dragon → ⚔️Fairy Dragon. 🔴Take it off the board in R8 |
| R10 | ⚔️Dragon (second), ⚔️Training Sword x2 | 3 | 18 | Damage for R10 and R11 |
| R12 | ⚔️Dragon (third), 1 weapon | 2 | 15 | Placed unmerged. Do not sell defence; sell what you do not need to pay for them |
Priority A (run-ending if missing) alone comes to 58 coins, and 89 with B. The budget after the shop penalty is 87, so buy C with sales, or with coins freed by selling things like the 🔧Shop VIP Card or the 🔧Reroll Sale Card.
Shopping checklist
Tap to count up. Tap again at the maximum to reset that row. Saved on this device, so it survives switching to the game and back.
ARun-ending if missingBMakes it much easierCSubstitutable
0 / 18
by R3
by R4
by R5
by R6
by R7
by R8
by R9
by R10
by R12
5. Merges
🛡️Leather Armor + 🔧Steel Spike    -> 🛡️Spiked Armor (+800 max HP, Spike 5 every 3.5s)
⚔️Spear + ⚔️Torch              -> ⚔️Candlestick (-50% enemy healing)
🔧HP Potion x2              -> 🔧Large HP Potion
⚔️Dragon + 🔧Golden Hero Statue     -> ⚔️Golden Dragon (Burn 4)
⚔️Dragon + ⚔️Fairy            -> ⚔️Fairy Dragon (restores 200 HP on hit)
⚔️Club + ⚔️Throwing Axe            -> ⚔️Axe
⚔️Torch + 🔧Warrior Flesh         -> 🔧Steak (the torch stays)
Merges only happen when you clear a round. And a single clear performs only one merge that uses any given item (one torch cannot make the ⚔️Candlestick and the 🔧Steak at the same time).
- 🔴 The ⚔️Spear merges with both the ⚔️Torch and the ⚔️Bloodstained Axe. Next to the ⚔️Bloodstained Axe it becomes a ⚔️Blood Frenzy and you get no ⚔️Candlestick
- 🔴 Keep the ⚔️Torch away from the 🔧Warrior Flesh. When you want the ⚔️Candlestick first, the 🔧Steak gets made instead
- 🔴 Do not put ⚔️Axe next to each other. They merge into a ⚔️Double-Bit Axe (700 / 2.2s) and damage per second drops by about 30%
- 🔴 Merges also happen when you retry. If you plan to retry R12, keep the pairs apart
6. The gate in each round (the 24th run, which cleared)
| R | Enemy | Pets | What had come in by then | HP left |
|---|---|---|---|---|
| 1-3 | Skeleton Warrior, Half-Troll, Skeleton Archer | — | Second ⚔️Throwing Axe, 🛡️Buckler, 🔧Shop VIP Card, ⚔️Spear, 🔧HP Potion x2 | 308 (R2) |
| 4 | Elisa Behenk | All three | 🔧Steel Spike. Clearing made the 🔧Large HP Potion | 1,901 |
| 5 | Skeleton Warrior | — | 🛡️Leather Armor, ⚔️Torch. Clearing made the 🛡️Spiked Armor and the ⚔️Candlestick | 1,251 |
| 6 | Half-Troll | ❄️Ice Reaper | ⚔️Dragon | 2,499 |
| 7 | Skeleton Archer | — | 🔧Golden Hero Statue. Clearing made the ⚔️Golden Dragon | 1,856 |
| 8 | Elisa Behenk | ❄️Ice Reaper + 🐯Tiger | ⚔️Torch (unmerged, second) | — |
| 9 | Skeleton Archer | None | ⚔️Training Sword, ⚔️Fairy, 🔧Broom | 2,398 |
| 10 | Half-Troll | ❄️Ice Reaper | Second ⚔️Dragon (next to the ⚔️Fairy → ⚔️Fairy Dragon), second ⚔️Training Sword. -105% healing | 2,779 |
| 11 | Half-Troll | ❄️Ice Reaper | 🔧Reroll Sale Card | 6 |
| 12 | Dryad | 🐲Red Dragon + ❄️Ice Reaper | Third ⚔️Dragon, ⚔️Club (sold the cards) | 1,859 |
- R5: add nothing and the Skeleton Warrior pushes you over (around 105% on paper). A single 🔧Steel Spike lifts it into the 140s
- R8: 🔴take healing items off the board (unmerged 🔧HP Potion, ⚔️Fairy). With Fire of the Dead, every heal sends Burn back at you. Leaving the ⚔️Fairy on took the calculation from 139% to 70%
- R9: the round you clear without pets. Unless you have damage (⚔️Golden Dragon) and defence (🛡️Spiked Armor or 🔧Broom) by the time you clear R8, you will not make it
- R11: the toughest Half-Troll (68,000 HP). Even the clearing run scraped through with 6 HP left
7. The boss board (103% on paper, killed in practice)
    1    2    3    4    5    6    7    8
A  TAXE TAXE TAXE TAXE GOLD GOLD DRGN DRGN
B  TAXE TSWD TSWD TAXE GOLD GOLD DRGN DRGN
C  CNDL CNDL CNDL TSWD TSWD MEAT MEAT LHP
D  TRCH CNDL ARM  ARM  FAIR FAIR STAF LHP
E  TRCH CNDL ARM  ARM  FAIR FAIR STAF CLUB
F  BRM  BRM  BRM  (□)  (□)  (□)  STAF CLUB
TAXE = ⚔️Throwing Axe / TSWD = ⚔️Training Sword / GOLD = ⚔️Golden Dragon / DRGN = ⚔️Dragon / CNDL = ⚔️Candlestick / TRCH = ⚔️Torch / FAIR = ⚔️Fairy Dragon / STAF = ⚔️Staff of Vitality / CLUB = ⚔️Club / ARM = 🛡️Spiked Armor / MEAT = 🔧Warrior Flesh / LHP = 🔧Large HP Potion / BRM = 🔧Broom. 15 items, 45 cells (3 empty).
- Keep all your defence: 🛡️Spiked Armor, 🔧Large HP Potion, 🔧Warrior Flesh, 🔧Broom
- 🔧Broom is critical. The boss's eye turns your buffs (such as the 🛡️Spiked Armor's Spike) into Burn, Poison and Freeze. 🔧Broom cleanses 5 at a time every 3 seconds, and at the kill we were carrying only Poison 1 and Freeze 1
- Do not place unmerged 🔧Steel Spike. It only adds more Spike for the boss to convert
- In this run a ⚔️Club never showed up until the end, so no ⚔️Axe was made (we stayed on two ⚔️Throwing Axe). Keep a ⚔️Club bought in R12 away from the ⚔️Throwing Axe (if it merges into an ⚔️Axe on a retry, the calculation drops from 118% to 101%)
Everything you hold in the boss fight
This is what is in hand after every merge is done, not the buying order.
| Item | Qty | Cells | Total | Position |
|---|---|---|---|---|
| ⚔️Golden Dragon | 1 | 4 | 4 | A5 |
| ⚔️Fairy Dragon | 1 | 4 | 4 | D5 |
| ⚔️Dragon | 1 | 4 | 4 | A7 |
| ⚔️Candlestick | 1 | 5 | 5 | C1 |
| 🛡️Spiked Armor | 1 | 4 | 4 | D3 |
| ⚔️Throwing Axe (one is starting gear) | 2 | 3 | 6 | A1, A3 |
| ⚔️Training Sword | 2 | 2 | 4 | B2, C4 |
| ⚔️Staff of Vitality (carry-in) | 1 | 3 | 3 | D7 |
| 🔧Broom | 1 | 3 | 3 | F1 |
| ⚔️Torch | 1 | 2 | 2 | D1 |
| ⚔️Club | 1 | 2 | 2 | E8 |
| 🔧Warrior Flesh (starting gear) | 1 | 2 | 2 | C6 |
| 🔧Large HP Potion | 1 | 2 | 2 | C8 |
15 items, 45 cells (of 48, 3 empty).
8. Enemy data for all twelve rounds
Max HP comes from the enemy data list; DPS is the raw value before your own reductions.
| R | Enemy | Max HP | DPS | Trait |
|---|---|---|---|---|
| R1 | Skeleton Warrior | 6,750 | 134 | Skeleton Core: takes +50% crit damage |
| R2 | Half-Troll | 7,452 | 111 | Sturdy Pants: when hit, a chance of Regen 1 (0.5% of max HP every 2s) |
| R3 | Skeleton Archer | 11,000 | 162 | Skeleton Core |
| R4 | Elisa Behenk | 12,000 | 153 | Fire of the Dead: Burns you every time you heal. Below 30% HP it sacrifices a follower to heal |
| R5 | Skeleton Warrior | 19,000 | 224 | Skeleton Core |
| R6 | Half-Troll | 20,000 | 125 | Sturdy Pants (Regen) |
| R7 | Skeleton Archer | 32,000 | 273 | Skeleton Core |
| R8 | Elisa Behenk | 30,000 | 262 | Fire of the Dead, 3 followers. The heaviest Burn |
| R9 | Skeleton Archer | 49,000 | 347 | Skeleton Core. The round to clear without pets |
| R10 | Half-Troll | 52,000 | 279 | Sturdy Pants (Regen). Stop it with -105% healing |
| R11 | Half-Troll | 68,000 | 318 | Sturdy Pants (Regen). Largest HP before the boss |
| R12 | Dryad | 97,000 | 493 | Bewitched (seals an item for 0.5s on hit) / Dryad's Eye (turns half your buffs into debuffs every 2.3s) |
9. Traps we learned from 23 losses
| Trap | What happened |
|---|---|
| Sold defence on the boss to buy weapons | Killed 7.5 seconds in at 2,000 max HP (the boss had been chipped to 54%) |
| Fired 🐯Tiger in R9 | Got through R9, but could not fire 🐲Red Dragon on the boss and fell short |
| No ⚔️Torch or ⚔️Candlestick by R6 | Could not stop the Half-Troll's Regen, and lost even at 129% on paper |
| Left 🔧HP Potion and ⚔️Fairy on the board in R8 | Fire of the Dead's Burn piled up and the run collapsed |
| Never managed to build a 🛡️Spiked Armor | Without 🔧Steel Spike, defence fell short in R5, R8 and R10. “Without Spike it really is rough” |
| Put two ⚔️Axe next to each other | They merged into a ⚔️Double-Bit Axe; not enough damage in R11 and we lost |
| Stacked Spike going into the boss | The Dryad's Eye turned the Spike into Burn 27, Poison 42 and Freeze 22 (the boss stopped at 80%) |
One more thing. How far you chip the boss changes a lot depending on whether you keep your defence. The 17th run, which kept all of it, got the boss down to 268 left (99.7%), and the 24th killed it.
10. The clear
Boss (Dryad, 97,000 HP) killed on the first attempt without a retry. We had 1,859 HP left, with the timer in its skull phase at 3.80 seconds left. Pets fired in the boss fight: 🐲Red Dragon + ❄️Ice Reaper.
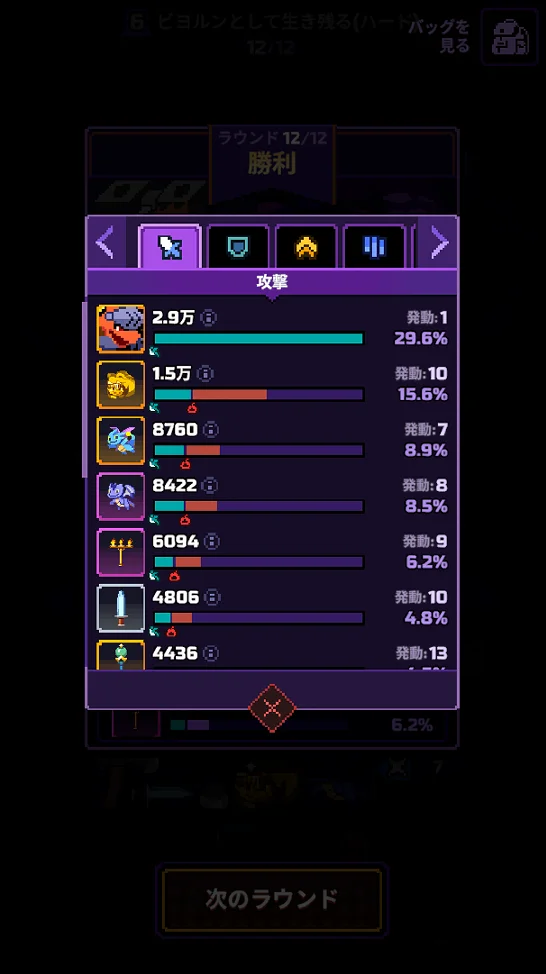
| Source | Damage | Share |
|---|---|---|
| 🐲Red Dragon | 29,000 | 29.6% |
| ⚔️Golden Dragon | 15,000 | 15.6% |
| ⚔️Fairy Dragon | 8,760 | 8.9% |
| ⚔️Dragon | 8,422 | 8.5% |
| ⚔️Candlestick | 6,094 | 6.2% |
| ⚔️Training Sword | 4,806 | 4.8% |
| ⚔️Staff of Vitality | 4,436 | about 4.5% |
Working back from the 🐲Red Dragon's 29.6%, total damage was about 98,000. The three dragons (⚔️Golden Dragon, ⚔️Fairy Dragon and the plain ⚔️Dragon) did about 32,000; together with the 🐲Red Dragon that is 60% of the total.
What we held when we cleared (boss fight)
⚔️Golden Dragon, ⚔️Fairy Dragon, ⚔️Dragon, ⚔️Throwing Axe x2, ⚔️Club, ⚔️Training Sword x2, ⚔️Candlestick, ⚔️Torch, ⚔️Staff of Vitality (carry-in), 🛡️Spiked Armor, 🔧Large HP Potion, 🔧Warrior Flesh, 🔧Broom.
11. FAQ
What should I carry in for Stage 6 Hard?
We cleared with the ⚔️Staff of Vitality. It restores 1,000 HP every 8 seconds and raises healing effect by 25%. The boss, Dryad, is a stage you win by holding on and chipping to the very end, so a staff that anchors your defence suited it.
I keep losing to the Skeleton Archer in R9
R9 is meant to be cleared without firing pets. Fire 🐯Tiger in R9 and you cannot fire 🐲Red Dragon on the boss. Have 🛡️Spiked Armor, ⚔️Candlestick and ⚔️Golden Dragon by the time you clear R8. In runs where they were not ready, we lost R9 without pets four times.
The Half-Troll (R10, R11) never stops healing
❄️Ice Reaper (-40%) + ⚔️Candlestick (-50%) + ⚔️Torch (-15%) makes -105%, and its Regen stops completely. Place one ⚔️Torch unmerged, separate from the one that goes into the ⚔️Candlestick. Adding more torches beyond that does nothing more for healing reduction.
Can I sell defensive items in the boss fight to buy weapons?
Do not sell them. A run that sold 🛡️Spiked Armor, 🔧Large HP Potion and 🔧Warrior Flesh to add weapons was killed 7.5 seconds in, still at 2,000 max HP. The run that kept all its defence survived into the last seconds of the timer.
I made two ⚔️Axe and got weaker
Clear a round with two ⚔️Axe next to each other and they merge into a ⚔️Double-Bit Axe (Epic). Damage per second drops from about 490 for the two axes to about 355 (roughly 30% less). Keep the axes apart.
What not to buy, and what not to place
- ❌Unmerged 🔧Steel Spike in the boss fight — the Dryad's Eye turns it into debuffs
- ❌Unmerged 🔧HP Potion and ⚔️Fairy in R8 — Fire of the Dead sends Burn back at you (just take them off; use them again from R9)
- ❌Two ⚔️Axe side by side — they merge into a ⚔️Double-Bit Axe and get weaker
Contact
Corrections, data fixes, or anything else about this site. Leave an email address if you would like a reply.