 Arua Raven
“Surviving Overgeared Hero as a Barbarian”
Labyrinth of Rafdonia
Arua Raven — Stage 4 Hard, a build that cleared
Updated 17 October 2026 · this is a build we actually cleared with
Stage 4 Hard with the wizard Arua Raven. The final boss is Duke Cambormere (151,000 HP, Vamp, 3 seconds of invulnerability when nearly dead). We cleared it on the 24th run, without a retry. The boss went down in 25.0 seconds with HP still full at 2,000.
The short version
- Carry in ⚔️Staff of Vitality. Its healing and Block protect the early rounds (the R5 Ghoul above all)
- Have a ⚔️Candlestick (⚔️Spear + ⚔️Torch) by the R6 shop. With ❄️Ice Reaper that is −90% healing, which is enough for the R7 Stout Undead and R8 Death Fiend. For the boss's Vamp, add ⚔️Torch as well: ❄️Ice Reaper + ⚔️Candlestick + ⚔️Torch for −105% or lower (the clear had two ⚔️Torch, −120%). Run 24 used 🎁Mimic in the R7 shop to get the ⚔️Candlestick in time for R7
- Main damage is the same as Stage 3: ⚔️Intermediate Magic: Magic Missile + 🔧Transformation Magic: Spell Amplification and two ⚔️Fairy Dragon (⚔️Dragon + ⚔️Fairy). The clear had bad luck in the shop and never got to make ⚔️Thunder Dragon, but you can win without it
- Pets: ❄️Ice Reaper, 🐲Red Dragon, 🎁Mimic (to speed up key merges). Save ❄️Ice Reaper 🐲Red Dragon for the boss (spend 🐲Red Dragon in R9–R11 and you fall short)
- Spread out your healing timings (every potion heals on the same 5.5-second cycle). ⚔️Fairy Dragon and ⚔️Fairy heal on hit; 🛡️Leather Gloves speeds up a potion
1. Stage 4 enemies and the trait
The trait is a buff, not a penalty: “hitting the boss with Sunspot Sphere deals fatal damage”. Arua Raven's traits, Sunspot Sphere and starting gear are on the Stage 1 page.
| R | Enemy | HP | Watch out |
|---|---|---|---|
| 1 | Skeleton Warrior | 6,750 | |
| 2 | Stout Undead | 3,726 | Revives twice |
| 3 | Stout Undead | 4,617 | Revives twice |
| 4 | Death Fiend | 20,000 | Heals and reduces damage |
| 5 | Ghoul | 21,000 | Hits hard. Takes +30% from Flame Spell and Burn |
| 6 | Skeleton Warrior | 25,000 | |
| 7 | Stout Undead | 16,000 | Revives twice. A revive is a heal, so ❄️Ice Reaper and ⚔️Candlestick work on it |
| 8 | Death Fiend | 47,000 | Big heal every 5 seconds |
| 9 | Ghoul | 54,000 | |
| 10 | Ghoul | 72,000 | The hardest-hitting round before the boss |
| 11 | Skeleton Archer | 85,000 | Arrows follow up its bow |
| 12 | Duke Cambormere | 151,000 | Vamp. When nearly dead, 3 seconds of invulnerability plus a heal |
HP is what Arua Raven's screen shows.
2. When to fire the pets
❄️Ice Reaper (cost 1) / 🐲Red Dragon (cost 2) / 🎁MimicPower is 5. It refills to 5 when you clear R4 and when you clear R8.
| R | Fire | Why |
|---|---|---|
| R1 | — | |
| R2, R3 | ❄️Ice Reaper | −40% on the Stout Undead's revive (a heal) |
| R4 | ❄️Ice Reaper 🐲Red Dragon | Refills to 5 on the clear |
| R5, R6 | — | Saved for R7 and R8 |
| R7 | ❄️Ice Reaper 🎁Mimic | Stout Undead. 🎁Mimic speeds up the ⚔️Candlestick (buy a ⚔️Spear in the shop and merge it with the ⚔️Torch on the spot). With ❄️Ice Reaper, healing at −90% or lower |
| R8 | ❄️Ice Reaper 🐲Red Dragon | Death Fiend 47,000. Refills to 5 on the clear |
| R9 | — | |
| R10, R11 | ❄️Ice Reaper | Freeze 15 slows its attacks |
| R12 | ❄️Ice Reaper 🐲Red Dragon | 🐲Red Dragon takes 45,000 (30% of max HP). ❄️Ice Reaper also cuts the Vamp healing |
Saving 🐲Red Dragon for the boss matters most. Run 16 spent 🐲Red Dragon in R9 and R10, met the boss with ❄️Ice Reaper alone, and lost with 30,000 left — a gap the 45,000 from 🐲Red Dragon would have closed.
3. Merges and how to build
⚔️Dragon + ⚔️Fairy                              → ⚔️Fairy Dragon x2
⚔️Spear + ⚔️Torch                                → ⚔️Candlestick (healing −50%)
⚔️Training Staff + 🔧Wyrd Branch            → ⚔️Wyrdwood Staff
🔧Whetstone + ⚔️Beginner Magic: Energy Bolt            → 🔧Magic Stone
⚔️Wyrdwood Staff + 🔧Magic Stone                  → ⚔️Archmage's Staff
⚔️Archmage's Staff + ⚔️Whip                      → ⚔️Maestro
🔧HP Potion x2 → 🔧Large HP Potion- Put three 🔧Transformation Magic: Spell Amplification in ⚔️Maestro's ◆, pointed at ⚔️Intermediate Magic: Magic Missile. They fire on every ⚔️Maestro attack and stack up (28,000 in the boss fight)
- ⚔️Fairy Dragon: Burn 2 and 200 HP healed on hit. The two together did 14,000 damage and healed 4,156 in the boss fight
- Spread out your healing timings. 🔧HP Potion and 🔧Large HP Potion all heal every 5.5 seconds, so they land together and leave gaps. Mix in items that heal on hit, and use 🛡️Leather Gloves (15% Haste to the item in its ◆) to shift a potion's cycle
- ⚔️Combat Hammer adds Stun
- 🎁Mimic lets you merge on the spot in the shop screen (normally merges happen when you clear the round). Use it to get key merges — ⚔️Candlestick, ⚔️Maestro, ⚔️Fairy Dragon, ⚔️Thunder Dragon — a round earlier. Run 24 bought a ⚔️Spear in the R7 shop and merged it with the ⚔️Torch next to it into a ⚔️Candlestick right there
4. What to have, and by when
“By” is the round by which the merge materials must be on the board. A merge happens when you clear that round. These deadlines are guidelines drawn from the 24 runs.
| By | Item | Qty | Why by then |
|---|---|---|---|
| R3 | ⚔️Training Staff + 🔧Wyrd Branch | 1 each | → ⚔️Wyrdwood Staff |
| R5 | 🛡️Leather Armor, 🛡️Leather Helmet | 1–2 | Defense so the R5 Ghoul doesn't take you down |
| R6 | ⚔️Spear + ⚔️Torch | 1 each | → ⚔️Candlestick. Stops the healing in R7 and R8. Reroll if the shop doesn't show one |
| R11 | ⚔️Torch (separate from the ⚔️Candlestick) | 1–2 | For the boss's Vamp. ❄️Ice Reaper + ⚔️Candlestick + ⚔️Torch for −105% or lower |
| R8 | 🔧Whetstone + ⚔️Beginner Magic: Energy Bolt → next to ⚔️Wyrdwood Staff | 1 each | → ⚔️Archmage's Staff |
| R10 | ⚔️Whip (next to ⚔️Archmage's Staff) | 1 | → ⚔️Maestro |
| R11 | ⚔️Dragon + ⚔️Fairy | 2 each | → two ⚔️Fairy Dragon (one ⚔️Dragon is starting gear) |
| R11 | 🔧Transformation Magic: Spell Amplification | 3 | Pointed at ⚔️Intermediate Magic: Magic Missile. Not a merge, so it works from the round you buy it |
| R11 | 🛡️Leather Gloves, ⚔️Combat Hammer, 🔧Large HP Potion | 1 each | Shift the healing cycle; Stun |
Shopping checklist
Tap to count up. Tap again at the maximum to reset that row. Saved on this device, so it survives switching to the game and back.
ARun-ending if missingBMakes it much easierCSubstitutable
0 / 21
by R3
by R5
by R6
by R8
by R10
by R11
5. Time taken, round by round (run 24, the clear)
| R | Enemy | Pets | Time | HP left |
|---|---|---|---|---|
| 1 | Skeleton Warrior | — | 14.6 s | 1,446 |
| 2 | Stout Undead | ❄️Ice Reaper | 20.8 s | 1,668 |
| 3 | Stout Undead | ❄️Ice Reaper | 24.2 s | 2,060 |
| 4 | Death Fiend | ❄️Ice Reaper 🐲Red Dragon | 4.5 s | 2,120 |
| 5 | Ghoul | — | 25.6 s | 1,665 |
| 6 | Skeleton Warrior | — | 22.6 s | 1,207 |
| 7 | Stout Undead | ❄️Ice Reaper 🎁Mimic | 15.6 s | 1,270 |
| 8 | Death Fiend | ❄️Ice Reaper 🐲Red Dragon | 17.6 s | 1,980 |
| 9 | Ghoul | — | 24.1 s | 2,000 |
| 10 | Ghoul | ❄️Ice Reaper | 25.7 s | 1,788 |
| 11 | Skeleton Archer | ❄️Ice Reaper | 27.3 s | 594 |
| 12 | Duke Cambormere | ❄️Ice Reaper 🐲Red Dragon | 25.0 s | 2,000 |
The closest call was the R11 Skeleton Archer (27.3 seconds, 594 HP left).
6. Where the 23 failed runs lost
| Lost at | Runs | Why |
|---|---|---|
| R7 Stout Undead, R8 Death Fiend | 8 | Six had no ⚔️Torch (⚔️Candlestick) by R6. ❄️Ice Reaper alone can't stop the healing (the other two were runs 11 and 22) |
| R9, R10 Ghoul | 7 | Not enough damage, with defense already worn down in earlier rounds |
| R12 Duke Cambormere | 3 | Run 4 was out-healed by Vamp at −40% (78,000 left). Runs 16 and 18 had no 🐲Red Dragon left (30,000 and 25,000 left) |
| R5 Ghoul, R11 Skeleton Archer, R2 | 5 | Entered the Ghoul with thin defense / taken down by the Skeleton Archer in about 10 seconds |
Runs 1–3 and most of runs 12–23 carried ⚔️Primal Flame and went for ⚔️Thunder Dragon, but damage could not keep up with the late enemy HP, and defense tended to be thin early on. This page follows run 24, which won without a retry.
7. The board at the clear (shop before the boss)
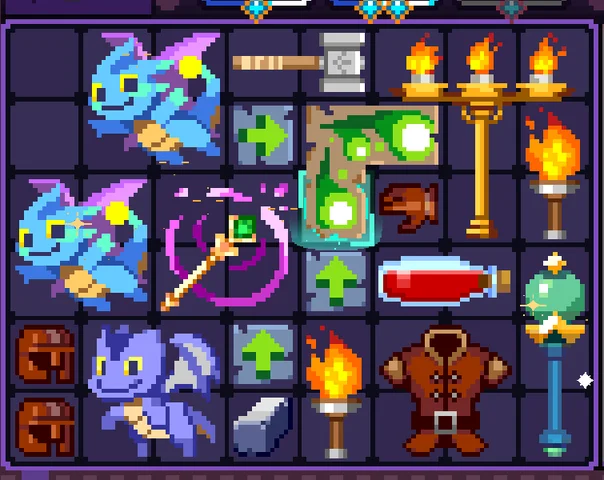
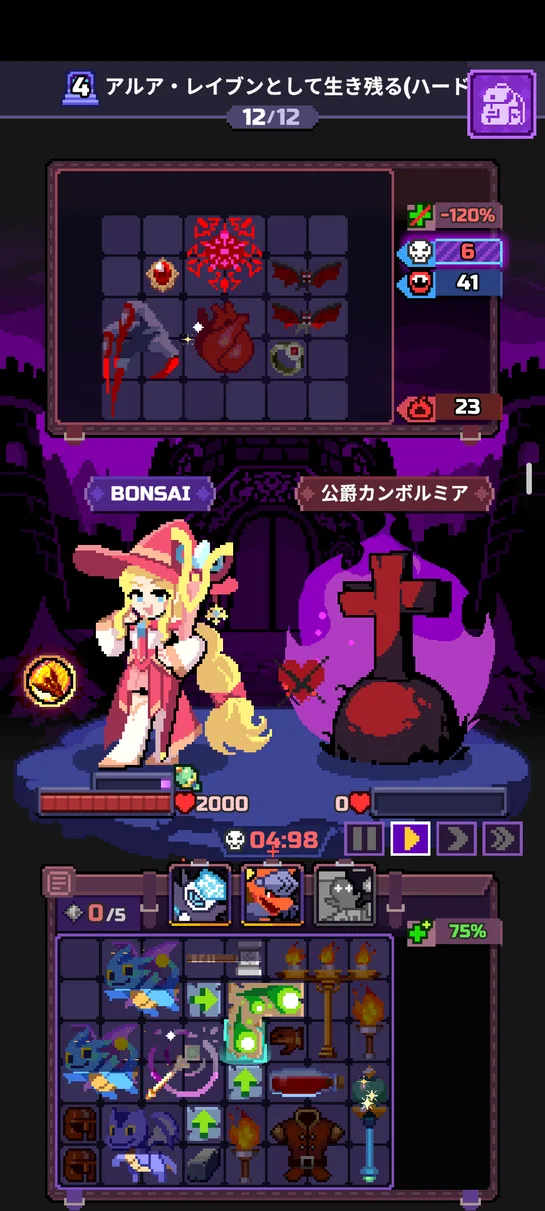
- Damage: ⚔️Intermediate Magic: Magic Missile with three 🔧Transformation Magic: Spell Amplification in its ◆, ⚔️Maestro, two ⚔️Fairy Dragon, ⚔️Dragon, ⚔️Combat Hammer, 🔧Whetstone
- Healing reduction: ⚔️Candlestick, two ⚔️Torch
- Defense: ⚔️Staff of Vitality, 🔧Large HP Potion, 🛡️Leather Armor, two 🛡️Leather Helmet
- Haste: two 🛡️Leather Gloves (15% Haste to the items in its ◆, to shift a potion's cycle)
The ⚔️Thunder Dragon materials (⚔️Intermediate Magic: Spark, 🔧Synergy Spell: Drizzle) never showed up, so they are not on the board — and the run still won. Almost the same shape as the Stage 3 clear.
8. Results screen at the clear
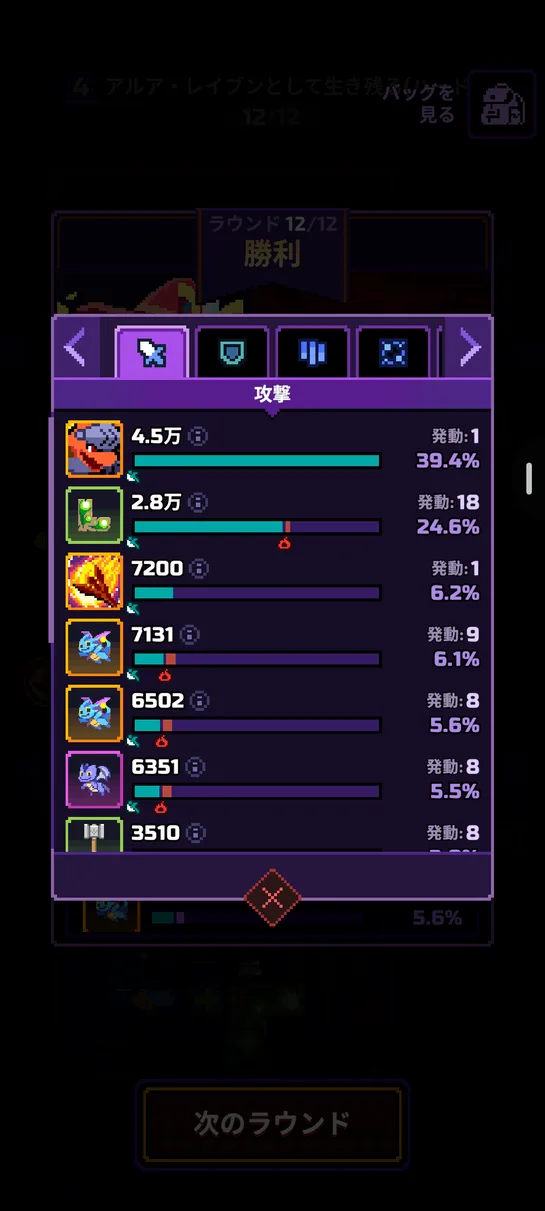
| Source | Damage | Share |
|---|---|---|
| 🐲Red Dragon | 45,000 | 39.4% |
| ⚔️Intermediate Magic: Magic Missile (18 procs) | 28,000 | 24.6% |
| Sunspot Sphere (1 proc) | 7,200 | 6.2% |
| ⚔️Fairy Dragon (9 procs) | 7,131 | 6.1% |
| ⚔️Fairy Dragon (8 procs) | 6,502 | 5.6% |
| ⚔️Dragon (8 procs) | 6,351 | 5.5% |
| ⚔️Combat Hammer (8 procs) | 3,510 | — |
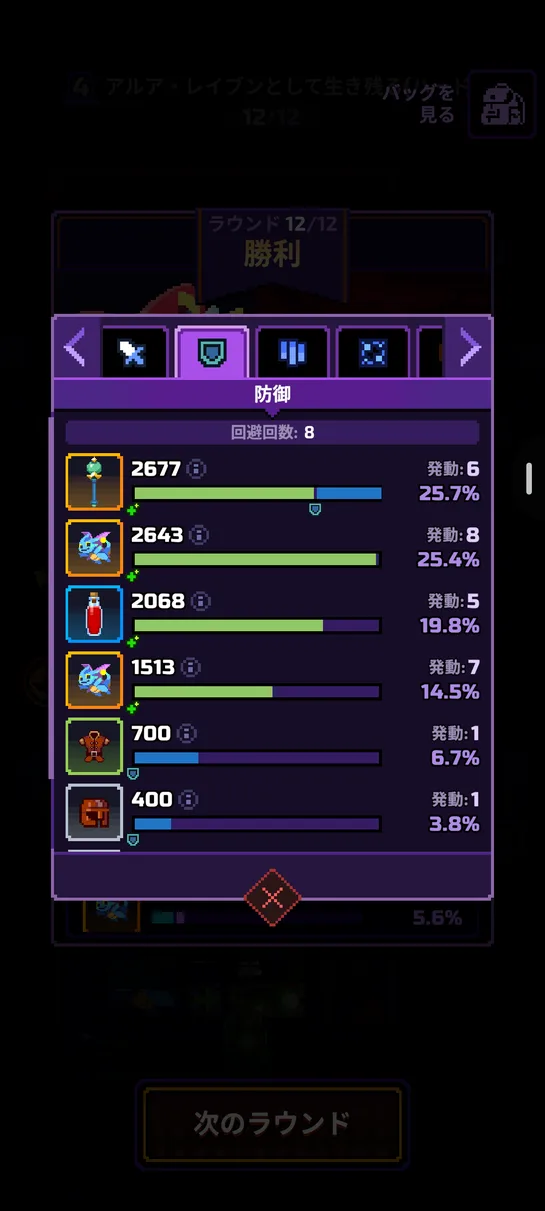
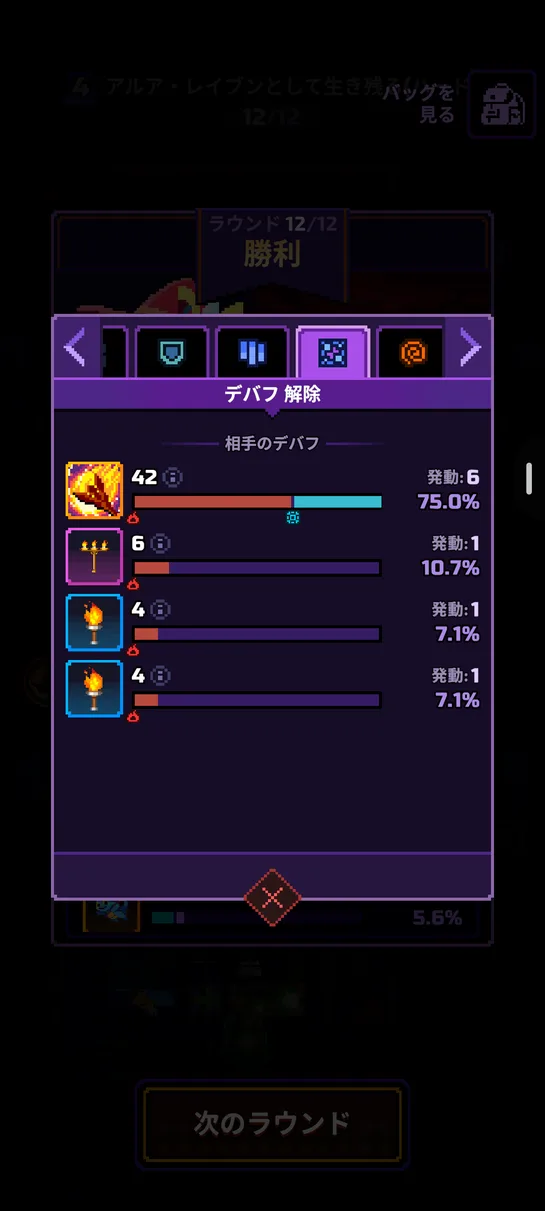
Defense: ⚔️Staff of Vitality 2,677, ⚔️Fairy Dragon 2,643 and 1,513, 🔧HP Potion 2,068, 🛡️Leather Armor 700, 🛡️Leather Helmet 400, 8 dodges. Debuffs applied: Burn from ⚔️Fairy Dragon 18, 16, 16; ❄️Ice Reaper 15; ⚔️Candlestick 6; ⚔️Torch 4 and 4. Sunspot Sphere removed 42 of the enemy's debuffs. Stun: ⚔️Combat Hammer 1.2 seconds x2. The boss's healing was at −120%.
9. FAQ
Which pets for Stage 4?
❄️Ice Reaper, 🐲Red Dragon and 🎁Mimic. We fired R2 ❄️Ice Reaper / R3 ❄️Ice Reaper / R4 ❄️Ice Reaper 🐲Red Dragon / R7 ❄️Ice Reaper 🎁Mimic / R8 ❄️Ice Reaper 🐲Red Dragon / R10 ❄️Ice Reaper / R11 ❄️Ice Reaper / boss ❄️Ice Reaper 🐲Red Dragon. Saving 🐲Red Dragon for the boss matters most.
What should I carry in?
⚔️Staff of Vitality. Builds that carried ⚔️Primal Flame and went for ⚔️Thunder Dragon could not keep up with the swelling enemy HP late in the run, and with thin defense early they were often taken down by the R5 Ghoul. With ⚔️Staff of Vitality, once you have a ⚔️Candlestick, R8 is reliably cleared.
How do I stop the boss's Vamp?
❄️Ice Reaper (−40%) + ⚔️Candlestick (−50%) + ⚔️Torch (−15% each) takes healing to −105% or lower. The boss needs ⚔️Torch on top of the ⚔️Candlestick (❄️Ice Reaper + ⚔️Candlestick alone is −90%). Run 4 had only ❄️Ice Reaper (−40%); the boss healed about 150,000 and the run lost with 78,000 left. The clear was at −120%.
How do I get through R7 and R8 (Stout Undead and Death Fiend)?
Line up a ⚔️Spear and a ⚔️Torch by the R6 shop to make a ⚔️Candlestick. In the clearing run 24, we picked 🎁Mimic in the R7 shop, bought a ⚔️Spear, and merged it with the ⚔️Torch right there on the shop screen, getting the ⚔️Candlestick in time for R7. That cut the Stout Undead's healing. All six runs with no ⚔️Torch by R6 (runs 2, 5, 6, 7, 15, 17) lost at R7 or R8. The only run that had one and still lost there was run 11 (R8, 8,195 left). If the shop doesn't show one, reroll for it.
Does the Sunspot Sphere “fatal damage” matter?
Stage 4's trait is “hitting the boss with Sunspot Sphere deals fatal damage”, but in the clear's boss fight it did 7,200 (once). The boss damage came mainly from 🐲Red Dragon (45,000) and ⚔️Intermediate Magic: Magic Missile (28,000).
Don't
- ❌ Enter R7 and R8 without a ⚔️Torch (⚔️Candlestick) by R6 (lost all six times)
- ❌ Spend 🐲Red Dragon in R9 and R10 and meet the boss with ❄️Ice Reaper alone (lost with 30,000 left)
- ❌ Try to stop the boss's Vamp with ❄️Ice Reaper alone (it healed about 150,000). A ⚔️Candlestick alone isn't enough either; add ⚔️Torch
- ❌ Rely on potions alone for healing (they all land every 5.5 seconds and you go down in the gaps)
- ❌ Enter the R5 Ghoul with no defensive items
Contact
Corrections, data fixes, or anything else about this site. Leave an email address if you would like a reply.