 Bjorn
“Surviving Overgeared Hero as a Barbarian”
Labyrinth of Rafdonia
Bjorn — Stage 3 Hard, a build that cleared
Updated 28 September 2026 · this is a build we actually cleared with
The final boss is Corpse Golem at 112,000 HP. Three attempts, two losses and one win, which went through with 0.10 seconds left. On 27 September 2026 we rebuilt the plan around a realistic haul (four 🛡️Spiked Armor) with reroll money included. Stage 3 is the stage where three kinds of enemies all gang up on your weapons. That is why the build settled on Spike as its core. Every enemy HP figure on this page is measured, worked back from the result screen.
The short version
- Carry in the ⚔️Staff of Vitality. With anything else, you fail to last 30 seconds in 8 of rounds R1-R9
- Pets: ❄️Ice Reaper, 🐲Red Dragon and 🐯Tiger. 🧊Yeti is not needed
- Two 🔧Golden Pig. Together with a ⚔️Gladius they become the ⚔️Piggycalibur, which keeps the income of 2 coins per shop and hands out +60 to ◆ weapons
- Four 🛡️Spiked Armor. The bottleneck is the 🛡️Leather Armor (Uncommon), so buy it on sight in the first half
- The Epics are the ⚔️Dragon and the 🔧Blood Stone
- 108 coins spent in total (from 99 coins + 22 coins of pig income). 13 coins can go to rerolls
- Merges only happen when you clear a round. Finish buying one round ahead
- Thinnest margin 109% (R1), boss 113%
27 September 2026: we revised the Spike estimate down and rebuilt the buying order
Bjorn's Giantization (all damage up to +30% in proportion to max HP gained) does not apply to Spike. It only applies to weapons, as the Stage 1 boss measurements showed.
Pushing through with Spike lost value, so two conclusions have changed.
- Buy 🔧Golden Pig (we used to say “do not buy them”)
- Add the ⚔️Fairy Dragon (⚔️Dragon + ⚔️Fairy)
Recalculated, the thinnest margin is 109%. The buying order from before the rebuild comes out at 100% in the same model, a coin flip.
How to read “margin”
On this site, margin (%) is “damage you can deal in 30 seconds ÷ the enemy's effective HP”. At 100% you exactly finish the enemy off.
| 130% or more | Almost certain win |
| 110-130% | Likely win |
| 90-110% | Coin flip. Needs rerolls and a tight board |
| Under 90% | Unfavourable. Add a pet or reroll more |
How accurate is it (as of 28 September 2026)
Checked against result screens from actual runs.
- Stage 1 boss: we won with the buy order on that page, and the model agrees
- Stage 5 (seven rounds lost on time): modelled vs measured weapon damage ratio is 0.88-1.11
- Stage 2 boss: we actually won with two 🛡️Spiked Armor, but the model says it falls short. The model is pessimistic about this boss
What misses most is “how many seconds until you die”, not damage. Builds with more healing or Block stay standing longer in practice than the model says.
Do not read “101% means a win” or “92% means a loss”. Each fight also swings ±10% on its own. Spike fires on 50% of the hits you take, which is only around 70 rolls in 30 seconds.
“Effective HP” is not raw HP. It adds the enemy's heals and revives. Cutting enemy healing lowers this effective HP.
And even with enough damage, you lose if you die first. That is what “dead” means in the tables, and it is separate from the margin %.
- Carry in the ⚔️Staff of Vitality — no contest
- Choosing the three pets
- What to have, and by when
- Merges — they only happen when you clear a round
- Max HP becomes damage
- Building the board
- Enemy data for all twelve rounds
- Why Spike — three enemies refuse weapons
- Deleting the Stout Undead heal
- Turning 🔧Golden Pig into the ⚔️Piggycalibur
- The clear
- FAQ
- What not to buy
1. Carry in the ⚔️Staff of Vitality — no contest
240 / 2s / 85%
[Skill] Rapid Healing: restore 1,000 HP and gain +25% healing effect (every 8s)
Converts 25% of the overheal produced by the skill and ◆ items into Block
We also ran the numbers for the ⚔️Thunderbolt Spike and the ⚔️Everfrozen. The result: you fail to last 30 seconds in 8 of rounds R1-R9.
Your max HP only reaches around 3,000, while enemies deal 289 to 443 per second. The 1,250 heal every 8 seconds and “25% of overheal becomes Block” are what keep you alive.
Together with the starting ⚔️Throwing Axe and 🔧Warrior Flesh, these three never come off the board.
Covering your healing with Vamp does not work
We also tried the ⚔️Thunderbolt Spike plus Vamp gear. Checking the compendium settled it: Vamp is “10 HP on 50% of hits”, and adding stacks does not change the heal per proc. Even at 14 Vamp it heals 6 per hit, about 500 over 30 seconds.
2. Choosing the three pets — ❄️Ice Reaper / 🐲Red Dragon / 🐯Tiger
❄️Ice Reaper (1 power) / 🐲Red Dragon (2) / 🐯Tiger (2)Power comes in blocks of 5 and refills “when you clear” R4 and R8. There are three blocks, R1-R4 / R5-R8 / R9-R12, and you only get 5 in each.
R1   🐲Red Dragon                   R1-R4   5 total
R2   🐯Tiger + ❄️Ice Reaper
R6   ❄️Ice Reaper                         R5-R8   5 total
R8   🐲Red Dragon + 🐯Tiger
R12  🐲Red Dragon + 🐯Tiger         R9-R12  4 total
Fire early, in R1 and R2. Buying two 🔧Golden Pig first leaves the early board thin. R1, at 109%, is the thinnest point of this build.
🧊Yeti is not needed. Stage 3 has no Stun traps. It was mandatory in Stage 1, but here it is a wasted slot.
🐲Red Dragon alone does 30%
“On battle start: fixed damage equal to 30% of the enemy's max HP” = 33,600. On the result screen of the clear it was 29.6%, comfortably first. Two power guarantees 30% of the boss's HP.
On the first attempt we forgot to fire it and lost with 27,000 left. The shortfall was almost exactly 33,600.
The third slot is 🐯Tiger — not 🪼Jellyfish Princess
🪼Jellyfish Princess  On being hit, 30% chance to gain 4 Spike (up to 5 times) = 20 Spike stacks
🐯Tiger      +25% weapon damage
Until 26 September 2026, 🪼Jellyfish Princess came out ahead in the boss-fight calculation. Once we found that Giantization does not apply to Spike, Spike's weight dropped and the order flipped. 🐯Tiger is also better on the way there (the skeleton-type enemies in R3, R7 and R9 take +50% Crit damage).
Pets cannot be changed once chosen.
3. What to have, and by when
Read this as “have this in hand by this round”. If the item above is missing, move down to the next one.
Shopping checklist
Tap to count up. Tap again at the maximum to reset that row. Saved on this device, so it survives switching to the game and back.
ARun-ending if missingBMakes it much easierCSubstitutable
0 / 20
by R1
by R2
by R3
by R4
by R5
by R6
by R7
by R8
by R9
by R11
Every merge
🛡️Leather Armor + 🔧Steel Spike     → 🛡️Spiked Armor (x4) ← +800 max HP each
⚔️Training Sword + 🔧Whetstone      → ⚔️Gladius     ← +60 to ◆ weapons (6 cells)
⚔️Club + ⚔️Throwing Axe            → ⚔️Axe
⚔️Axe + 🔧Blood Stone               → ⚔️Bloodstained Axe         ← +60 each time you take damage
The remaining four 🔧Steel Spike are not merged; place them as they are. One cell for “80 Block + 3 Spike every 4 seconds” is the best value per cell.
The ⚔️Gladius combines with two 🔧Golden Pig into the ⚔️Piggycalibur. This build goes all the way to it (section 10). It keeps the income of 2 coins per shop, and five cells turn into three cells of +60 to ◆ weapons.
Turn the 🔧Warrior Flesh into a 🔧Steak
🔧Warrior Flesh  On battle start: +80 damage to ◆ creatures   ← dead, since we place no creatures
           At 50% HP or below: restore 400 HP (once)

🔧Steak  On battle start: +10% healing effect.
           At 50% HP or below: restore 500 HP and gain 5 Regen. (once)
The ⚔️Torch is a catalyst and is not consumed. No coins and no cells added: a straight upgrade.
The ⚔️Bloodstained Axe is about its late growth, not Vamp
⚔️Bloodstained Axe (Epic, 4 cells)  500 / 2.2s / 85%   ← ⚔️Axe + 🔧Blood Stone
  On battle start: gain 5 Vamp.              ← about 500 over 30s. Do not count on it
  On losing 15% of HP: +60 damage.           ← this is the real point
At Stage 3's damage intake it fires more than 20 times in 30 seconds. Getting ground down is itself your damage. Its upgrade, the ⚔️Blood Frenzy (= ⚔️Bloodstained Axe + ⚔️Assault Spear), deals 600 and adds +100 each time. In the clear it did 10,000 over 12 procs, second only to 🐲Red Dragon.
How many 🛡️Leather Armor you managed to buy
🛡️Spiked Armor is 🛡️Leather Armor (Uncommon) + 🔧Steel Spike (Rare). What limits the count is the 🛡️Leather Armor: it shows up less and less in the later shops. 🔧Steel Spike shows often in the back half, so the plan assumes you can collect up to 7 in total.
For each number of 🛡️Leather Armor you managed to buy, we worked out the best buying order you can build from there. Just drop down from the top row.
| 🛡️Leather Armor | 🔧Steel Spike | Rounds to buy the armor | Thinnest margin | Boss | Total | Verdict |
|---|---|---|---|---|---|---|
| 2 | 7 | R3, R4 | 107% | 107% | 110 coins | Coin flip |
| 3 | 7 | R3, R4, R6 | 113% | 113% | 117 coins | Good odds of winning |
| 4 | 6 | R1, R3, R5, R7 | 106% | 106% | 87 coins | Coin flip |
| 5 | 7 | R3, R4, R6, R8, R10 | 123% | 123% | 117 coins | Good odds of winning |
These values are from before tightening the board. Read the differences between rows.
The buying order on this page is four 🛡️Leather Armor and eight 🔧Steel Spike; with the board tightened it reaches boss 113%.
4. Merges only happen when you clear a round
Anything you buy in a round's shop is still raw material in that round's fight.
This cost us the second attempt. We bought a 🛡️Leather Armor in the R12 shop and thought “that makes three 🛡️Spiked Armor”, but it did not merge. We fought with two and ran out of time 7,619 short (6.8% of the enemy's HP).
Finish any purchase that involves a merge by one round before the round you need it.
5. A Stage 3-only rule — max-HP gains get less efficient every round
The in-game text: “Max HP Increase Efficiency gradually decreases”.
🔴 Giantization (all damage up to +30% in proportion to max HP gained) does not apply to Spike (measured 27 September 2026). However much max HP you stack, Spike stays at 20 per stack; only weapons get the boost. Even so, max HP works four ways, ① defence ③ Flesh Burst ④ healing ⑤ Block gained, so 🛡️Spiked Armor is still the top priority. The numbers on this page are the corrected ones.
efficiency = 98.75% - 3.125% x round95.6% in R1, 83.1% in R5, 61.3% in R12.
You can confirm it from measurements. 🔧Red Dust (+200 max HP) shows 190 in R1 and 166 in R5, matching the calculated 191 and 166.
The earlier you build 🛡️Spiked Armor, the more you get. Built in R12, only 60% of it lands. Stages 1 and 2 have no such penalty, so it is easy to overlook.
6. Building the board (boss fight: 129,571 dealt / 112,000 HP = 113%)
    1    2    3    4    5    6    7    8
A  (□)  PIGC PIGC PIGC BLAX (□)  SPK  (□)
B  FAIR FAIR MEAT STAF BLAX BLAX BLAX (□)
C  FAIR FAIR MEAT STAF ARM  ARM  (□)  SPK
D  (□)  (□)  (□)  STAF ARM  ARM  (□)  (□)
E  ARM  ARM  (□)  ARM  ARM  (□)  ARM  ARM
F  ARM  ARM  SPK  ARM  ARM  SPK  ARM  ARM
PIGC = ⚔️Piggycalibur / FAIR = ⚔️Fairy Dragon / ARM = 🛡️Spiked Armor / BLAX = ⚔️Bloodstained Axe / STAF = ⚔️Staff of Vitality / MEAT = 🔧Warrior Flesh / SPK = 🔧Steel Spike.
Everything you hold in the boss fight
This is what is in hand once every merge is done. It is not the buying order as such.
| Item | Qty | Cells | Total | Position |
|---|---|---|---|---|
| ⚔️Fairy Dragon | 1 | 4 | 4 | B1 |
| 🛡️Spiked Armor | 4 | 4 | 16 | C5, E1, E4, E7 |
| ⚔️Bloodstained Axe | 1 | 4 | 4 | A5 |
| ⚔️Piggycalibur | 1 | 3 | 3 | A2 |
| ⚔️Staff of Vitality (carry-in) | 1 | 3 | 3 | B4 |
| 🔧Warrior Flesh (starting gear) | 1 | 2 | 2 | B3 |
| 🔧Steel Spike | 4 | 1 | 4 | A7, C8, F3, F6 |
13 items, 36 cells (of 48, 12 empty). Fill the gaps with whatever you draw.
12 cells stay empty. This build keeps 13 coins for rerolls, so place whatever you pick up without hesitation. If you draw more 🔧Steel Spike, that is the best use (80 Block + 3 Spike in one cell).
| ◆ source | Effect | What it actually reaches |
|---|---|---|
| ⚔️Piggycalibur (A2) | On battle start: +60 damage to ◆ weapons | ⚔️Fairy Dragon, ⚔️Staff of Vitality, ⚔️Bloodstained Axe |
| 🔧Warrior Flesh (B3) | On battle start: +80 damage to ◆ creatures | ⚔️Fairy Dragon. In this build it is not dead |
| ⚔️Staff of Vitality (B4) | 25% of ◆ items' overheal becomes Block | 🛡️Spiked Armor |
🛡️Spiked Armor and 🔧Steel Spike have no ◆, so they can go anywhere. Decide where the items with ◆ go first, then fill the gaps with the rest.
7. Enemy data for all twelve rounds (measured)
Enemy HP is worked back from the total damage dealt on the result screen's “Attack” tab plus the enemy's remaining HP. However, that tab rounds large numbers, showing them like “16K”. We derive the total from an unrounded row and that row's share (%), so errors of a few hundred remain.
DPS is calculated from the enemy's gear (attack / cooldown x hit rate),
the raw value before your own reductions are applied.
Only values marked * are measured from the result screen; they include
follow-up hits that do not appear in the gear list (such as the five arrows in R9), so they come out higher than the calculated value.
| R | Enemy | Max HP | DPS | Trait |
|---|---|---|---|---|
| R1 | Stout Undead | 3,600 | 117 | Endless Horde x1 |
| R2 | Stout Undead | 3,312 | 145* | Endless Horde x2 |
| R3 | Skeleton Warrior | 10,000 | 151 | +50% crit damage taken |
| R4 | Gargoyle Statue | 15,000 | 179 | Gargoyle's Eye x1 (strips Haste) |
| R5 | Banshee | 12,000 | 193 | Black Scream x2 (-40% weapon damage) |
| R6 | Stout Undead | 11,000 | 218 | Endless Horde x2 |
| R7 | Skeleton Warrior | 28,000 | 243 | +50% crit damage taken |
| R8 | Gargoyle Statue | 36,000 | 394 | Gargoyle's Eye x2, 0.5s Stun while enraged |
| R9 | Skeleton Archer | 44,000 | 443* | Five arrows. The hardest hit before the boss |
| R10 | Banshee | 41,000 | 341 | Black Scream x2 (-40% weapon damage) |
| R11 | Banshee | 52,000 | 364 | Black Scream x2. Largest HP before the boss |
| R12 | Corpse Golem | 112,000 | 289 | Cleanses all Burn at 50% HP |
The boss is 40% lighter than the road to it (289 per second against R9's 443). If you die, it is on the way there; the boss is where you fail to finish the job.
The crunch is only the R12 boss (109%). The road is at least 150% in R1 and R2, and R9 hurts most at 443 per second, but by then your 🛡️Spiked Armor are complete and it sits at 196%.
This is not a build that falls on the way. It comes down to one thing: whether you can finish off the boss.
8. Why Spike — three enemies refuse weapons for three different reasons
| Enemy | Rounds | What it does | Spike |
|---|---|---|---|
| Banshee | R5, R10, R11 | Black Scream x2: -40% weapon damage | Passes straight through |
| Gargoyle Statue | R4, R8 | Gargoyle's Eye: strips 5% of your items' Haste per hit | Irrelevant |
| Corpse Golem | R12 | At 50% HP it cleanses all Burn and cannot be burned afterwards | Irrelevant |
Spike triggers on the number of times the enemy hits you. Your speed and your weapon damage do not matter. Spike is the only thing that slips past all three at once.
On top of that, 🛡️Spiked Armor hands out +800 max HP. Bjorn's Giantization (all damage up to +30% in proportion to max HP gained) depends on max HP, so defence and offence grow from the same purchase.
🔧Steel Spike (Rare, 6 coins) is “80 Block + 3 Spike every 4 seconds” in a single cell. Cell efficiency matters more toward the end, when the 48-cell board fills up. As a place for spare coins, it is the safest choice.
9. Deleting the Stout Undead heal
The Stout Undead in R1, R2 and R6 carries Endless Horde (on lethal damage: 0.5s invulnerability and a full heal). The tooltip says “once per battle”, but R2 and R6 carry two copies and it fires twice.
Healing reduction stacks additively.
❄️Ice Reaper    40%   ← pet. this build uses only this
⚔️Candlestick    50%   ← ⚔️Spear (6) + ⚔️Torch (6) merged
⚔️Torch    15%
            ----
             105%   all three and the heal is zero
This build gets through with only the 40% from ❄️Ice Reaper. ⚔️Spear + two ⚔️Torch cost 18 coins, yet they only matter in three fights: R1, R2 and R6. Putting those 18 coins into 🔧Steel Spike and rerolls raises the margin across the whole run.
Fire ❄️Ice Reaper in R2 and R6. That brings effective HP down from 2.4x to 2.2x. R2 is at 150% and R6 at 177%, so that is enough.
If you get the ⚔️Spear and ⚔️Torch cheaply, by all means build it.
| What you have | R2 effective HP | R6 effective HP |
|---|---|---|
| 105% (all three) | 3,312 | 11,000 |
| 55% (no ⚔️Candlestick) | 7,286 | 20,900 |
Buy two ⚔️Torch. One is consumed as an ingredient of the ⚔️Candlestick. The ⚔️Spear can also turn into the ⚔️Assault Spear, so lock the ⚔️Spear too until the ⚔️Candlestick is built; it prevents accidents.
10. Turn two 🔧Golden Pig into the ⚔️Piggycalibur
Without watching a single advert, you get 99 coins over twelve rounds.
🔧Golden Pig (Common, 4 coins, 1 cell)
  On entering the shop: gain 1 coin.
  On battle start: +60 max HP per ◆ tool.
Buy two in R1 for +22 coins of income. You have 121 coins to work with instead of 99.
And the two become the ⚔️Piggycalibur
⚔️Gladius + 🔧Golden Pig + 🔧Golden Pig → ⚔️Piggycalibur
  On entering the shop: gain 2 coins.        ← the same as the two pigs
  On battle start: +60 damage to ◆ weapons.
Your income does not drop. On top of that, five cells (pig 1 + pig 1 + ⚔️Gladius 3) shrink into a single three-cell weapon. The ⚔️Gladius is a ⚔️Training Sword + a 🔧Whetstone, both Common items that show up easily.
On the boss board, this is the one item handing out +60 to ◆ weapons (it lands on the ⚔️Fairy Dragon, the ⚔️Staff of Vitality and the ⚔️Bloodstained Axe).
Until 27 September 2026 we wrote “do not buy the pigs”
Back then the reason was reroll money. Collecting eight 🔧Steel Spike means rerolling until they appear on the shelf, and buying pigs eats that money: that was the logic.
Once we found that Giantization does not apply to Spike, pushing through with Spike lost value. Turning the income into the ⚔️Fairy Dragon and the ⚔️Piggycalibur is stronger, and 13 coins are still left for rerolls (108 spent, 121 in hand).
Sale items buy and sell for the same price (normal items sell for half, rounded up). Even weapons or armor that are not on the list are fine to buy when you see them on sale; sell them when you no longer need them. Always grab 🔧Steel Spike (6 coins) and 🛡️Leather Armor (4 coins) on sale.
11. The clear
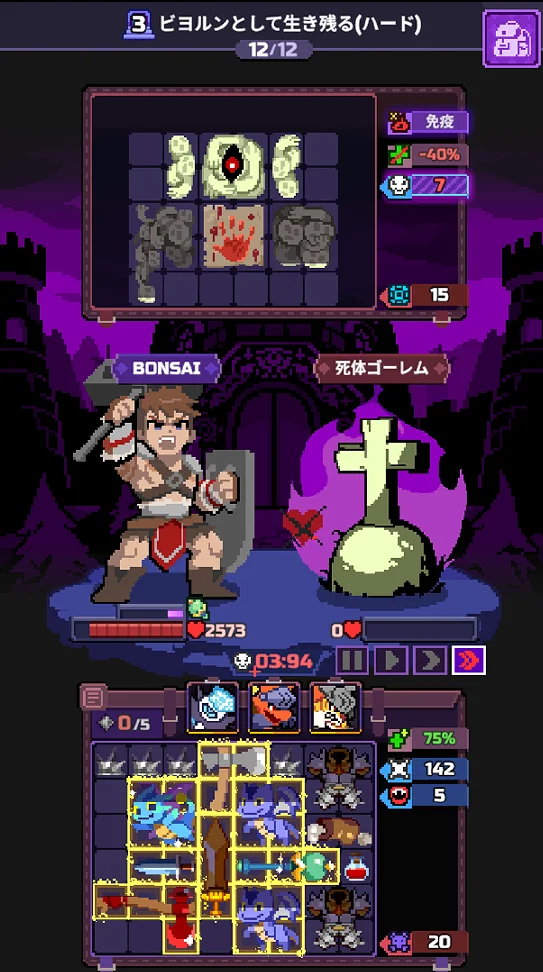
On 30 September 2026 we cleared it again without using a retry. The boss Corpse Golem went down with 2,573 HP left. The pets in the boss fight were all three: 🐲Red Dragon, 🐯Tiger and ❄️Ice Reaper.
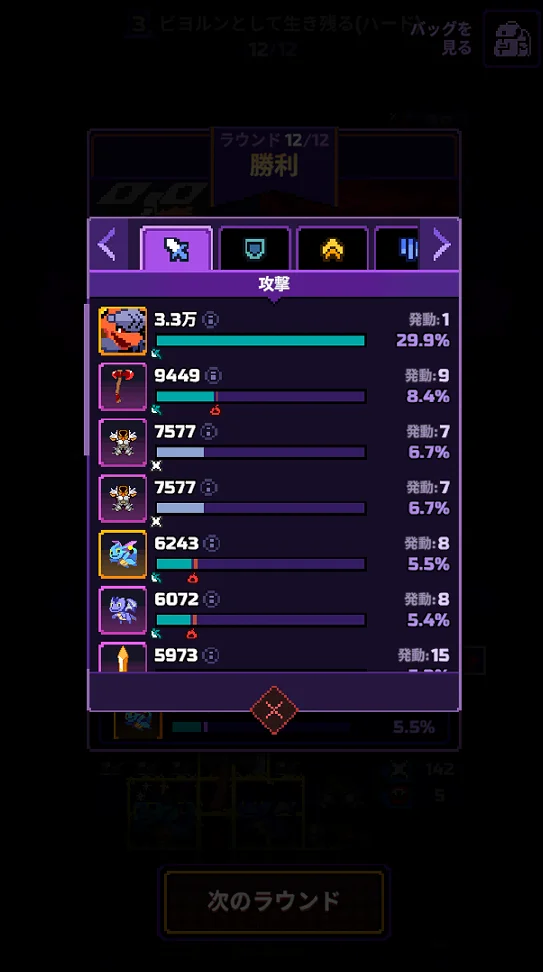
| Source | Damage | Share | Procs |
|---|---|---|---|
| 🐲Red Dragon | 33K | 29.9% | 1 |
| ⚔️Bloodstained Axe | 9,449 | 8.4% | 9 |
| 🛡️Spiked Armor (two, each) | 7,577 each | 6.7% each | 7 |
| ⚔️Fairy Dragon | 6,243 | 5.5% | 8 |
| ⚔️Dragon | 6,072 | 5.4% | 8 |
| ⚔️Piggycalibur | 5,973 | about 5.3% | 15 |
Total damage dealt was about 112,000 (worked back from 9,449 / 8.4%), consistent with the boss's 112,000 HP. This run had two 🛡️Spiked Armor, three 🔧Steel Spike (unmerged), the ⚔️Fairy Dragon, two ⚔️Dragon, the ⚔️Bloodstained Axe and the ⚔️Piggycalibur, and the pets went R1 🐲Red Dragon + ❄️Ice Reaper / R2 🐯Tiger / R6 ❄️Ice Reaper / R8 🐲Red Dragon + 🐯Tiger / R12 🐲Red Dragon + 🐯Tiger + ❄️Ice Reaper.
R8 (Gargoyle Statue) and R9 (Skeleton Archer) get much easier with just one cheap defensive item added, such as an 🔧HP Potion, a 🛡️Buckler or a 🛡️Leather Helmet. The previous run went into R8 with no defensive item and fell with 383 left.
The previous clear
33K    29.6%  1 proc    🐲Red Dragon
10K     9.5%  12 procs  ⚔️Blood Frenzy (old build)
10K     8.9%  8 procs   🛡️Spiked Armor
7,130         5 procs   🔧Steel Spike
Total damage 111,486 (worked back from 33,000 / 29.6%), consistent with the boss's 112,000 HP. 0.10 seconds were left.
As in Stage 1 (🐲Red Dragon at 29.7%), one main gun takes 30%. That is different from Stage 2, where the win comes from pushing with sheer volume.
12. FAQ
How much HP does the Stage 3 final boss have?
The Corpse Golem has 112,000. Once its HP drops below 50% it cleanses all Burn and cannot be burned again. It deals 289 per second, about 40% lighter than the Skeleton Archer on the way there (443). If you die, it is on the way there; the boss is where you fail to finish the job.
Why build around Spike?
In Stage 3, three kinds of enemies each make weapons hard to land, each for a different reason. Banshee cuts weapon damage by 40%, Gargoyle Statue strips Haste from your items, and the boss cleanses all Burn. Spike slips past all three. Spike triggers on the number of times the enemy hits you, so neither your speed nor your weapon damage matters to it.
What should I carry in?
The ⚔️Staff of Vitality. Swap in ⚔️Thunderbolt Spike or ⚔️Everfrozen and run the numbers, and you fail to last 30 seconds in 8 of rounds R1-R9. Your max HP only reaches around 3,000, while enemies deal 289 to 443 per second. The 1,250 heal every 8 seconds and “25% of overheal becomes Block” are the backbone of survival.
Which pets should I pick?
The three: ❄️Ice Reaper, 🐲Red Dragon and 🐯Tiger. 🧊Yeti is not needed: Stage 3 has no Stun traps. Fire them early: 🐲Red Dragon in R1, 🐯Tiger + ❄️Ice Reaper in R2. Buying two 🔧Golden Pig first leaves the early board thin, and R1 is the thinnest round at 109%. Pets cannot be changed once chosen.
Can Vamp cover my healing?
No. Vamp is 10 HP on 50% of hits, and stacking it does not change the heal per proc. Even at 14 Vamp it comes to about 500 over 30 seconds. The reason to buy the ⚔️Bloodstained Axe is not its Vamp but “on losing 15% of HP: +60 damage”.
What I bought in the round 12 shop did not merge
Merges only happen when you clear a round. Anything bought in that round's shop is still raw material in that fight. This cost us one run. Finish any purchase that involves a merge by one round before the round you need it.
Does the Stage 1 or Stage 2 build work here?
No. The Stage 1 Burn build stalls halfway because the boss cleanses all Burn. The Stage 2 push-with-volume build is eroded by the 40% weapon damage cut and the Haste strip. Stage 3 alone also has a rule that makes max-HP gains less efficient every round.
What not to buy
- ❌🔧Berserk Potion — “every 3.5 seconds lose 300 HP, increasing by 100 each proc” = 5,200 self-damage over 30 seconds from a single one. With three of them we fell in R11 at 15.6 seconds. 🔧HP Potion and 🔧Red Dust merge on their own when adjacent, so mind where you put them
- ⚔️Boulder — it adds “+50% damage to all weapons”, but also “all items 30% slower”. 🛡️Spiked Armor (every 3.5 seconds) is the main damage, and the slowdown stacks with the Gargoyle Statue Haste strip, so it is a net loss
- Do not rate ⚔️Rock per second — it attacks only once per battle. Buying it is not a loss in itself (1 coin to buy, 1 coin to sell)
Measuring tricks
Tap a row on the result screen and a breakdown bubble appears.
🔧Red Dust
  Total defensive damage: 262
  Healing:                 96
  Max HP increase:        166
“Healing” and “Max HP increase” are shown separately, so you can check the decay in max-HP efficiency from section 4 on the spot.
The top number on the attack tab divided by its share = total damage dealt. Add the enemy's remaining HP and you can work back its effective HP. Useful when comparing builds.
Contact
Corrections, data fixes, or anything else about this site. Leave an email address if you would like a reply.