 Arua Raven
“Surviving Overgeared Hero as a Barbarian”
Labyrinth of Rafdonia
Arua Raven — Stage 6 Hard, a build that cleared
Updated 18 October 2026 · this is a build we actually cleared with
Stage 6 Hard with the wizard Arua Raven. The final boss is Dryad (97,000 HP). We cleared it on run 32, without a retry. The boss went down in 16.5 seconds, at full HP.
The short version
- The main damage is ⚔️Thunder Dragon: 78,000 in the boss fight (79.7% of the total). We fired 🎁Mimic in R10 and merged it on the spot in the shop screen
- Four 🔧Transformation Magic: Spell Amplification placed around ⚔️Thunder Dragon, plus ⚔️Maestro, ⚔️Fairy Dragon and two more ⚔️Dragon
- ❄️Ice Reaper every time against Half-Troll (R2, R6, R10, R11). It regenerates when hit, so never drop the −40% healing
- R6 and R8 are the walls. Have ⚔️Wyrdwood Staff and ⚔️Advanced Magic: Thunderstrike working by the end of R5
- Complete the Sunspot Sphere quest (10 seconds without damage) by R4. Put down Block from R1
- Carry in ⚔️Staff of Vitality. Pets: ❄️Ice Reaper, 🐲Red Dragon, 🎁Mimic. The boss fell to ❄️Ice Reaper alone
1. Stage 6 enemies and the trait
The trait is “shop penalty: shop reroll cost increases by 1 coin”. The screen shows 2 coins per reroll (buy 🔧Reroll Sale Card and two rerolls per round are free). Arua Raven's traits, Sunspot Sphere and starting gear are on the Stage 1 page.
| R | Enemy | HP | Watch out |
|---|---|---|---|
| 1 | Skeleton Warrior | 6,750 | |
| 2 | Half-Troll | 7,452 | Regenerates when hit |
| 3 | Skeleton Archer | 11,000 | |
| 4 | Elisa Behenk | 12,000 | Burns you when you heal |
| 5 | Skeleton Warrior | 19,000 | |
| 6 | Half-Troll | 20,000 | Regenerates. Easy to time out |
| 7 | Skeleton Archer | 32,000 | |
| 8 | Elisa Behenk | 30,000 | Burns on heal. Runs 4–7 stopped here |
| 9 | Skeleton Archer | 49,000 | |
| 10 | Half-Troll | 52,000 | Regenerates |
| 11 | Half-Troll | 68,000 | Regenerates |
| 12 | Dryad | 97,000 | Final boss. Seals an item for 0.5 seconds on hit; turns half your buffs into debuffs |
2. When to fire the three pets
❄️Ice Reaper (cost 1) / 🐲Red Dragon (cost 2) / 🎁Mimic (cost 1)Power is 5. It refills to 5 when you clear R4 and when you clear R8.
| R | Fire | Why |
|---|---|---|
| R1 | — | |
| R2 | ❄️Ice Reaper | −40% to Half-Troll's regeneration |
| R3 | ❄️Ice Reaper | |
| R4 | 🐲Red Dragon ❄️Ice Reaper | Elisa Behenk. Refills to 5 on the clear, so spend it all |
| R5 | — | |
| R6 | ❄️Ice Reaper | Half-Troll 20,000. Add 🐲Red Dragon if the previous round took over 20 seconds |
| R7 | ❄️Ice Reaper | Skeleton Archer 32,000 (1.6x R6) |
| R8 | 🐲Red Dragon ❄️Ice Reaper | Elisa Behenk 30,000. Refills to 5 on the clear |
| R9 | ❄️Ice Reaper | |
| R10 | 🎁Mimic ❄️Ice Reaper | Merge ⚔️Thunder Dragon on the spot in the shop screen; ❄️Ice Reaper for Half-Troll |
| R11 | ❄️Ice Reaper | Half-Troll 68,000 |
| R12 | ❄️Ice Reaper | Dryad. 16.5 seconds with ⚔️Thunder Dragon |
🎁Mimic lets you merge on the spot in the shop screen (normally merges happen when you clear the round). Each use advances one step only.
3. How to make ⚔️Thunder Dragon
⚔️Intermediate Magic: Spark x2                                   → ⚔️Advanced Magic: Thunderstrike
⚔️Advanced Magic: Thunderstrike + 🔧Synergy Spell: Drizzle       → ⚔️Fusion Magic: Lightning Storm
⚔️Fusion Magic: Lightning Storm + ⚔️Dragon (starting gear) → ⚔️Thunder Dragon (Legendary)
⚔️Training Staff + 🔧Wyrd Branch                   → ⚔️Wyrdwood Staff
🔧Whetstone + ⚔️Beginner Magic: Energy Bolt                   → 🔧Magic Stone
⚔️Wyrdwood Staff + 🔧Magic Stone                         → ⚔️Archmage's Staff
⚔️Archmage's Staff + ⚔️Whip                             → ⚔️Maestro
⚔️Dragon + ⚔️Fairy                                     → ⚔️Fairy Dragon
⚔️Torch + ⚔️Spear → ⚔️Candlestick (enemy healing −50%)- ⚔️Thunder Dragon: attacks 0–2 extra times; 15% Haste to the Staff in its ◆ at the start of battle; crits while the enemy is stunned (+7% crit damage)
- Four 🔧Transformation Magic: Spell Amplification around ⚔️Thunder Dragon, placed so it is inside their effect range (◆)
- ⚔️Maestro, ⚔️Fairy Dragon and two more ⚔️Dragon
- Don't put ⚔️Torch next to ⚔️Wyrdwood Staff (they merge into a different staff and you lose the ⚔️Candlestick)
4. What to have, and by when
“By” is the round by which the merge materials must be on the board. A merge happens when you clear that round (or right away in the shop if you fire 🎁Mimic). These deadlines are guidelines drawn from the clearing board and the runs that reached the boss.
| By | Item | Qty | Why by then |
|---|---|---|---|
| R1 | 🛡️Leather Armor, 🛡️Leather Helmet | 1 each | Block banks no-damage seconds for the Sunspot Sphere quest by R4 |
| R3 | ⚔️Intermediate Magic: Spark | 2 | → ⚔️Advanced Magic: Thunderstrike. Prevents the R6 time-out |
| R3 | ⚔️Training Staff + 🔧Wyrd Branch | 1 each | → ⚔️Wyrdwood Staff |
| R5 | ⚔️Torch + ⚔️Spear | 1 each | → ⚔️Candlestick for Half-Troll in R6, R10, R11 |
| R8 | 🔧Transformation Magic: Spell Amplification | 1–2 | Boost ⚔️Advanced Magic: Thunderstrike (later ⚔️Thunder Dragon) |
| R9 | 🔧Synergy Spell: Drizzle (next to ⚔️Advanced Magic: Thunderstrike) | 1 | → ⚔️Fusion Magic: Lightning Storm |
| R9 | ⚔️Dragon (second) + ⚔️Fairy | 1 each | → ⚔️Fairy Dragon |
| R10 | ⚔️Fusion Magic: Lightning Storm next to the starting ⚔️Dragon | — | → ⚔️Thunder Dragon. Fire 🎁Mimic in R10 to merge it on the spot |
| R11 | 🔧Whetstone + ⚔️Beginner Magic: Energy Bolt, ⚔️Whip | 1 each | → 🔧Magic Stone → ⚔️Archmage's Staff → ⚔️Maestro |
| R11 | 🔧Transformation Magic: Spell Amplification (third and fourth) | 2 | Place them so ⚔️Thunder Dragon is inside their effect range (◆) |
| R11 | ⚔️Dragon (third) | 1 | Damage |
| R11 | 🛡️Leather Gloves | 2 | 15% Haste to the items in its ◆ |
Shopping checklist
Tap to count up. Tap again at the maximum to reset that row. Saved on this device, so it survives switching to the game and back.
ARun-ending if missingBMakes it much easierCSubstitutable
0 / 24
by R1
by R3
by R5
by R9
by R11
5. The R6 and R8 walls
Of 32 runs, most of the 31 that failed stopped at R6 or R8.
- R6 (Half-Troll 20,000, regenerates): runs 10, 12, 13, 19, 24, 29 and 30 were lost here (mostly time-outs). What they had in common: neither ⚔️Wyrdwood Staff nor ⚔️Advanced Magic: Thunderstrike was working by the end of R5. Runs that had two ⚔️Intermediate Magic: Spark and the staff materials by R3 got through R6 (runs 14 and 16 in about 17 seconds)
- R8 (Elisa Behenk 30,000): runs 4–7, 18 and 22 were lost here. Fire 🐲Red Dragon ❄️Ice Reaper and have 🔧Transformation Magic: Spell Amplification on ⚔️Advanced Magic: Thunderstrike
- Don't lose with power left. Run 17 skipped ❄️Ice Reaper in R5 and lost with 840 left; run 19 lost R6 with 4 power unused and 3,168 left. If the previous round took over 20 seconds, fire
6. Time taken, round by round (run 32, the clear)
| R | Enemy | Pets | Time | HP left |
|---|---|---|---|---|
| 1 | Skeleton Warrior | — | 17.2 s | 2,060 |
| 2 | Half-Troll | ❄️Ice Reaper | 6.5 s | 2,060 |
| 3 | Skeleton Archer | ❄️Ice Reaper | 17.4 s | 1,989 |
| 4 | Elisa Behenk | 🐲Red Dragon ❄️Ice Reaper | 17.5 s | 2,000 |
| 5 | Skeleton Warrior | — | 18.5 s | 1,986 |
| 6 | Half-Troll | ❄️Ice Reaper | 23.8 s | 1,441 |
| 7 | Skeleton Archer | ❄️Ice Reaper | 21.7 s | 1,148 |
| 8 | Elisa Behenk | 🐲Red Dragon ❄️Ice Reaper | 21.0 s | 1,469 |
| 9 | Skeleton Archer | ❄️Ice Reaper | 19.1 s | 1,409 |
| 10 | Half-Troll | 🎁Mimic ❄️Ice Reaper | 19.0 s | 1,705 |
| 11 | Half-Troll | ❄️Ice Reaper | 17.5 s | 1,647 |
| 12 | Dryad | ❄️Ice Reaper | 16.5 s | 2,000 |
R6–R8 went over 20 seconds, but there was enough defense to get through. Once ⚔️Thunder Dragon was in place in R10, rounds got shorter even as enemy HP grew.
7. The board at the clear (shop before the boss)
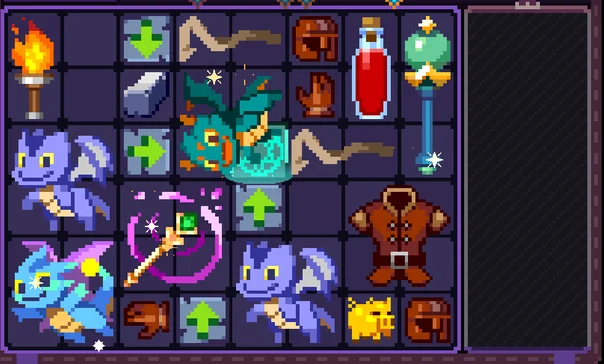
- Damage: ⚔️Thunder Dragon, four 🔧Transformation Magic: Spell Amplification, ⚔️Maestro, ⚔️Fairy Dragon, two ⚔️Dragon, two ⚔️Training Staff, ⚔️Torch, 🔧Whetstone
- Defense: ⚔️Staff of Vitality, 🔧Large HP Potion, 🛡️Leather Armor, two 🛡️Leather Helmet
- Haste: two 🛡️Leather Gloves (15% Haste to the items in its ◆)
- Other: 🔧Golden Pig
8. Results screen at the clear
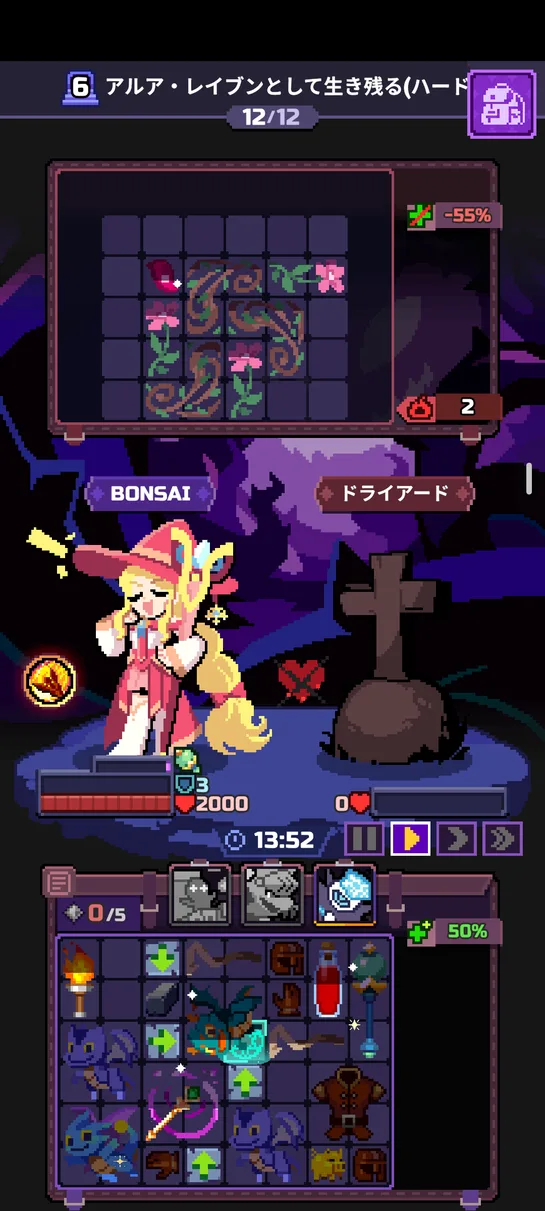
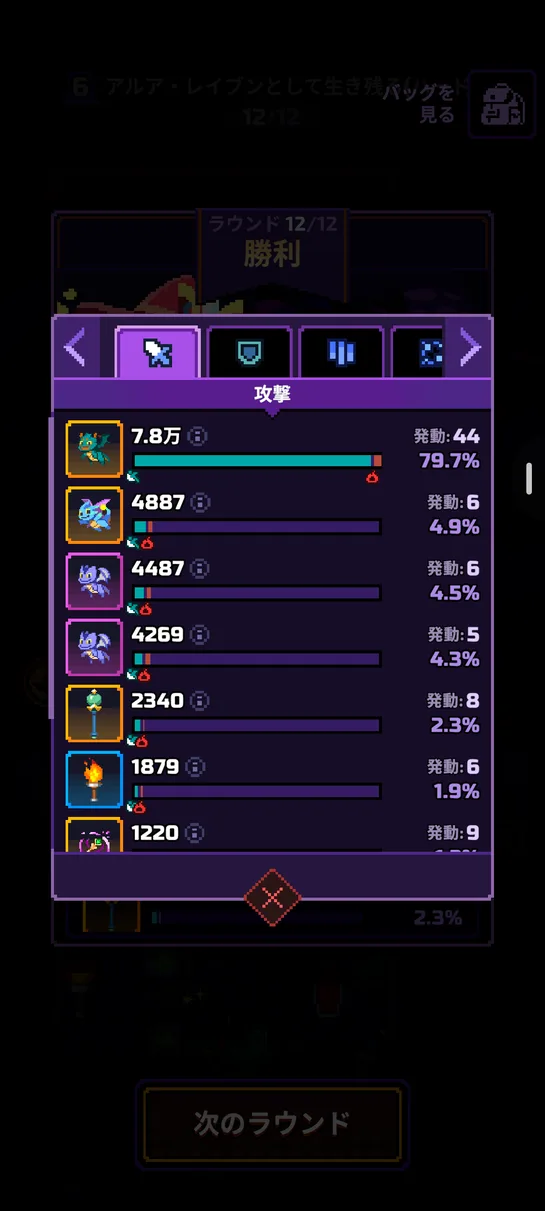
| Source | Damage | Share |
|---|---|---|
| ⚔️Thunder Dragon (44 procs) | 78,000 | 79.7% |
| ⚔️Fairy Dragon (6 procs) | 4,887 | 4.9% |
| ⚔️Dragon (6 procs) | 4,487 | 4.5% |
| ⚔️Dragon (5 procs) | 4,269 | 4.3% |
| ⚔️Staff of Vitality (8 procs) | 2,340 | 2.3% |
| ⚔️Torch (6 procs) | 1,879 | 1.9% |
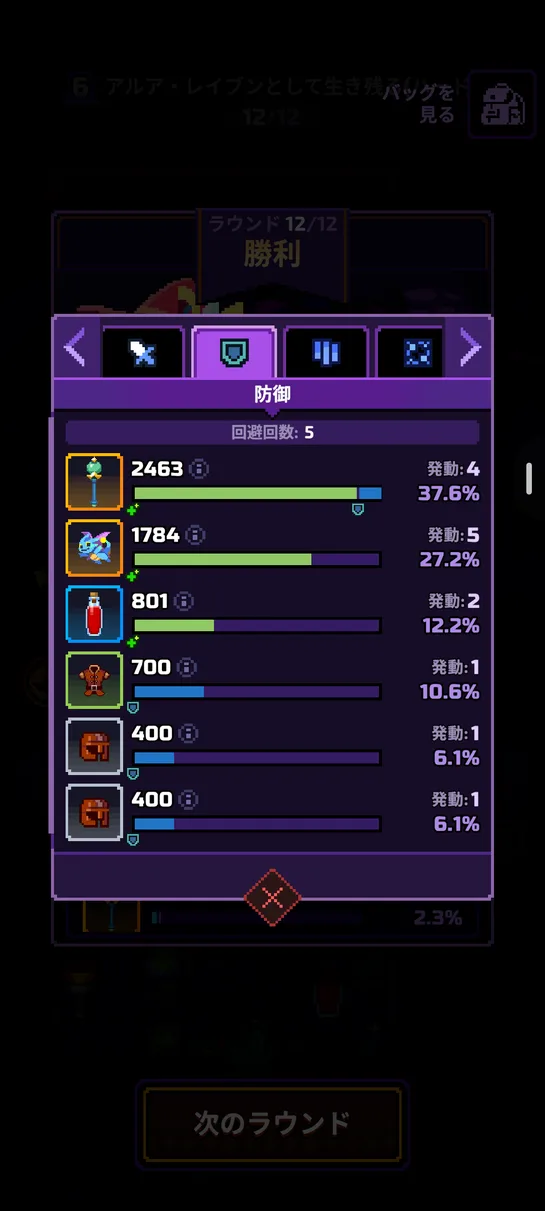
Defense: 5 dodges, ⚔️Staff of Vitality 2,463, ⚔️Fairy Dragon 1,784, 🔧Large HP Potion 801, 🛡️Leather Armor 700, 🛡️Leather Helmet 400 x2. Debuffs applied: ❄️Ice Reaper 15, ⚔️Dragon 12, 12, 10, ⚔️Torch 4. Debuffs removed: Sunspot Sphere 47.
9. FAQ
Which pets for Stage 6?
❄️Ice Reaper, 🐲Red Dragon and 🎁Mimic. We fired R2 ❄️Ice Reaper / R3 ❄️Ice Reaper / R4 🐲Red Dragon ❄️Ice Reaper / R6 ❄️Ice Reaper / R7 ❄️Ice Reaper / R8 🐲Red Dragon ❄️Ice Reaper / R9 ❄️Ice Reaper / R10 🎁Mimic ❄️Ice Reaper / R11 ❄️Ice Reaper / boss ❄️Ice Reaper. R1 and R5 were cleared without pets.
Why ❄️Ice Reaper?
Half-Troll shows up four times (R2, R6, R10, R11) and regenerates every time it is hit. Put the −40% healing from ❄️Ice Reaper on it every time. Stacked with ⚔️Candlestick (−50% healing) and ⚔️Torch (−15%) it reaches −105%. Run 11 skipped ❄️Ice Reaper in R10, the regeneration stacked to 83, and the run was lost.
Don't I need to save 🐲Red Dragon for the boss?
The clearing run fired only ❄️Ice Reaper at the boss. With ⚔️Thunder Dragon inside the range of four 🔧Transformation Magic: Spell Amplification, Dryad (97,000) went down in 16.5 seconds at full HP. The 5 power for R9–R12 went R9 ❄️Ice Reaper / R10 🎁Mimic ❄️Ice Reaper / R11 ❄️Ice Reaper / boss ❄️Ice Reaper.
Where do runs usually fail?
R6 Half-Troll (20,000, regenerates) and R8 Elisa Behenk (30,000). In R6, if neither ⚔️Wyrdwood Staff nor ⚔️Advanced Magic: Thunderstrike is working by the end of R5, you can't finish it in 30 seconds and time runs out. If the previous round took over 20 seconds, add pets.
Did you get Sunspot Sphere?
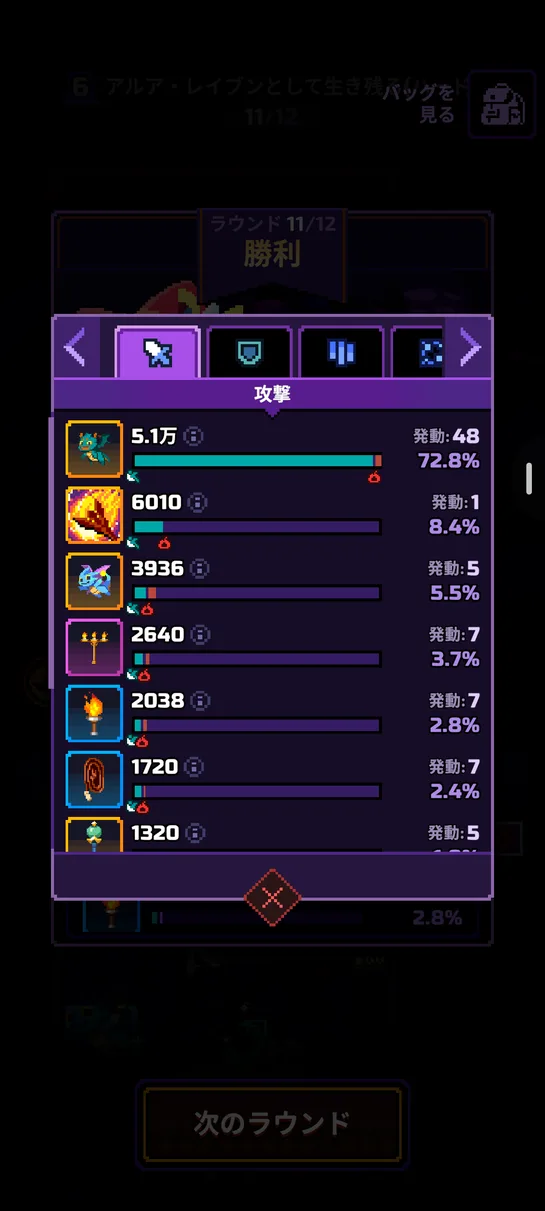
Yes (6,010 in R11, and 47 debuffs removed in the boss fight). Sunspot Sphere is the effect of a skin you can use on Arua Raven's stages: complete the quest “take no HP damage for 10 seconds in battle” by R4 and it fires 15 seconds into every later battle. Put down 🛡️Leather Armor and 🛡️Leather Helmet from R1 for Block to bank the no-damage seconds.
What should I carry in?
The clear carried ⚔️Staff of Vitality. In the boss fight it healed 2,463, nearly 40% of all defense. Elisa Behenk in R4 and R8 burns you when you heal, but every lost run was lost to low damage (time-outs), not to the burn.
Don't
- ❌ Skip ❄️Ice Reaper against Half-Troll (R2, R6, R10, R11) — the regeneration stacks and you can't finish it
- ❌ Go into R6 with no staff and no ⚔️Intermediate Magic: Spark by R5 (time-out)
- ❌ Move on with power left when the previous round took over 20 seconds
- ❌ Put ⚔️Torch next to ⚔️Wyrdwood Staff (it merges into a different staff and you can't make ⚔️Candlestick)
- ❌ Skip defense in R1–R4 (you miss the Sunspot Sphere quest)
Contact
Corrections, data fixes, or anything else about this site. Leave an email address if you would like a reply.