 Bjorn
“Surviving Overgeared Hero as a Barbarian”
Labyrinth of Rafdonia
Bjorn — Stage 7 Hard, a build that cleared
Updated 1 October 2026 · this is a build we actually cleared with
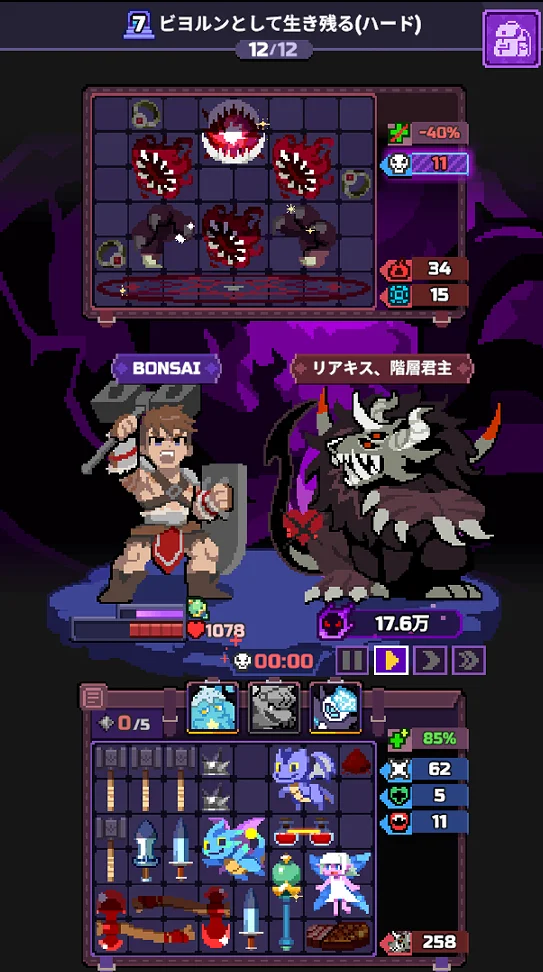
The final boss is Riakis, Lord of Floor. It is a boss you cannot kill: survive 30 seconds and you win. Every boss attack is a percentage of your max HP, and it speeds up with Riakis's Shadow, which stacks for every second you spend fighting on the way. On our 16th run we cleared without using a retry (survived 30 seconds on the first boss attempt, 1,078 HP left).
The short version
- Carry in the ⚔️Staff of Vitality. Pets: 🪼Jellyfish Princess, 🐲Red Dragon, ❄️Ice Reaper
- R4 all three / R7 ❄️Ice Reaper / R8 🐲Red Dragon + 🪼Jellyfish Princess / R11 🪼Jellyfish Princess / R12 🪼Jellyfish Princess + ❄️Ice Reaper. Fire nothing anywhere else
- Hold the boss with “four ⚔️Combat Hammer (Stun) + two ⚔️Bloodstained Axe (Vamp) + the ⚔️Staff of Vitality”
- Vamp produced 40% of the healing. The hits from hammers and swords are what keep Vamp turning
- Always buy 🔧Steel Spike on sight. Without a 🛡️Spiked Armor you die to the R8 Carnivaro
- Sell the 🛡️Spiked Armor for the boss. More max HP means bigger percentage hits
- Do not make a ⚔️Candlestick (no enemy in Stage 7 heals)
How to read “margin”
On this site, margin (%) is “damage you can deal in 30 seconds ÷ the enemy's effective HP”. At 100% you exactly finish the enemy off.
| 130% or more | Almost certain win |
| 110-130% | Likely win |
| 90-110% | Coin flip. Needs rerolls and a tight board |
| Under 90% | Unfavourable. Add a pet or reroll more |
How accurate is it (as of 28 September 2026)
Checked against result screens from actual runs.
- Stage 1 boss: we won with the buy order on that page, and the model agrees
- Stage 5 (seven rounds lost on time): modelled vs measured weapon damage ratio is 0.88-1.11
- Stage 2 boss: we actually won with two 🛡️Spiked Armor, but the model says it falls short. The model is pessimistic about this boss
What misses most is “how many seconds until you die”, not damage. Builds with more healing or Block stay standing longer in practice than the model says.
Do not read “101% means a win” or “92% means a loss”. Each fight also swings ±10% on its own. Spike fires on 50% of the hits you take, which is only around 70 rolls in 30 seconds.
“Effective HP” is not raw HP. It adds the enemy's heals and revives. Cutting enemy healing lowers this effective HP.
And even with enough damage, you lose if you die first. That is what “dead” means in the tables, and it is separate from the margin %.
1. Carry in the ⚔️Staff of Vitality
Bjorn starts with the ⚔️Throwing Axe and the 🔧Warrior Flesh. On top of that you can carry in exactly one S-Legendary. Stage 7 offers these nine.
⚔️Spiral Spear / ⚔️Elderwood Bow / ⚔️Staff of Vitality / ⚔️Meteor Hammer / ⚔️Deathrattle
⚔️Primal Flame / ⚔️Omnicleaver / ⚔️Divine Smite / ⚔️Thunderbolt Spike
We cleared with the ⚔️Staff of Vitality.
⚔️Staff of Vitality
  [Skill] Rapid Healing: restore 1,000 HP and gain +25% healing effect (every 8s)
Converts 25% of the overheal produced by skills and range items into Block- This stage is about lasting 30 seconds against a boss you cannot kill, so you need a healing pillar. In the boss fight of the clear, the staff alone healed 3,319
- Its heal is a fixed amount, not a share of max HP, so the lower you keep your max HP, the more each heal counts
- In the calculation with the ⚔️Thunderbolt Spike swapped in, you die first on the way in R3 and R6, and your damage drops too
2. Rules only Stage 7 has
| Enemy | Trick | Counter |
|---|---|---|
| Wraith (R1, R2, R7, R9, R11) | Fadecloth: -20% weapon damage taken (two of them in R9 and R11) | Push with the number of weapons. R7 and R11 are the peaks on the way |
| Skeletons (R3, R5, R6, R10) | Skeleton Core: +50% crit damage taken (Bjorn has 0% Crit, so it does not matter) | Rounds you lose on time. Weapons over defence |
| Carnivaro (R4, R8) | A crit hit wipes all your Block / Mana Mine removes your Dodge | Rounds you lose by dying. R8 takes 🛡️Spiked Armor + 🐲Red Dragon + 🪼Jellyfish Princess |
| Riakis, Lord of Floor (R12) | Cannot be killed. Survive 30 seconds to win. Every attack is a share of your max HP | Stun (hammers) + healing (Vamp, staff) |
Riakis's Shadow (Evil Hiatus) — measured values
The boss's tool Evil Hiatus raises the boss's item Haste and Accuracy in proportion to its Riakis's Shadow stacks. The stacks build once per second of battle time in R1-R11 and do not go away before R12. They keep growing during the boss fight too. (Below, just “stacks”.)
| Boss item | Base value | At 261 stacks (shown mid-fight) |
|---|---|---|
| Shadowmaw | Every 9.2s, 7 hits x 5% of max HP, 100% Accuracy | Every 3.2s, Accuracy over 100% |
| Spirit of Chaos x3 | Every 3.1s, 2% of max HP, 40% Accuracy | Every 1.1s, Accuracy over 100% |
| Riakis's Claw x2 | Every 1.9s, 2 hits x 3%, 10% Accuracy | Every 0.7s, 75% Accuracy |
- Per stack: item Haste +0.7%, Accuracy +0.25 points (all three items' cooldowns match base / (1 + 0.007 x 261))
- At 260 stacks the boss deals about 32% of your max HP per second. At 0 stacks it would be 5-8%
- Kill things in 22 seconds on average on the way and you arrive at 260 stacks; 15 seconds on average and it is 165. The faster you kill, the weaker the boss
- On the pre-battle lineup screen the counter next to the boss shows 0, but the running total kicks in the moment the fight starts
- While the hammers have the boss stunned, the stacks do not grow either. In a boss fight with 6 seconds of Stun, the stacks went up by +24 over 30 seconds
3. How to fire the three pets
🪼Jellyfish Princess (2 power) / 🐲Red Dragon (2) / ❄️Ice Reaper (1)Power comes in blocks of 5 and refills “when you clear” R4 and R8 (R1-R4 / R5-R8 / R9-R12). 🐲Red Dragon, 🪼Jellyfish Princess and ❄️Ice Reaper cost exactly 5 together, so you can fire all three in R4.
| R | Fire | Left in that block | Why |
|---|---|---|---|
| R4 | 🐲Red Dragon + 🪼Jellyfish Princess + ❄️Ice Reaper | 5 → 0 | Carnivaro, first time. Get through R1-R3 without firing |
| R5, R6 | None | 5 | At 130% or more on paper you get through without pets. If it is short, 🪼Jellyfish Princess |
| R7 | ❄️Ice Reaper | 5 → 4 | Wraith (Fadecloth). ❄️Ice Reaper's Freeze 15 slows the enemy and makes a big difference to your HP left |
| R8 | 🐲Red Dragon + 🪼Jellyfish Princess | 4 → 0 | Carnivaro, second time. You need both here |
| R9, R10 | None | 5 | Clearable once your ⚔️Dragon and ⚔️Combat Hammer are in place |
| R11 | 🪼Jellyfish Princess | 5 → 3 | The toughest Wraith (83,000 HP). The clearing run had 0.7 seconds left |
| R12 | 🪼Jellyfish Princess + ❄️Ice Reaper | 3 → 0 | The boss does not need 🐲Red Dragon's damage. Hold on with 800 Block and Freeze 15 |
In Stage 7, ❄️Ice Reaper is there for “Freeze 15 (enemy items 15% slower)”, not for healing reduction. No enemy in Stage 7 heals.
❄️Ice Reaper adds no damage. Use 🪼Jellyfish Princess for rounds that are short on paper, and ❄️Ice Reaper for rounds that are enough on paper where your only worry is dying.
4. What to have, and by when
Read this as “have this in hand by this round”. What the shop shows is luck, so this is not a round-by-round buying order. Anything involving a merge is due one round before the round you want to use it in.
| By | Item | Qty | Why by then |
|---|---|---|---|
| R2 | Any weapons | 2 | Three weapons by R3. A ⚔️Club next to the ⚔️Throwing Axe makes an ⚔️Axe. With only two weapons at R3 you lose on time |
| R3 | 🔧HP Potion | 2 | Clear with them adjacent → 🔧Large HP Potion. Defence for R8 |
| R6 | 🔧Steel Spike | 1 | 🔴Rare. Always buy it on sight, ahead of weapons. Helps both your damage in R5-R7 and your defence in R8 |
| R6 | 🛡️Leather Armor | 1 | Clear next to the 🔧Steel Spike → 🛡️Spiked Armor. The pillar that keeps you standing against the R8 Carnivaro |
| R7 | ⚔️Combat Hammer | 1 | The first Stun source for the boss fight. Doubles as a weapon on the way |
| R8 | ⚔️Fairy + ⚔️Dragon | 1 each | Clear with them adjacent → ⚔️Fairy Dragon. The ⚔️Dragon is Epic (10% in R7) |
| R8 | 🔧Blood Stone | 1 | Epic. Clear next to an ⚔️Axe → ⚔️Bloodstained Axe (Vamp 5) |
| R11 | ⚔️Combat Hammer | 3 | The 2nd to 4th. Stun the boss, and keep Vamp turning with the hits |
| R11 | 🔧Blood Stone (second) | 1 | Next to the second ⚔️Axe → the second ⚔️Bloodstained Axe |
| R12 | ⚔️Dragon, ⚔️Fairy, 🔧Red Dust | 1 each | The ⚔️Dragon's Burn boosts the ⚔️Fairy Dragon's healing. 🔧Red Dust is Vamp 1 |
Shopping checklist
Tap to count up. Tap again at the maximum to reset that row. Saved on this device, so it survives switching to the game and back.
ARun-ending if missingBMakes it much easierCSubstitutable
0 / 18
by R2
by R3
by R6
by R7
by R8
by R11
by R12
5. Merges
🛡️Leather Armor + 🔧Steel Spike    -> 🛡️Spiked Armor (+800 max HP, Spike 5 every 3.5s)
🔧HP Potion x2              -> 🔧Large HP Potion
⚔️Axe + 🔧Blood Stone               -> ⚔️Bloodstained Axe (500 / 2.2s, Vamp 5)
⚔️Dragon + ⚔️Fairy            -> ⚔️Fairy Dragon (on hit: restore 200 HP + 4 per Burn on the enemy)
⚔️Club + ⚔️Throwing Axe            -> ⚔️Axe
⚔️Torch + 🔧Warrior Flesh         -> 🔧Steak (at 50% HP or less: restore 500 HP + Regen 5)
⚔️Training Sword + 🔧Whetstone     -> ⚔️Gladius (+60 damage to adjacent weapons)
Merges only happen when you clear a round (and when you retry). Items bought in the R12 shop do not merge before the fight.
- 🔴 Do not put a ⚔️Torch next to a ⚔️Spear. It becomes a ⚔️Candlestick (-50% enemy healing), but no enemy in Stage 7 heals, so they are stronger placed separately
- 🔴 Do not put ⚔️Axe next to each other. They merge into a ⚔️Double-Bit Axe and damage per second drops by about 30%
6. The gate in each round (the 16th run, which cleared)
| R | Enemy | Pets | What had come in by then | HP left | Stacks |
|---|---|---|---|---|---|
| 1-3 | Wraith, Wraith, Skeleton Archer | — | ⚔️Club (→ ⚔️Axe), ⚔️Training Sword, 🛡️Leather Armor, ⚔️Torch (next to the 🔧Warrior Flesh → 🔧Steak), 🔧HP Potion | 1,688 (R3) | 64 |
| 4 | Carnivaro | All three | ⚔️Throwing Axe (second), ⚔️Training Sword | — | — |
| 5 | Skeleton Archer | — | 🔧Whetstone (→ ⚔️Gladius), ⚔️Training Sword, 🛡️Leather Helmet | 388 | 105 |
| 6 | Skeleton Warrior | — | ⚔️Club (→ second ⚔️Axe), 🔧Steel Spike (→ 🛡️Spiked Armor) | 1,308 | 127 |
| 7 | Wraith | ❄️Ice Reaper | ⚔️Combat Hammer, ⚔️Fairy | 2,860 | 149 |
| 8 | Carnivaro | 🐲Red Dragon + 🪼Jellyfish Princess | 🔧Blood Stone (→ ⚔️Bloodstained Axe), ⚔️Dragon (→ ⚔️Fairy Dragon) | 2,052 | 166 |
| 9 | Wraith | — | ⚔️Combat Hammer, 🔧Steel Spike | 1,789 | 189 |
| 10 | Skeleton Archer | — | ⚔️Combat Hammer (third), 🔧Steel Spike | 2,405 | 211 |
| 11 | Wraith | 🪼Jellyfish Princess | 🔧Blood Stone (→ second ⚔️Bloodstained Axe) | 2,860 | 234 |
| 12 | Riakis, Lord of Floor | 🪼Jellyfish Princess + ❄️Ice Reaper | ⚔️Combat Hammer (fourth), ⚔️Dragon, ⚔️Fairy, 🔧HP Potion, 🔧Red Dust. Sold the 🛡️Spiked Armor and the 🔧Golden Pig | 1,078 | 258 |
- R3, R5, R6: against the Skeletons you lose on time. Runs that bought only defensive items and added no weapons fell in R5 (101% on paper) and R6 (93%)
- R8: Carnivaro killed us at about 23 seconds all three times. The three wins all had 🛡️Spiked Armor + 🐲Red Dragon + 🪼Jellyfish Princess
- R11: the toughest Wraith (83,000 HP, two Fadecloth). Even the clearing run had 0.7 seconds left
7. The boss board (max HP kept at 2,000)
| Role | Items | What it did in the boss fight |
|---|---|---|
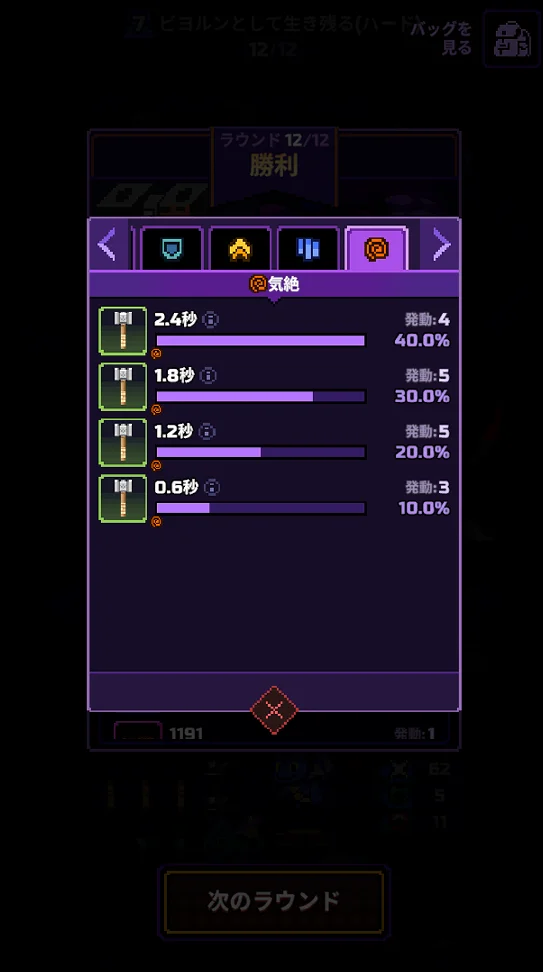
| Stun | ⚔️Combat Hammer x4 | Held the boss for 6.0 seconds in total (2.4 + 1.8 + 1.2 + 0.6s). The stacks do not grow while it is stopped |
| Vamp | ⚔️Bloodstained Axe x2, 🔧Red Dust | Vamp 11. Heals every time one of your attacks lands |
| Healing | ⚔️Staff of Vitality, ⚔️Fairy Dragon, ⚔️Fairy, 🔧Steak, 🔧HP Potion x2 | ⚔️Staff of Vitality 3,319, ⚔️Fairy 1,486, 🔧Steak 1,191 |
| Burn | ⚔️Dragon | Burn boosts the ⚔️Fairy Dragon's healing |
| Block | 🔧Steel Spike x2, 🪼Jellyfish Princess | 616 x2, 880 |
| Hits | ⚔️Gladius, ⚔️Training Sword x2 | Keep Vamp turning |
- 🔴 Sell the 🛡️Spiked Armor. The boss's damage is a percentage of max HP, so raising max HP raises every hit. Your healing and Block amounts do not change
- 🔴 Do not buy shields or 🔧Mithril Ingot. They did nothing against percentage damage (the defence tab showed 0 for the ingot)
- 🔧Absorbing Necklace (buff removal) did not remove Riakis's Shadow
8. Enemy data for all twelve rounds
Max HP comes from the enemy data list; DPS is the raw value before your own reductions. For the boss it is a share of max HP, at 0 stacks.
| R | Enemy | Max HP | DPS | Trait |
|---|---|---|---|---|
| R1 | Wraith | 5,600 | 136 | Fadecloth: -20% weapon damage taken |
| R2 | Wraith | 7,728 | 151 | Fadecloth |
| R3 | Skeleton Archer | 11,000 | 162 | Skeleton Core (+50% crit damage taken; irrelevant to Bjorn). Watch the timer |
| R4 | Carnivaro | 21,000 | 163 | Crit hits wipe all your Block |
| R5 | Skeleton Archer | 20,000 | 220 | Skeleton Core. A round you can lose on time |
| R6 | Skeleton Warrior | 27,000 | 247 | Skeleton Core, Labyrinth Ring x2. A round you can lose on time |
| R7 | Wraith | 28,000 | 280 | Fadecloth, Labyrinth Ring x2. Get through with ❄️Ice Reaper |
| R8 | Carnivaro | 49,000 | 325 | Block wipe, Mana Mine. Tends to fall at 23s. 🐲Red Dragon + 🪼Jellyfish Princess |
| R9 | Wraith | 45,000 | 365 | Fadecloth x2 |
| R10 | Skeleton Archer | 79,000 | 364 | Skeleton Core. More arrows |
| R11 | Wraith | 83,000 | 432 | Fadecloth x2. Largest HP before the boss |
| R12 | Riakis, Lord of Floor | Cannot be killed | 5.2% of max HP | Cannot be killed. Survive 30 seconds to win. Every attack is a share of your max HP (sped up by Riakis's Shadow) |
9. Traps we learned from 14 losses
| Trap | What happened |
|---|---|
| Only two weapons by R3 | Lost on time to the R3 Skeleton Archer (10% left) |
| Bought only defensive items in R5 and R6 | Not enough damage, lost on time (chipped to 94% in R5 and 92% in R6) |
| Went into R8 without a 🛡️Spiked Armor | Killed in 23 seconds by Carnivaro (three times) |
| Used 🪼Jellyfish Princess in R6 | Only 3 power left for R7 and R8; died to the R7 Wraith (twice) |
| Fired ❄️Ice Reaper in R7 when the calculation was short | ❄️Ice Reaper adds no damage. With 🪼Jellyfish Princess it was 143-153% on paper |
| Retried the boss | The stacks started at 283, and we fell in 15 seconds, shorter than the 24 of the first attempt |
| Relied on shields and the ingot against the boss | No effect on percentage damage; 0 on the defence tab |
Our first clear (9th run) used a retry on the boss. The retry's merges produced three ⚔️Fairy Dragon and we lasted the 30 seconds (357 HP left, starting from 247 stacks). This page records the 16th run, which used no retry.
10. The clear
We lasted the full 30 seconds against the boss (Riakis, Lord of Floor) on the first attempt, without a retry. We had 1,078 HP left, at 258 stacks. Pets fired in the boss fight: 🪼Jellyfish Princess + ❄️Ice Reaper.

Defence tab (healing and Block)
| Source | Amount | Procs |
|---|---|---|
| ⚔️Staff of Vitality | 3,319 | 19 |
| ⚔️Bloodstained Axe (first) | 1,926 | 6 |
| ⚔️Bloodstained Axe (second) | 1,749 | 5 |
| ⚔️Fairy | 1,486 | 7 |
| 🔧Steak | 1,191 | 1 |
| 🪼Jellyfish Princess | 880 | 1 |
| ⚔️Fairy Dragon | 758 | 4 |
| 🔧Steel Spike x2 | 616 + 616 | 7 + 7 |
| 🔧HP Potion x2 | 530 + 242 | 3 + 1 |
| 🔧Red Dust | 494 | 1 |
| ⚔️Combat Hammer x4 | 455 + 271 + 167 + 35 | |
| ⚔️Gladius, ⚔️Training Sword x2 | 402 + 352 + 179 | |
| ⚔️Dragon | 276 | 3 |
The total is about 15,900. Hammers and swords have no healing effect of their own; the healing listed against them is Vamp firing every time they hit. Together with the two ⚔️Bloodstained Axe and the 🔧Red Dust, Vamp-related healing came to about 6,300, roughly 40% of the total, about twice the ⚔️Staff of Vitality.
What we held when we cleared (boss fight)
⚔️Combat Hammer x4, ⚔️Bloodstained Axe x2, ⚔️Fairy Dragon, ⚔️Dragon, ⚔️Fairy, ⚔️Gladius, ⚔️Training Sword x2, ⚔️Staff of Vitality (carry-in), 🔧Steel Spike x2, 🔧HP Potion x2, 🔧Steak, 🔧Red Dust.
11. FAQ
Can the Stage 7 Hard boss, Riakis, Lord of Floor, be killed?
No. It is a round that tells you to survive to the very last moment: last 30 seconds and you win. Every boss attack deals damage equal to a percentage of your max HP, so you hold on with Stun and healing, not with damage.
What is Riakis's Shadow?
It stacks once per second of battle time in R1-R11 and carries over into R12. Each stack raises the boss's item Haste by +0.7% and its Accuracy by +0.25 points (measured). At 260 stacks the boss moves at about 2.8x speed, so killing things fast on the way is itself boss prep.
Do shields or 🔧Mithril Ingot help in the boss fight?
No. The boss's damage is a percentage of max HP, so the defence tab showed 0 for the 🔧Mithril Ingot, and 🛡️Wooden Shield and 🛡️Buckler did not even appear in the list. What works is healing, Block, and the Stun from ⚔️Combat Hammer.
If I lose to the boss, should I retry?
We do not recommend it. Retrying does not reduce the stacks; whatever piled up in the first fight is added on top. A retry that started at 283 stacks fell in 15 seconds (the first attempt lasted 24). Use your retry on a dangerous round on the way.
The R8 Carnivaro kills me every time
All three times, Carnivaro killed us at about 23 seconds (we had chipped it to 92-98%). R8 is not a round where you fail to finish the enemy; it is a round where you die. Have 🛡️Spiked Armor and 🔧Large HP Potion by R7, and go in with 🐲Red Dragon + 🪼Jellyfish Princess.
What not to buy, and what not to place
- ❌🛡️Spiked Armor in the boss fight — more max HP means bigger percentage hits (sell it in R12)
- ❌Shields and 🔧Mithril Ingot in the boss fight — no effect on percentage damage
- ❌⚔️Candlestick — no enemy in Stage 7 heals. Place the ⚔️Spear and the ⚔️Torch apart
- ❌Buying only defensive items in R5-R7 — you lose on time to the Skeletons and Wraith
Contact
Corrections, data fixes, or anything else about this site. Leave an email address if you would like a reply.